
This tutorial is for rooting the HTC One V which involves unlocking the phone’s bootloader and flashing a file to the phone via USB cable.
Note: It is NOT necessary to gain S-OFF to root the One V.
This guide may also work for rooting the HTC Wind / HTC Desire S (T328w). If you decide to try rooting your Wind / Desire V, make sure you first download the stock HTC RUU (ROM Update Utility) to recover if there are any issues.
Please note that unlocking your phone’s bootloader does involve the possibility of voiding your warranty, so be certain that you are willing to risk that to root your phone. Moreover, you proceed at your own risk. I accept no responsibility for what you do with your phone. Follow the directions closely, and the odds are you will succeed without any trouble.
You will need much patience and time, and you’ll need to know how to use SDK tools for Android (see below). If you are a total noob, I do not recommend this for your first project!") If you try anyway and get confused with terminology, try looking here for answers: Terminology - CyanogenMod Wiki.
If you try anyway and get confused with terminology, try looking here for answers: Terminology - CyanogenMod Wiki.
1. Perform a full backup your phone’s data
Unlocking the bootloader will involve doing a factory reset. This will result in the loss of all accounts, emails, texts and apps installed on the device. However, data on the SD card such as music, photos and videos will be safe. The device will not format the SD card.
2. Update your software version
To update your software after rooting, you will have to go through hassle of re-flashing the stock recovery and re-locking the bootloader. The phone will lose root and you’ll have to go back through steps 3C-5F, so make sure you’ve updated first. To manually check if a software update is available, go to Settings > About > Software updates > Check now.
3. Unlock your bootloader at htcdev.com
The next step is to head over to htcdev.com and follow the procedure there to unlock your bootloader. This is the step that can void your warranty!
3A. Getting started
Create an account at htcdev.com and login. Click the Unlock Bootloader icon and Get Started button. On the next screen, drop down the “Select Your Device” list, choose All Other Supported Models and click the Begin Unlock Bootloader button. Then, fill out the two nasty forms telling HTC that it’s perfectly fine with you to possibly lose your warranty by going through with this process.

3B. Obtaining your unlock token
The first page of instructions shows you how to boot the phone into HBOOT, select FASTBOOT and connect the phone to your computer via USB. But the instructions are not right for the One V since it doesn’t have a removable battery. So here’s the replacement procedure:
Step 1 – No need to shut the phone down.
Step 2 – To enter HBOOT (or “bootloader mode”, the power button for longer than 10 seconds. As soon as the screen turns black, hold down volume and let off the power button. At the top of the screen you will see ***_LOCKED_***.
Step 3 – Use the volume rocker to select FASTBOOT if it’s not selected already. You may have to wait for the device to run through a routine check for zip files to update.
Step 4 – Connect the phone to your computer using the USB cable.
If you followed the directions above regarding SDK tools, Java Runtime and HTC Sync, you can skip page 2 of the instructions (steps 5-7) and move onto page 3.
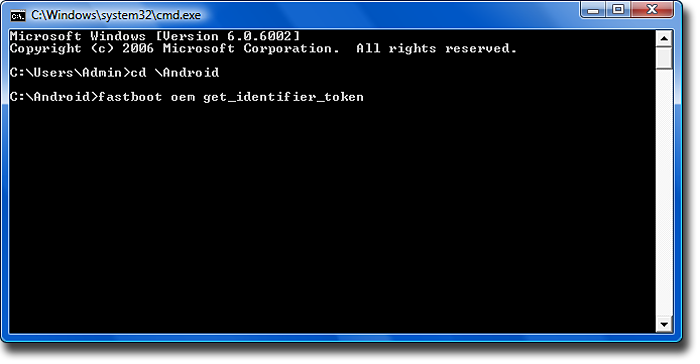
In Step 8, you open a command prompt in Windows and navigate to the folder where you installed SDK Tools (it should be c:android-sdk-windows or c:Android) and type the command
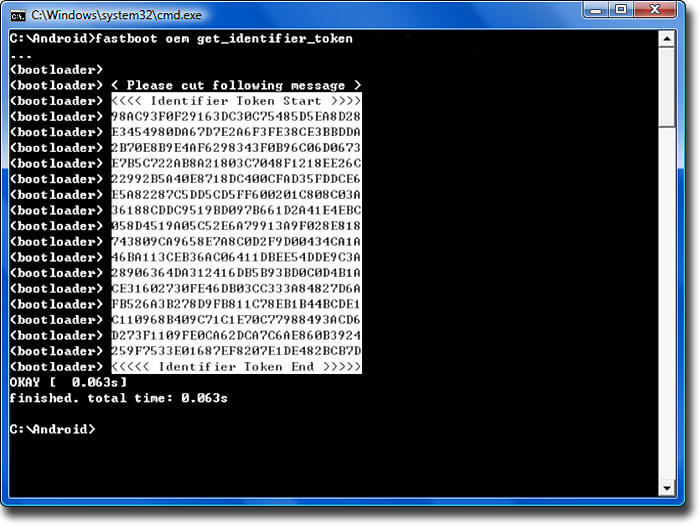
Step 9 is where most people get hung up. Make sure that you do not select any spaces next to the identifier token, or any lines above or below the Identifier Token Start/End. Do exactly as you see in this pic:
Paste the identifier token copied from the command window above into the box at the bottom of htcdev.com’s page 3 in your browser and click the Submit button. You will receive an email from htcdev.com with the subject “The key to unlocking your HTC Device” that has an attached file named “Unlock_code.bin” and a link to continue the unlock process. Download the attachment into the folder you installed Android SDK tools and click on the link to continue from page 4. You may have to log back in.
3C. Unlock the bootloader
For Step 12, go back to the command prompt and make sure you are in the folder where you installed Android SDK tools and downloaded the file “Unlock_code.bin” above. Now you will flash “Unlock_code.bin” to the phone using the following command:
You will see the following warning screen on the phone, again confirming that you are willing to waive your warranty rights to unlock the bootloader:
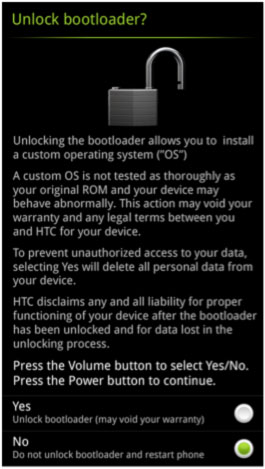
Use the volume rocker to select Yes (up one click) and press the power button once. The bootloader will proceed to erase all your data, unlock itself and reboot the phone.
After running through the setup wizard, go back into HBOOT (turn the phone off with the long press, hold down volume and press the power button) and confirm that you’ve unlocked your bootloader successfully. You should see ***_UNLOCKED_***. Success!

4. Install ClockworkMod Recovery
A custom recovery allows you to backup and restore ROMs including all user apps, data and cache to the SD card. It is also used to flash scripts, custom kernel and custom ROMs, which will come in handy at step 5 below where we root the phone.
1) There are two types of One V - the international GSM version (uses a sim card) and the U.S. Sprint/Virgin Mobile CDMA version (no sim card), and there are custom recoveries for both types that aren't interchangeable.
If your phone uses a sim card, download recovery-clockwork-5.8.4.5-primou.img from ClockworkMod's index of recoveries.
If you have a U.S. Cellular/Sprint/Virgin Mobile (U.S.) device that doesn't require a sim card, download cwmrecovery.img. Be sure to click the thanks button for Android Forums member jmz for his handy work.
As an alternate, PrimoC/CDMA users (no SIM) can download and install jmz's TWRP2 Recovery. See the directions in his thread: http://androidforums.com/one-v-all-...imoc-recovery-twrp2-recovery-7-10-2012-a.html
2) Reboot the phone into bootloader, select Fastboot and connect the USB cable.
3) Open a command prompt and navigate to the folder where you saved the recovery image in step 1 above. Type the following command:
or
4) Reboot the phone back into bootloader using the following command:
You should see the new Recovery.
5. Now on to root the phone!
5A. Head over to XDA Developers and download the SuperSU access management tool. You'll want to grab the attached file at the bottom of the OP called CWM-SuperSU-v0.9x.zip. This will root your phone and install the SuperSU app in one smooth motion. Much thanks, credit and kudos go out to XDA user Chainfire. Login over at XDA and hit the thanks button for him somewhere or donate to his Paypal account and buy him a Coke.
5B. Copy CWM-SuperSU-v0.9x.zip to your SD card.
5C. Restart the phone into HBOOT again and select Recovery. After Recovery has launched, choose install zip from sdcard > choose zip from sdcard and select CWM-SuperSU-v0.9x.zip.
5D. Reboot the phone. It is now rooted!
5E. Go to the app drawer and click on SuperSU. Update the binary when prompted. It’s icon looks like this:

5F. Install and open any app requiring root access to confirm that the phone is rooted.
Credits:
Note: It is NOT necessary to gain S-OFF to root the One V.
This guide may also work for rooting the HTC Wind / HTC Desire S (T328w). If you decide to try rooting your Wind / Desire V, make sure you first download the stock HTC RUU (ROM Update Utility) to recover if there are any issues.
Please note that unlocking your phone’s bootloader does involve the possibility of voiding your warranty, so be certain that you are willing to risk that to root your phone. Moreover, you proceed at your own risk. I accept no responsibility for what you do with your phone. Follow the directions closely, and the odds are you will succeed without any trouble.
You will need much patience and time, and you’ll need to know how to use SDK tools for Android (see below). If you are a total noob, I do not recommend this for your first project!
If you try anyway and get confused with terminology, try looking here for answers: Terminology - CyanogenMod Wiki.Before you begin, make sure that your computer can properly recognize the phone:
You will need SDK tools for Android, Java runtime, and HTC Sync installed on your Windows computer. If you run Mac, I can’t help you. I avoid all that narcissistic iStuff like the plague.
1. You only need to install HTC Sync for the drivers that come with it. But the program sometimes causes conflicts, so during this procedure, make sure it is not running. Open Task Manager in Windows and kill it. If you don’t use HTC Sync, you may also open Control Panel and uninstall it without uninstalling the drivers.
2. With the phone on, connect the USB cable. Make sure the phone is connected in Charge only mode.
3. Enable USB debugging by going to Settings > Development > USB debugging.
1. Perform a full backup your phone’s data
Unlocking the bootloader will involve doing a factory reset. This will result in the loss of all accounts, emails, texts and apps installed on the device. However, data on the SD card such as music, photos and videos will be safe. The device will not format the SD card.
2. Update your software version
To update your software after rooting, you will have to go through hassle of re-flashing the stock recovery and re-locking the bootloader. The phone will lose root and you’ll have to go back through steps 3C-5F, so make sure you’ve updated first. To manually check if a software update is available, go to Settings > About > Software updates > Check now.
3. Unlock your bootloader at htcdev.com
The next step is to head over to htcdev.com and follow the procedure there to unlock your bootloader. This is the step that can void your warranty!
3A. Getting started
Create an account at htcdev.com and login. Click the Unlock Bootloader icon and Get Started button. On the next screen, drop down the “Select Your Device” list, choose All Other Supported Models and click the Begin Unlock Bootloader button. Then, fill out the two nasty forms telling HTC that it’s perfectly fine with you to possibly lose your warranty by going through with this process.
3B. Obtaining your unlock token
The first page of instructions shows you how to boot the phone into HBOOT, select FASTBOOT and connect the phone to your computer via USB. But the instructions are not right for the One V since it doesn’t have a removable battery. So here’s the replacement procedure:
Step 1 – No need to shut the phone down.
Step 2 – To enter HBOOT (or “bootloader mode”
, the power button for longer than 10 seconds. As soon as the screen turns black, hold down volume and let off the power button. At the top of the screen you will see ***_LOCKED_***.Step 3 – Use the volume rocker to select FASTBOOT if it’s not selected already. You may have to wait for the device to run through a routine check for zip files to update.
Step 4 – Connect the phone to your computer using the USB cable.
If you followed the directions above regarding SDK tools, Java Runtime and HTC Sync, you can skip page 2 of the instructions (steps 5-7) and move onto page 3.
In Step 8, you open a command prompt in Windows and navigate to the folder where you installed SDK Tools (it should be c:android-sdk-windows or c:Android) and type the command
Code:
fastboot oem get_identifier_token
Step 9 is where most people get hung up. Make sure that you do not select any spaces next to the identifier token, or any lines above or below the Identifier Token Start/End. Do exactly as you see in this pic:
Paste the identifier token copied from the command window above into the box at the bottom of htcdev.com’s page 3 in your browser and click the Submit button. You will receive an email from htcdev.com with the subject “The key to unlocking your HTC Device” that has an attached file named “Unlock_code.bin” and a link to continue the unlock process. Download the attachment into the folder you installed Android SDK tools and click on the link to continue from page 4. You may have to log back in.
3C. Unlock the bootloader
For Step 12, go back to the command prompt and make sure you are in the folder where you installed Android SDK tools and downloaded the file “Unlock_code.bin” above. Now you will flash “Unlock_code.bin” to the phone using the following command:
Code:
fastboot flash unlocktoken Unlock_code.binUse the volume rocker to select Yes (up one click) and press the power button once. The bootloader will proceed to erase all your data, unlock itself and reboot the phone.
After running through the setup wizard, go back into HBOOT (turn the phone off with the long press, hold down volume and press the power button) and confirm that you’ve unlocked your bootloader successfully. You should see ***_UNLOCKED_***. Success!
4. Install ClockworkMod Recovery
A custom recovery allows you to backup and restore ROMs including all user apps, data and cache to the SD card. It is also used to flash scripts, custom kernel and custom ROMs, which will come in handy at step 5 below where we root the phone.
1) There are two types of One V - the international GSM version (uses a sim card) and the U.S. Sprint/Virgin Mobile CDMA version (no sim card), and there are custom recoveries for both types that aren't interchangeable.
If your phone uses a sim card, download recovery-clockwork-5.8.4.5-primou.img from ClockworkMod's index of recoveries.
If you have a U.S. Cellular/Sprint/Virgin Mobile (U.S.) device that doesn't require a sim card, download cwmrecovery.img. Be sure to click the thanks button for Android Forums member jmz for his handy work.
As an alternate, PrimoC/CDMA users (no SIM) can download and install jmz's TWRP2 Recovery. See the directions in his thread: http://androidforums.com/one-v-all-...imoc-recovery-twrp2-recovery-7-10-2012-a.html
2) Reboot the phone into bootloader, select Fastboot and connect the USB cable.
3) Open a command prompt and navigate to the folder where you saved the recovery image in step 1 above. Type the following command:
Code:
fastboot flash recovery recovery-clockwork-5.8.4.5-primou.img
Code:
fastboot flash recovery cwmrecovery.img
Code:
fastboot reboot recovery5. Now on to root the phone!
5A. Head over to XDA Developers and download the SuperSU access management tool. You'll want to grab the attached file at the bottom of the OP called CWM-SuperSU-v0.9x.zip. This will root your phone and install the SuperSU app in one smooth motion. Much thanks, credit and kudos go out to XDA user Chainfire. Login over at XDA and hit the thanks button for him somewhere or donate to his Paypal account and buy him a Coke.
5B. Copy CWM-SuperSU-v0.9x.zip to your SD card.
5C. Restart the phone into HBOOT again and select Recovery. After Recovery has launched, choose install zip from sdcard > choose zip from sdcard and select CWM-SuperSU-v0.9x.zip.
5D. Reboot the phone. It is now rooted!
5E. Go to the app drawer and click on SuperSU. Update the binary when prompted. It’s icon looks like this:
5F. Install and open any app requiring root access to confirm that the phone is rooted.
Now enjoy hacking your Droid!
Credits:
- Chainfire at xda-developers.com for SuperSU and the rooted binaries.
- XDA member Lloir for producing the first official ClockworkMod Recovery for the One V GSM.
- Android Forums member JMZ for producing the first ClockworkMod Recovery for the One V CDMA.
- Agent13 here at Android Forums for help smoothing out the process.

")


