
***
There are other ways to install the custom recovery, but this method probably is the most used. If you want to use the Drakaz application, you will have to root your phone first using the easyroot method by Drakaz. The easiest way to get the custom recovery would be to Odin the JC6 firmware with integrated recovery, but you shouldn't mess with any of that if you don't really know what you are doing.
***
____________________
The guide is now updated for Galaxo 1.6.3.4 or GAOSP Beta 3!
Ladies and gentlemen, here's a complete idiot's guide to updating to Galaxo/Gaosp! It seems long and complicated, but it really isn't. I was using the JC6 firmware on my phone before updating to Galaxo, but you don't need any specific firmware. You don't ever need to use an external SD card during this process.
THIS WORKS FOR BOTH I7500 AND I7500L
**I suggest downloading and saving every folder directly on your desktop, so everything is easy to find.**
This guide takes for granted that you can access your phone via USB from your computer. If the device isn't detected properly, you should install Samsung New PC Studio (NPS). You don't need to use the software at all, but it will install the correct drivers. To access your phone from your PC, plug it in and then move the notification bar down, select the USB notification and then select "Mount".
STEP 1 (ADB drivers):
You need to install the ADB drivers, which mean Android Debug Bridge. You’ll need those to operate the Android SDK correctly. You don’t understand what I’m saying? No worries, just follow the tutorial, and if you have a problem, post your question saying what went wrong and what happened.
Download the drivers here: MEGAUPLOAD - The leading online storage and file delivery service
I’m using Windows 7 (32 bits), so maybe the steps aren’t exactly the same for other versions of Windows.
Open your Galaxy, go into the Settings, select Applications, then Development, then tick USB debugging. Now plug it into your computer. Open up the device manager.
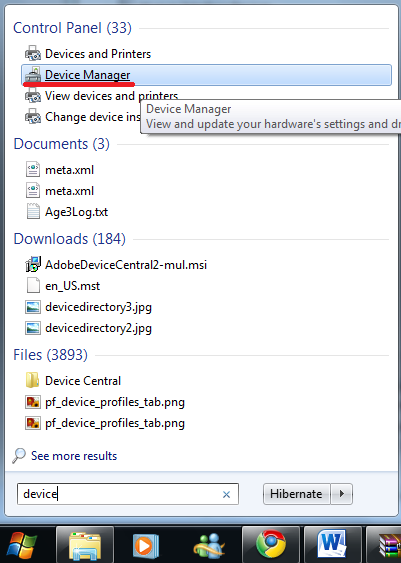
You should see an unknown device with a yellow exclamation mark. Right-click it and select update drivers.
Select Browse my computer.
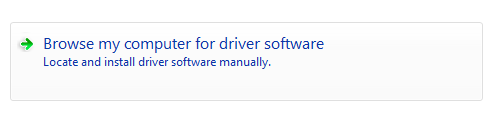
Select Let me pick from a list of device drivers on my computer.

If you see a list of devices and you have to pick one, don’t select any and just click next again. Then, click “Have Disk”. Browse to the “usb_driver” folder, then select the x86 folder (which means 32-bits) and in it select “android_usb.inf". If you have a 64 bits version of Windows, instead of going into the x86 folder, get the “android_usb.inf” that is in the amd64 folder.
Your device should now have the required drivers. More on that later, but for now just stick to the guide. If none of the three "android_usb.inf" seem to be working, you should try this one, it might solve your problem.
STEP 2 (Placing the Recovery, Update and Google Apps):
You’re going to need those files:
The Android SDK: Download the Android SDK | Android Developers
The latest custom recovery (used to apply the update, among other stuff)
Galaxo 1.6.3.4 or GAOSP Beta 3
The GAOSP Google apps (pick the light or ultra light) (also known as Gapps) or the Galaxo Google Apps.
I suggest saving all of those to the same place, to avoid confusion.
Start by placing the “android-sdk-windows” folder to the root of your C drive. The place doesn’t really matter, but you’ll have to type the path into a command prompt later, so if you follow my example, place it in the root of your C drive.
Extract “RECOVERY_version number.zip”. You now have “recovery.img” and “RECTOOLS.tar.gz”. Take “recovery.img” and place it in the “tools” folder of the “android-sdk-windows” folder, which should now be located right into your C drive.
Mount your phone, you’re going to be placing stuff on it.
Take “GAOSP-2-PUBLIC-BETA-3.zip" or "Galaxo_1.6.3.4.zip”, “Gapps_light.zip” and “RECTOOLS.tar.gz” (the last one was in RECOVERY_version numbers.zip), and place them on the internal SD card of your phone. I placed the three of those in no folders, directly on the phone, just in case. Alright!
STEP 3 (Recovery and update):
Power off your phone. It should still be connected via USB.
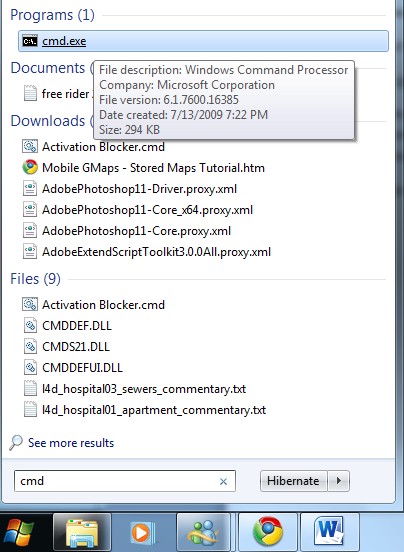
Open a Command Prompt (search for “cmd” in the start menu, and click on “cmd.exe”") .
.
Type “cd C:\android-sdk-windows\tools”, of course without the “ ”. If you didn’t put the Android SDK on the root of your C drive, you’ll have to modify this line and put the actual path. Press enter.
Now type “fastboot flash recovery recovery.img” without pressing enter just yet.
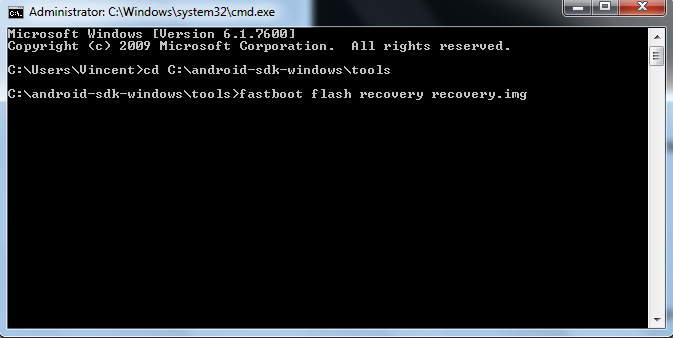
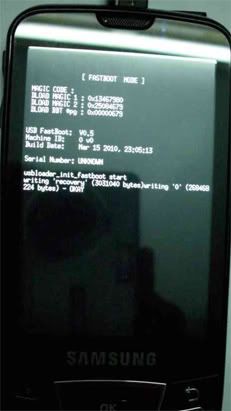
Boot your phone into fastboot mode, do so by pressing and holding both the Call button (bottom left) and Power button (bottom right) at the same time, until you see on the phone that you are in fastboot mode. You’ll have about 15 seconds to press enter on the command prompt on the computer. If it works, you’ll see something else than “waiting for device” appear in the command prompt.
Fastboot on the phone (picture took by Chronodekar and his brother, thanks!):
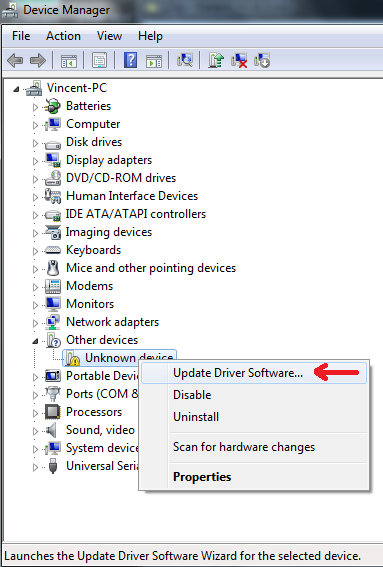
When I tried to do so, it wouldn’t do anything. It would wait for the device, then my Galaxy would boot normally. To solve this, open the device manager on your computer and turn the Galaxy off again. You are going to boot into fastboot mode again, but you’ll have about 15 seconds to check the device manager (open it beforehand), and see if there’s a new device that needs drivers. Mine was something like Android 1.0 (with a yellow exclamation mark, meaning that there are no drivers). You’ll do the exact same thing as you did with the ADB driver, using the exact same driver (right click the unknown device, update the driver, select from a list, next, Have disk, Browser, then find the same “android_usb.inf”. Check the beginning of the guide if you don’t remember what to do.) You'll need to do this during the 15 seconds the Android 1.0 will appear, so you have to be quick.
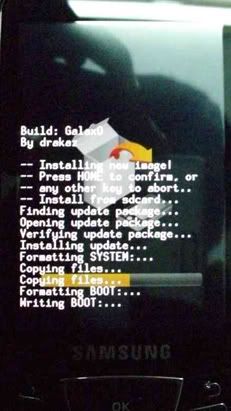
During the process, on the phone (picture took by Chronodekar and his bro):
Success (command prompt):
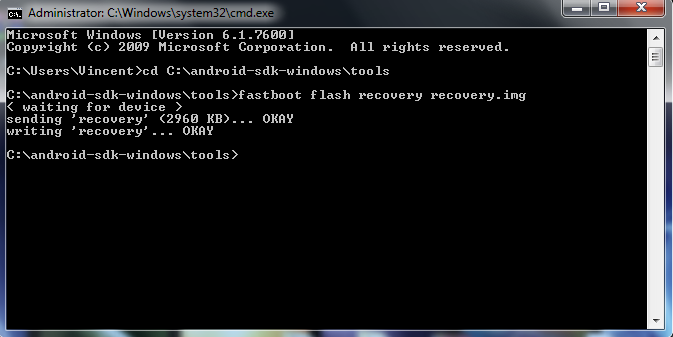
If it worked, well great, now power off your phone again. Boot it again, but this time in recovery mode. Do so by holding the “Lower volume button”, the Call button and the power button. If it works, you’ll see a green menu with lots of choices. You’re almost done.
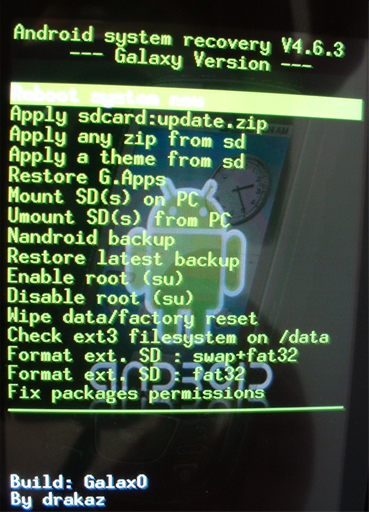
Go down and select “Nandroid backup”. It will take a short while but it sure is worth it. You'll have to press the Home button to confirm, just follow the instructions on-screen.
Now, select “Wipe data/Factory reset”. It’s going to erase all your applications and settings, but it shouldn’t touch anything saved on your SD card (such as pictures, music, saves, etc). It’s important to do so, else the phone will not work properly.
After that, select "Apply any zip". Now on the list find either the GAOSP.zip file or the Galaxo.zip file, depending on your choice. Right after that, select "fix package permissions", then "apply any zip" again but this time pick the Gapps you previously downloaded, which will restore the Google Applications on your phone. I do not recommend to wipe again at this point, it seems pointless to me.
You can now reboot and enjoy Galaxo or GAOSP!
**Now if you want to switch between GAOSP and Galaxo or if you want to change version of GAOSP or Galaxo, you simply have to put the new .zip on your phone, boot into recovery, wipe, apply the zip, fix package permissions, apply the Gapps and you're good to go. The "hard" part is to install the custom recovery for the first time.**
If the phone gets stuck on the Android screen, wait for about 10 minutes, and then if it's still stuck, pull out the battery and boot again. If it still doesn't work, you can try again, or boot into recovery and try to apply Gaosp.zip or Galaxo.zip again, rebooting, and then fix package permissions and apply the Google apps.
______________________________________
Have questions, comments? Post them here!
You want to thank me? Screw me, donate some money to DRAKAZ! He did all the hard stuff!
There are other ways to install the custom recovery, but this method probably is the most used. If you want to use the Drakaz application, you will have to root your phone first using the easyroot method by Drakaz. The easiest way to get the custom recovery would be to Odin the JC6 firmware with integrated recovery, but you shouldn't mess with any of that if you don't really know what you are doing.
***
____________________
The guide is now updated for Galaxo 1.6.3.4 or GAOSP Beta 3!
Ladies and gentlemen, here's a complete idiot's guide to updating to Galaxo/Gaosp! It seems long and complicated, but it really isn't. I was using the JC6 firmware on my phone before updating to Galaxo, but you don't need any specific firmware. You don't ever need to use an external SD card during this process.
THIS WORKS FOR BOTH I7500 AND I7500L
**I suggest downloading and saving every folder directly on your desktop, so everything is easy to find.**
This guide takes for granted that you can access your phone via USB from your computer. If the device isn't detected properly, you should install Samsung New PC Studio (NPS). You don't need to use the software at all, but it will install the correct drivers. To access your phone from your PC, plug it in and then move the notification bar down, select the USB notification and then select "Mount".
STEP 1 (ADB drivers):
You need to install the ADB drivers, which mean Android Debug Bridge. You’ll need those to operate the Android SDK correctly. You don’t understand what I’m saying? No worries, just follow the tutorial, and if you have a problem, post your question saying what went wrong and what happened.
Download the drivers here: MEGAUPLOAD - The leading online storage and file delivery service
I’m using Windows 7 (32 bits), so maybe the steps aren’t exactly the same for other versions of Windows.
Open your Galaxy, go into the Settings, select Applications, then Development, then tick USB debugging. Now plug it into your computer. Open up the device manager.
You should see an unknown device with a yellow exclamation mark. Right-click it and select update drivers.
Select Browse my computer.
Select Let me pick from a list of device drivers on my computer.
If you see a list of devices and you have to pick one, don’t select any and just click next again. Then, click “Have Disk”. Browse to the “usb_driver” folder, then select the x86 folder (which means 32-bits) and in it select “android_usb.inf". If you have a 64 bits version of Windows, instead of going into the x86 folder, get the “android_usb.inf” that is in the amd64 folder.
Your device should now have the required drivers. More on that later, but for now just stick to the guide. If none of the three "android_usb.inf" seem to be working, you should try this one, it might solve your problem.
STEP 2 (Placing the Recovery, Update and Google Apps):
You’re going to need those files:
The Android SDK: Download the Android SDK | Android Developers
The latest custom recovery (used to apply the update, among other stuff)
Galaxo 1.6.3.4 or GAOSP Beta 3
The GAOSP Google apps (pick the light or ultra light) (also known as Gapps) or the Galaxo Google Apps.
I suggest saving all of those to the same place, to avoid confusion.
Start by placing the “android-sdk-windows” folder to the root of your C drive. The place doesn’t really matter, but you’ll have to type the path into a command prompt later, so if you follow my example, place it in the root of your C drive.
Extract “RECOVERY_version number.zip”. You now have “recovery.img” and “RECTOOLS.tar.gz”. Take “recovery.img” and place it in the “tools” folder of the “android-sdk-windows” folder, which should now be located right into your C drive.
Mount your phone, you’re going to be placing stuff on it.
Take “GAOSP-2-PUBLIC-BETA-3.zip" or "Galaxo_1.6.3.4.zip”, “Gapps_light.zip” and “RECTOOLS.tar.gz” (the last one was in RECOVERY_version numbers.zip), and place them on the internal SD card of your phone. I placed the three of those in no folders, directly on the phone, just in case. Alright!
STEP 3 (Recovery and update):
Power off your phone. It should still be connected via USB.
Open a Command Prompt (search for “cmd” in the start menu, and click on “cmd.exe”
.
Type “cd C:\android-sdk-windows\tools”, of course without the “ ”. If you didn’t put the Android SDK on the root of your C drive, you’ll have to modify this line and put the actual path. Press enter.
Now type “fastboot flash recovery recovery.img” without pressing enter just yet.
Boot your phone into fastboot mode, do so by pressing and holding both the Call button (bottom left) and Power button (bottom right) at the same time, until you see on the phone that you are in fastboot mode. You’ll have about 15 seconds to press enter on the command prompt on the computer. If it works, you’ll see something else than “waiting for device” appear in the command prompt.
Fastboot on the phone (picture took by Chronodekar and his brother, thanks!):
When I tried to do so, it wouldn’t do anything. It would wait for the device, then my Galaxy would boot normally. To solve this, open the device manager on your computer and turn the Galaxy off again. You are going to boot into fastboot mode again, but you’ll have about 15 seconds to check the device manager (open it beforehand), and see if there’s a new device that needs drivers. Mine was something like Android 1.0 (with a yellow exclamation mark, meaning that there are no drivers). You’ll do the exact same thing as you did with the ADB driver, using the exact same driver (right click the unknown device, update the driver, select from a list, next, Have disk, Browser, then find the same “android_usb.inf”. Check the beginning of the guide if you don’t remember what to do.) You'll need to do this during the 15 seconds the Android 1.0 will appear, so you have to be quick.
During the process, on the phone (picture took by Chronodekar and his bro):
Success (command prompt):
If it worked, well great, now power off your phone again. Boot it again, but this time in recovery mode. Do so by holding the “Lower volume button”, the Call button and the power button. If it works, you’ll see a green menu with lots of choices. You’re almost done.
Go down and select “Nandroid backup”. It will take a short while but it sure is worth it. You'll have to press the Home button to confirm, just follow the instructions on-screen.
Now, select “Wipe data/Factory reset”. It’s going to erase all your applications and settings, but it shouldn’t touch anything saved on your SD card (such as pictures, music, saves, etc). It’s important to do so, else the phone will not work properly.
After that, select "Apply any zip". Now on the list find either the GAOSP.zip file or the Galaxo.zip file, depending on your choice. Right after that, select "fix package permissions", then "apply any zip" again but this time pick the Gapps you previously downloaded, which will restore the Google Applications on your phone. I do not recommend to wipe again at this point, it seems pointless to me.
You can now reboot and enjoy Galaxo or GAOSP!
**Now if you want to switch between GAOSP and Galaxo or if you want to change version of GAOSP or Galaxo, you simply have to put the new .zip on your phone, boot into recovery, wipe, apply the zip, fix package permissions, apply the Gapps and you're good to go. The "hard" part is to install the custom recovery for the first time.**
If the phone gets stuck on the Android screen, wait for about 10 minutes, and then if it's still stuck, pull out the battery and boot again. If it still doesn't work, you can try again, or boot into recovery and try to apply Gaosp.zip or Galaxo.zip again, rebooting, and then fix package permissions and apply the Google apps.
______________________________________
Have questions, comments? Post them here!
You want to thank me? Screw me, donate some money to DRAKAZ! He did all the hard stuff!

")

 , but i had a few questions:


