
Okay so like I said in my Recovery Download thread, I am trying to help jump start this All Things Root Forum. This Guide will cover how to root you Sprint GNex using fastboot on Windows, Mac, or Linux. I will also cover what to do after rooting.
Disclaimer:
I am not responsible for your device, only you are. If your device causes World War 3 it falls on your shoulders, not mine.
Instructions on how to use this Guide
Read and Follow each step, if you do not understand one feel free to ask.
If you are having trouble with a certain step please see the Troubleshooting in the Second post.
Step 1: Backup
In this rooting process all of your data will be wiped including pictures, music, and contacts. Make sure that you backup everything you need, contacts can be backed up to google, pictures and music can be backed up to the computer.
Step 2: Getting set up
First off you need the appropriate ADB and Fastboot files for you operating system. Just download the appropriate file for your OS, it will contain the files needed to unlock, root, and flash recovery.
Windows
Mac
Linux
Once you download your the zip for your OS go ahead and unzip it to a directory that you will remember.
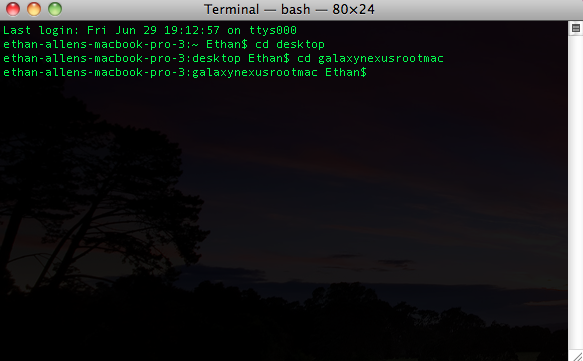
Step 3: Command Line CD
Open your OS's command line, for Mac and Linux it is terminal for Windows I'm not quite sure, I use Mac. Once the command line is open CD to the directory that you unziped the file to.
Note yours may be different, you are changing the directory to where you unzipped the file to myine happens to be desktop>GalaxyNexusRootMac
Step 4: Boot into Fastboot on your Phone
To do this power the device off and then hold down volume up, volume down, and power until you feel the phone vibrate. A screen with an Android and a bunch of info will pop up. Look at the bottom and make sure it says locked.
Step 5: Drivers
(Windows only if on Mac or Linux skip to step 6)
Plug in your phone and make sure you have the proper drivers. Go to Device Manager and check that you have “Samsung Android ADB Interface,” if they are not there you will need to download and install them from here.
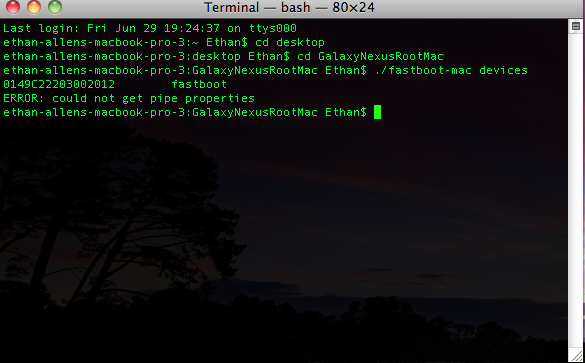
This is a command to make sure your phone is recognized by the computer.
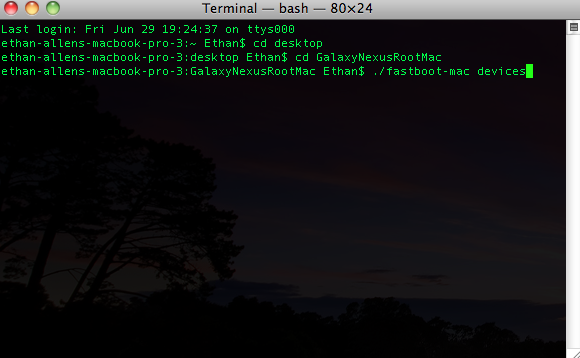
Make sure it shows the serial number after you enter it.
Step 6: Unlock Bootloader
While in fastboot plug your phone into your computer via USB. The rest of step 6 is system independent so just select which one is for you and follow the directions.
Windows
Mac
Linux
Make sure to follow the directions in you section, this picture is from a Mac.

Phone screen while unlocking.
Step 7: Flash Recovery
In this step we will flash a recovery for a guide to recoveries please see this thread. Step 7 is once again system independent so select your OS and follow the directions.
Windows
Mac
Linux
Step 8: Install Super User (SU) Binary
This step is easy, reboot the phone, set it up if you would like or wait till later. After it is fully rebooted plug your phone into your computer and move the CWM-SuperSU-v0.87.zip to the phone. You can put it anywhere but the root directory (not in any folder) is the easiest in my opinion. Now reboot the phone into bootloader again. Once in bootloader navigate using the volume buttons to recovery mode and select it using power. If you get a red "!" go down to the second post and read the troubleshooting") Go to the wipe option and wipe cache and dalvik. Now go to the flash zip from SD card and flash the CWM-SuperSU-v0.87.zip. After it is done reboot the phone and you are rooted.
Go to the wipe option and wipe cache and dalvik. Now go to the flash zip from SD card and flash the CWM-SuperSU-v0.87.zip. After it is done reboot the phone and you are rooted.
After Root
Once you are rooted there are many things you can do with your phone that you previously couldn't. The main one of these being installing third party build of Android called ROMs. You can also install third party kernels that will help with battery life/speed of device. All of this section is being written assuming you are using clockwork mod recovery, Team Win shouldn't be that different.
After Root Section 1: Backup
Okay the first thing we want to do before anything is backup your phone. To do this boot into recovery. (Power off>hold power and both volume buttons>navigate to recovery with volume and select with power) Now that we are in recovery go to the section called backup and restore. Select "Backup" and let it run its course. When it is done you will want to save this backup to your computer and I would suggest another place as well such as a external drive or maybe even dropbox.
Extra note: Make sure to backup before flashing anything. This will ensure that if anything goes goes wrong you have something to fall back on. I usually keep at least 3-5 backups, my original, a set up of my current ROM, other ROMs I like to switch between, and the one I made right before my last flash.
After Root Section 2: Flashing a ROM
Some ROMs have different install instructions such as MIUI, be sure to read the entire ROM thread before installing, this is just the general instructions.
First thing you will need is a ROM. Luckily in the sticky section we have an awesome ROM and Kernel download page.
Download page for ROMs and Kernels
Thanks frenchy
Extra step if using Google Wallet: If you use Google Wallet make sure to go into settings and select "Reset Google Wallet." This will help keep your secure element from committing suicide and ultimately rendering Wallet useless.
Now that you have the ROM move it to the root of your "SD card" meaning not in a folder. Now boot into recovery and select "wipe cache" now go to the advanced settings and select "wipe dalvik" now go back to the regular settings and select "wipe data/ factory reset" (or something like that). Now that we are done wiping go to "install zip from SD card," find the ROM that you want and select it and hit yes. It will run its couse and give you an all new build of Android to enjoy.
Extra Note: Many people like to repeat the wipe process another time or two to make sure that nothing remains to mess the new ROM up.
After Root Section 3: Flashing a Kernel
Flashing a kernels instructions are the same as a ROM except you don't have to do the factory reset only wipe cache and dalvik.
Please tell me if you have any problems or questions, I will maybe be able to answer them and if I can't I will try to find the answer.
This guide will also work for the Verizon and GSM version but you will need to find a proper recovery, also when you flash a ROM make sure that it is a ROM for the Verizon/GSM Galaxy Nexus. Once again I am not responsible for your device, you are the only one who is responsible for what you do.
Disclaimer:
I am not responsible for your device, only you are. If your device causes World War 3 it falls on your shoulders, not mine.
Instructions on how to use this Guide
Read and Follow each step, if you do not understand one feel free to ask.
If you are having trouble with a certain step please see the Troubleshooting in the Second post.
Step 1: Backup
In this rooting process all of your data will be wiped including pictures, music, and contacts. Make sure that you backup everything you need, contacts can be backed up to google, pictures and music can be backed up to the computer.
Step 2: Getting set up
First off you need the appropriate ADB and Fastboot files for you operating system. Just download the appropriate file for your OS, it will contain the files needed to unlock, root, and flash recovery.
Windows
Mac
Linux
Once you download your the zip for your OS go ahead and unzip it to a directory that you will remember.
Step 3: Command Line CD
Open your OS's command line, for Mac and Linux it is terminal for Windows I'm not quite sure, I use Mac. Once the command line is open CD to the directory that you unziped the file to.
Note yours may be different, you are changing the directory to where you unzipped the file to myine happens to be desktop>GalaxyNexusRootMac
Step 4: Boot into Fastboot on your Phone
To do this power the device off and then hold down volume up, volume down, and power until you feel the phone vibrate. A screen with an Android and a bunch of info will pop up. Look at the bottom and make sure it says locked.
Step 5: Drivers
(Windows only if on Mac or Linux skip to step 6)
Plug in your phone and make sure you have the proper drivers. Go to Device Manager and check that you have “Samsung Android ADB Interface,” if they are not there you will need to download and install them from here.
This is a command to make sure your phone is recognized by the computer.
Make sure it shows the serial number after you enter it.
Step 6: Unlock Bootloader
While in fastboot plug your phone into your computer via USB. The rest of step 6 is system independent so just select which one is for you and follow the directions.
Windows
Once you are in the proper directory type in this command exactly
fastboot oem unlock
Now follow the directions on your phone's screen. This command will unlock your bootloader and make it to where you can install a custom recovery.
fastboot oem unlock
Now follow the directions on your phone's screen. This command will unlock your bootloader and make it to where you can install a custom recovery.
Mac
Once you are in the proper directory type in this command exactly
./fastboot-mac oem unlock
Now follow the directions on your phone's screen. This command will unlock your bootloader and make it to where you can install a custom recovery.
./fastboot-mac oem unlock
Now follow the directions on your phone's screen. This command will unlock your bootloader and make it to where you can install a custom recovery.
Linux
Once you are in the proper directory type in this command exactly
./fastboot-linux oem unlock
Now follow the directions on your phone's screen. This command will unlock your bootloader and make it to where you can install a custom recovery.
./fastboot-linux oem unlock
Now follow the directions on your phone's screen. This command will unlock your bootloader and make it to where you can install a custom recovery.
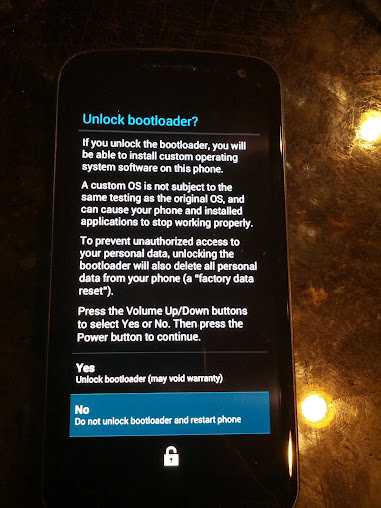
Make sure to follow the directions in you section, this picture is from a Mac.
Phone screen while unlocking.
Step 7: Flash Recovery
In this step we will flash a recovery for a guide to recoveries please see this thread. Step 7 is once again system independent so select your OS and follow the directions.
Windows
In the same directory you used to unlock the bootloader use the command for the recovery you want.
Clockwork
fastboot flash recovery recovery-clockwork-5.8.3.1-toroplus.img
Clockwork Touch
fastboot flash recovery recovery-clockwork-touch-5.8.3.1-toroplus.img
Team Win Recovey Project (TWRP)
fastboot flash recovery twrp-toroplus-2.1.2.img
Clockwork
fastboot flash recovery recovery-clockwork-5.8.3.1-toroplus.img
Clockwork Touch
fastboot flash recovery recovery-clockwork-touch-5.8.3.1-toroplus.img
Team Win Recovey Project (TWRP)
fastboot flash recovery twrp-toroplus-2.1.2.img
Mac
In the same directory you used to unlock the bootloader use the command for the recovery you want.
Clockwork
./fastboot-mac flash recovery recovery-clockwork-5.8.3.1-toroplus.img
Clockwork Touch
./fastboot-mac flash recovery recovery-clockwork-touch-5.8.3.1-toroplus.img
Team Win Recovey Project (TWRP)
./fastboot-mac flash recovery twrp-toroplus-2.1.2.img
Clockwork
./fastboot-mac flash recovery recovery-clockwork-5.8.3.1-toroplus.img
Clockwork Touch
./fastboot-mac flash recovery recovery-clockwork-touch-5.8.3.1-toroplus.img
Team Win Recovey Project (TWRP)
./fastboot-mac flash recovery twrp-toroplus-2.1.2.img
Linux
In the same directory you used to unlock the bootloader use the command for the recovery you want.
Clockwork
./fastboot-linux flash recovery recovery-clockwork-5.8.3.1-toroplus.img
Clockwork Touch
./fastboot-linux flash recovery recovery-clockwork-touch-5.8.3.1-toroplus.img
Team Win Recovey Project (TWRP)
./fastboot-linux flash recovery twrp-toroplus-2.1.2.img
Clockwork
./fastboot-linux flash recovery recovery-clockwork-5.8.3.1-toroplus.img
Clockwork Touch
./fastboot-linux flash recovery recovery-clockwork-touch-5.8.3.1-toroplus.img
Team Win Recovey Project (TWRP)
./fastboot-linux flash recovery twrp-toroplus-2.1.2.img
Step 8: Install Super User (SU) Binary
This step is easy, reboot the phone, set it up if you would like or wait till later. After it is fully rebooted plug your phone into your computer and move the CWM-SuperSU-v0.87.zip to the phone. You can put it anywhere but the root directory (not in any folder) is the easiest in my opinion. Now reboot the phone into bootloader again. Once in bootloader navigate using the volume buttons to recovery mode and select it using power. If you get a red "!" go down to the second post and read the troubleshooting
Go to the wipe option and wipe cache and dalvik. Now go to the flash zip from SD card and flash the CWM-SuperSU-v0.87.zip. After it is done reboot the phone and you are rooted.After Root
Once you are rooted there are many things you can do with your phone that you previously couldn't. The main one of these being installing third party build of Android called ROMs. You can also install third party kernels that will help with battery life/speed of device. All of this section is being written assuming you are using clockwork mod recovery, Team Win shouldn't be that different.
After Root Section 1: Backup
Okay the first thing we want to do before anything is backup your phone. To do this boot into recovery. (Power off>hold power and both volume buttons>navigate to recovery with volume and select with power) Now that we are in recovery go to the section called backup and restore. Select "Backup" and let it run its course. When it is done you will want to save this backup to your computer and I would suggest another place as well such as a external drive or maybe even dropbox.
Extra note: Make sure to backup before flashing anything. This will ensure that if anything goes goes wrong you have something to fall back on. I usually keep at least 3-5 backups, my original, a set up of my current ROM, other ROMs I like to switch between, and the one I made right before my last flash.
After Root Section 2: Flashing a ROM
Some ROMs have different install instructions such as MIUI, be sure to read the entire ROM thread before installing, this is just the general instructions.
First thing you will need is a ROM. Luckily in the sticky section we have an awesome ROM and Kernel download page.
Download page for ROMs and Kernels
Thanks frenchy
Extra step if using Google Wallet: If you use Google Wallet make sure to go into settings and select "Reset Google Wallet." This will help keep your secure element from committing suicide and ultimately rendering Wallet useless.
Now that you have the ROM move it to the root of your "SD card" meaning not in a folder. Now boot into recovery and select "wipe cache" now go to the advanced settings and select "wipe dalvik" now go back to the regular settings and select "wipe data/ factory reset" (or something like that). Now that we are done wiping go to "install zip from SD card," find the ROM that you want and select it and hit yes. It will run its couse and give you an all new build of Android to enjoy.
Extra Note: Many people like to repeat the wipe process another time or two to make sure that nothing remains to mess the new ROM up.
After Root Section 3: Flashing a Kernel
Flashing a kernels instructions are the same as a ROM except you don't have to do the factory reset only wipe cache and dalvik.
Please tell me if you have any problems or questions, I will maybe be able to answer them and if I can't I will try to find the answer.
This guide will also work for the Verizon and GSM version but you will need to find a proper recovery, also when you flash a ROM make sure that it is a ROM for the Verizon/GSM Galaxy Nexus. Once again I am not responsible for your device, you are the only one who is responsible for what you do.

")


