
This guide will explain how to completely modify the settings.apk to 'look-like' ICS style, minus the toggles... still cant figure that out yet 
basically this is a Part 2 of this guys guide here ([GUIDE] ICS Style 'Settings.apk' - Make it yourself !! !! - xda-developers) written by Balamu96m
his guide explains how to add the extra titles and divide your settings into sections
my guide explains how to change the font & prefference selection size to look more like ICS
so in here you will learn how to get from this:
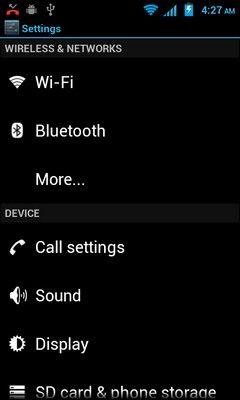
to this:

Also you can follow this guide here
([TUTORIAL] How to change Android's black background - xda-developers) written by AvatarOfFrost
or this guide here
(http://androidforums.com/esteem-all-things-root/584365-mod-guide-how-change-system-backgrounds.html) written by shinyside
to change the actual background of your settings.apk (and other apps) with the background of your choice
for information on how to properly decompile & recompile apk's look here (http://androidforums.com/esteem-all...roperly-decompile-recompile-apks-apktool.html)
Let's Begin
ok so at this point you should have your settings.apk with the added titles over specified sections.. so now the first step is to (again):
-decompile the settings.apk (apktool preffered)
-scroll through to this directory (res/layout) and locate a file called 'prefference_icon.xml'
-the edits were going to make are very simple so im not going to copy and paste my whole xml file for you all, just pay attention and you should be able to do this
-first thing to change is:<ImageView
--look for the android:layout_width= & android:layout_hieght= set values as 25.0dip so should look like this
android:layout_width="25.0dip" android:layout_height="25.0dip"
this sets your icon size
-next line to edit is: <RelativeLayout
--same thing just for height, set to 25.0dip
this sets the layout size of prefference selection
-last but not least is:<TextView (the one that has android:textAppearance="?android:textAppearanceLarge)
--only thing to edit is android:textAppearance="?android:textAppearanceLarge LOL
--change it to Medium
and thats it.. very simple
Bonus thanks fuzzy, shiny, vsuperuserv and all you guys for the help
as a bonus ill also provide this info, some friends helped me accomplish this goal so thanks to them!!
to edit the image used as the title background for those new titles you added
it's in the framework-res.apk, same idea as the guide for replacing the stock android 'black background' with an image, we are just replacing an image with another image, because original is a .9 and the device wont boot if not edited properly lol
-look for this file in here: res/values/styles.xml
-open xml in text editor (npp) and serch for this line:
<style name="Widget.TextView.ListSeparator" parent="@style/Widget.TextView">
--under it will be this line: <item name="background">@drawable/dark_header</item>
--change 'dark_header' to whatever you want (i use settings_title_header)
--now create a .png 480x40 and edit it to your liking, name it what you chose for a name ie: settings_title_header.png and place it in drawable-hdpi
now recompile and BOOM!!!
Remember to thank all your devs, themers, modders etc...
basically this is a Part 2 of this guys guide here ([GUIDE] ICS Style 'Settings.apk' - Make it yourself !! !! - xda-developers) written by Balamu96m
his guide explains how to add the extra titles and divide your settings into sections
my guide explains how to change the font & prefference selection size to look more like ICS
so in here you will learn how to get from this:
to this:
Also you can follow this guide here
([TUTORIAL] How to change Android's black background - xda-developers) written by AvatarOfFrost
or this guide here
(http://androidforums.com/esteem-all-things-root/584365-mod-guide-how-change-system-backgrounds.html) written by shinyside
to change the actual background of your settings.apk (and other apps) with the background of your choice
now before we begin, i just want to say the information i am personally providing is all learned from MY own trial & error, did NOT take this information from anywhere else off anyone else's guide, so i appologize if somebody already went through the trouble of writing this up..
for information on how to properly decompile & recompile apk's look here (http://androidforums.com/esteem-all...roperly-decompile-recompile-apks-apktool.html)
Let's Begin
ok so at this point you should have your settings.apk with the added titles over specified sections.. so now the first step is to (again):
-decompile the settings.apk (apktool preffered)
-scroll through to this directory (res/layout) and locate a file called 'prefference_icon.xml'
-the edits were going to make are very simple so im not going to copy and paste my whole xml file for you all, just pay attention and you should be able to do this
-first thing to change is:<ImageView
--look for the android:layout_width= & android:layout_hieght= set values as 25.0dip so should look like this
android:layout_width="25.0dip" android:layout_height="25.0dip"
this sets your icon size
-next line to edit is: <RelativeLayout
--same thing just for height, set to 25.0dip
this sets the layout size of prefference selection
-last but not least is:<TextView (the one that has android:textAppearance="?android:textAppearanceLarge)
--only thing to edit is android:textAppearance="?android:textAppearanceLarge LOL
--change it to Medium
and thats it.. very simple
Bonus thanks fuzzy, shiny, vsuperuserv and all you guys for the help
as a bonus ill also provide this info, some friends helped me accomplish this goal so thanks to them!!
to edit the image used as the title background for those new titles you added
it's in the framework-res.apk, same idea as the guide for replacing the stock android 'black background' with an image, we are just replacing an image with another image, because original is a .9 and the device wont boot if not edited properly lol
-look for this file in here: res/values/styles.xml
-open xml in text editor (npp) and serch for this line:
<style name="Widget.TextView.ListSeparator" parent="@style/Widget.TextView">
--under it will be this line: <item name="background">@drawable/dark_header</item>
--change 'dark_header' to whatever you want (i use settings_title_header)
--now create a .png 480x40 and edit it to your liking, name it what you chose for a name ie: settings_title_header.png and place it in drawable-hdpi
now recompile and BOOM!!!
Remember to thank all your devs, themers, modders etc...


