• After 15+ years, we've made a big change: Android Forums is now Early Bird Club. Learn more here.

Root [GUIDE] How to Root the OnePlus One

CafeKampuchia

Android Expert
Dec 8, 2011
2,542
2,785
Pursat, Cambodia
Disclaimer: Rooting does not void the OnePlus One’s warranty, though damaging your hardware (i.e., burning up your CPU by overclocking, hardbricking the device) will (source). You proceed at your own risk! I accept no responsibility for what you do with your phone. Follow the directions closely, and the odds are you will succeed without any trouble. If you are not sure what you are doing, do some more research before you try. If you get confused with terminology, try looking here for answers or Google it. If you get stuck, post a question in the thread—we're here for you trying to make this as easy and painless as possible :)

Preliminary steps:

1. Make sure that your phone is always charged above 50%!!!
Running out of battery in the middle of flashing something could brick your phone. That would void your warranty.

2. Make sure that your computer can properly communicate with the device:
We will be issuing commands to the phone from your PC via the USB cable using Android’s SDK tools, in particular ADB and fastboot. If you have not done so already, you must install the following on your Windows computer for this to work:
  1. Java runtime
  2. The Universal Android ADB Driver for Windows.
  3. SDK tools for Android (alternately just ADB & fastboot). Remember where this is installed on your harddrive for later!
If you run Mac, I can’t help you; I avoid all that narcissistic iStuff like the plague. If you run Linux, you are probably a h4x3r and don’t need my help anyway!

You can verify the connection between your PC and phone by running the following procedure:
A. With the phone booted normally, connect it to your computer with the USB cable.
B. Enable Android debugging by going to Settings > About phone and tapping on “Build number” 7 times.
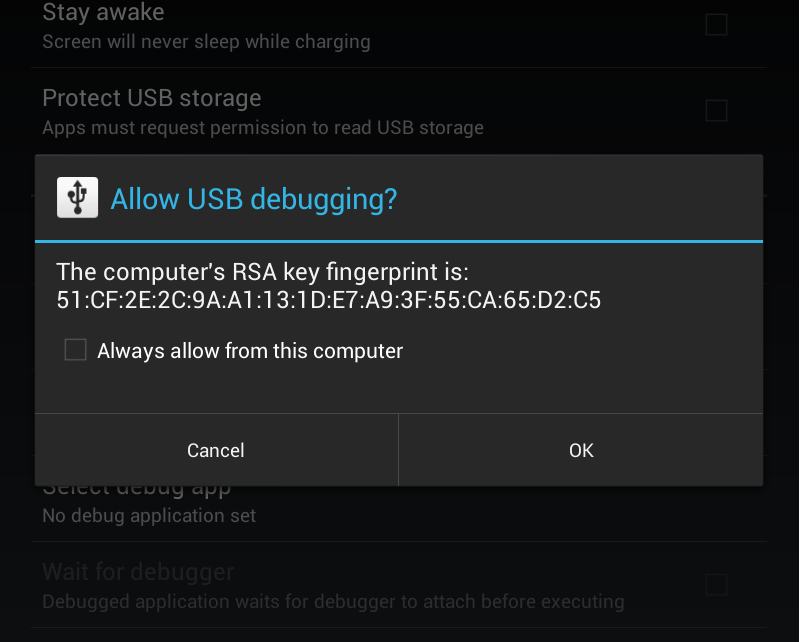
C. Go to Settings > Developer options and check “Android debugging”. A dialogue box will appear asking you to authorize your computer’s RSA fingerprint. Click "Always allow..."
nexusae0_Screenshot_2013-02-12-11-47-41.png
D. Open a command prompt in Windows and navigate to the folder where you put SDK tools for Android (ADB & fastboot).
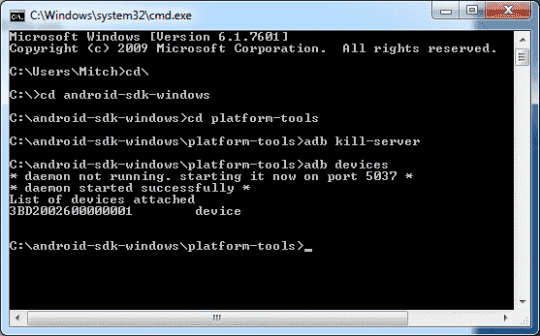
E. Type the following command:
Code:
adb devices
You should get a return like this:
adb-finding-kindle-fire.png
If you cannot get the connection to work:
1. Check your USB connection, then verify that Android debugging is enabled in settings and that your computer’s RSA fingerprint has been authorized.
2. Still not working? Open Device Manager in Windows and make sure that you don’t have a yellow exclamation point next to something like “Android Device” or “One.” This would indicate a driver problem that must be resolved. Try re-installing the Universal Android ADB Driver for Windows, and make sure to restart your computer. Once you’ve rebooted, if you still have a yellow triangle, right-click on the device and select “Update Driver Software,” then “Search automatically for updated driver software.”
3. If you still have a yellow exclamation point, then try forcing the driver to install:
  • In Device Manager, right-click on the device and select “Update Driver Software.”
  • Select “Browse my computer for driver software”
  • Select “Let me pick from a list of device drivers on my computer”
  • Select “ADB Interface” from the list
  • Select manufacturer “Google”
  • Select “Android Testing Interface Version xxx”
  • Click “Next.” If you get a warning, select “Yes” to continue and wait for the driver to install properly.
3. Know how to enter “fastboot mode” on the OnePlus One
To root the device, you must be competent at booting it into fastboot mode. There are two ways to accomplish this:
  1. Power off the phone. Then simultaneously hold down the volume up & power buttons until it vibrates. When done correctly, you will see the words “Fastboot Mode” on a black screen. If not, you dumb-thumbed it, and the device will boot normally into Android. Power off the device and try again.
  2. With the phone running Android normally and Android debugging enabled (see above), open a command prompt in Windows, navigate to the folder where you installed SDK tools (ADB & fastboot) and type:
Code:
adb reboot bootloader


In this guide, there are two rooting options. Please read the descriptions below and choose the option you like by clicking on its link or scrolling down in the thread until you see it.

1. Root by unlocking the bootloader, then flashing a custom recovery & SuperSU zip
Benefits
  • Allows flashing custom recoveries and nandroid backups
  • Allows flashing custom kernels and ROMs

Liabilities
  • Requires a factory reset and loss of all data
  • More complicated for inexperienced rooters
  • Sets a tamper flag, though it can be reset

2. Root by unlocking the bootloader then flashing a custom recovery & custom ROM
Benefits
  • If you are considering doing this, I think you know already!

Liabilities
  • This ^^^. And if not, you need to do your homework first!

CREDITS:
  • My friend KOLIO here at Android Forums for the OnePlus One invite and the inspiration to write this rooting guide :)
  • Developer Chainfire for the root pixie dust and SuperSU permissions manager app.
  • The various devs that make FREE recoveries, kernels and ROMs for us all to enjoy!
 
Last edited:
ROOTING METHOD 1:
Root by unlocking the bootloader, then flashing a custom recovery & SuperSU zip
1. Backup your phone’s data
Unlocking the bootloader will involve doing a factory reset resulting in the loss of all accounts, emails, texts, apps and app data, pictures, music, etc. on the device. Move anything you need to keep onto your PC or a cloud service like DropBox.

2. Unlock the bootloader
2A.
Boot the device into fastboot mode. (Simultaneously hold down the volume up & power buttons until it vibrates.) You should see a black screen with the words “Fastboot Mode”.
2B. Unlock the bootloader using the following commands:
Code:
fastboot oem unlock
The device will unlock the bootloader, erase all user data and reboot itself.

3. Re-enable Android debugging and disable recovery protection
3A.
Re-enable Developer options by going to Settings > About phone and tapping on “Build number” 7 times.
3B. Go to Settings > Developer options. Check “Android debugging” and re-authorize your computer’s RSA fingerprint, then uncheck “Update CM recovery”.

4. Download SuperSU zip
4A.
Head over to Chainfire’s CF-Root download page and download the SuperSU access management tool, probably called something like UPDATE-SuperSU-v2.XX.zip. This zip file will root your device and install the SuperSU access management app in one smooth motion. Much thanks, credit and kudos go out to XDA user Chainfire. Login over at XDA and hit the thanks button for him here or donate to his Paypal account and buy him a Coke. ;)
4B. Copy UPDATE-SuperSU-v2.XX.zip to your phone’s SD card.

5. Flash a custom recovery
5A.
Choose a custom recovery. There are three good choices out there right now, and you’ll need to read up on them to make your decision. There are no bad choices—it all comes down to personal preference. Download the zip file from the OP of the recovery you choose to your PC.
TWRP (Team Win Recovery Project)
CWM (ClockworkMod Recovery)
CWM Advanced Edition (PhilZ Touch) <— this is what I’m using
5B. Extract the recovery image from the zip file you downloaded above (ie, openrecovery-twrp-2.7.1.0-bacon.img) to the location where you installed SDK tools (ADB & fastboot). Rename it “recovery.img”.
5C. Boot the device into fastboot mode and connect it to your computer with the USB cable.
5D. Open a command prompt in Windows and navigate to the folder where you installed SDK tools (ADB & fastboot). Type the following commands:
Code:
fastboot flash recovery recovery.img
fastboot boot recovery.img
You should now see the custom recovery you just flashed, not the stock recovery.

6. Backup your ROM
In TWRP press “Backup” and in CWM press or scroll to “Backup and Restore.”

Don’t be a noob—backup your device!!! If you screw something up, reverting back to stock can cause massive headaches. :( Restoring from a backup in recovery is MUCH easier. ;) You can also restore if you've ruined your ROM causing a softbrick or deleted system apps that you shouldn’t have.

7. Root the device
7A.
The device should still be in recovery from step 6 above. Go back to the main menu and press Install (TWRP) or choose Install Zip (CWM) and find UPDATE-SuperSU-v2.XX.zip on the SD card, then flash it.
7B. Reboot the phone. It is now rooted!
7C. Go to the app drawer and open SuperSU. Its icon looks like this:
148_Phlash3D-1.png
Update the binary if prompted.
7D. Download and install Root Checker from the Play Store to verify that you have root access. ;)
 
Last edited:
Upvote 0
ROOTING METHOD 2:
Root by unlocking the bootloader then flashing a custom recovery & custom ROM
NOTE: This method should result in a rooted device since most custom ROMs come pre-rooted. If not, after the custom ROM is flashed, go back to method 2, steps 4 & 7 to root it with SuperSU zip.
1. Research and download your custom ROM
1A.
There are two categories of options for custom ROMs.
A. Custom AOSP ROMs like CM11 (not CM11S), Paranoid Android, SlimKat and MoKee.

B. Modified ROMs based on other sources, including modified versions CM11S and ColorOS as well as PAC-man.
A good repository of custom ROMs and kernels for the OnePlus One may be found here:
[INDEX][REPO][AIO] ONEPLUS ONE ROM | Kernel | MODs | Recovery - XDA-Developers.com

Although not rooted, you could also go with OnePlus’s official AOSP ROM based on Kit Kat 4.4.4 for a Nexus-like experience. You will have to root it with SuperSU zip per steps 4 & 7 of rooting method 2 above.
NOTE: Many custom ROMs come without including Google services. If this is the case, the OP of the thread for the ROM you have chosen will tell you and also provide the link to download “GApps” (=Google Apps). Download Gapps.zip and save it to your computer for later. If the thread for the ROM you are considering doesn't have a link to Gapps, try this one.
1B. Download the ROM of your choice and save it to your computer. DO NOT place it on the SD card of your phone yet, as it is destined to be erased in the next step!

2. Backup your phone’s data
Unlocking the bootloader will involve doing a factory reset resulting in the loss of all accounts, emails, texts, apps and app data, pictures, music, etc. on the device. Move anything you need to keep onto your PC or a cloud service like DropBox.

3. Unlock the bootloader
3A.
Boot the device into fastboot mode. (Simultaneously hold down the volume up & power buttons until it vibrates.) You should see a black screen with the words “Fastboot Mode”.
3B. Unlock the bootloader using the following commands:
Code:
fastboot oem unlock
The device will unlock the bootloader, erase all user data and reboot itself.

4. Copy the ROM you downloaded in step 1 above to the SD card of your phone.
If you downloaded GApps.zip, move that to your SD card at this time as well.

5. Flash a custom recovery
5A.
Choose a custom recovery. There are three good choices out there right now, and you’ll need to read up on them to make your decision. There are no bad choices—it all comes down to personal preference. Download the zip file from the OP of the recovery you choose to your PC.
TWRP (Team Win Recovery Project)
CWM (ClockworkMod Recovery)
CWM Advanced Edition (PhilZ Touch) <— this is what I’m using
5B. Extract the recovery image from the zip file you downloaded above (ie, openrecovery-twrp-2.7.1.0-bacon.img) to the location where you installed SDK tools (ADB & fastboot). Rename it “recovery.img”.
5C. Boot the device into fastboot mode.
5D. Open a command prompt in Windows and navigate to the folder where you installed SDK tools (ADB & fastboot). Type the following commands:
Code:
fastboot flash recovery recovery.img
fastboot boot recovery.img
You should now see the custom recovery you just flashed, not the stock recovery.

6. Backup your ROM
In TWRP press “Backup” and in CWM press or scroll to “Backup and Restore.”

Don’t be a noob—backup your device!!! If you screw something up, reverting back to stock can cause massive headaches. :( Restoring from a backup in recovery is MUCH easier. ;)

7. Flash the custom ROM
NOTE: Any directions that come with the custom ROM you downloaded supersede the directions below!
7A. The device should still be in recovery from step 6 above. Go back to your recovery’s main menu and select “Wipe” (TWRP) or “Wipe Data/Factory Reset” (CWM). If you are using PhilZ Touch CWM recovery, then chose “Clean to Install New ROM” after that.
7B. For TWRP and regular CWM recoveries, you must further wipe cache and dalvik cache.
NOTE: Now you know why I prefer PhilZ Touch CWM, since the “Clean to Install New ROM” option takes care of all that automatically ;)
7C. Go back to the main menu and press Install (TWRP) or choose Install Zip (CWM) and find the ROM zip file you copied to your SD card, then flash it.
7D. Do the same with the GApps zip that you copied to your SD card.
7E. Reboot the phone. It is now rooted! ;)
NOTE: If you flashed an unrooted ROM like Official OnePlus AOSP, now is the time to root the device with SuperSU zip per steps 4 & 7 of rooting method 2 above
 
Last edited:
  • Like
Reactions: Mikestony and 13onk
Upvote 0
If you run Mac, I can&#8217;t help you&#8212;I avoid all that narcissistic iStuff like the plague.

This comment makes your guide my _Absolute Favorite_ of all the guides I've read!

1) I got a great laugh out of it.

2) Supremely narcissistic, perfectly describes the prior CEO and the culture he cultivated within the company (trust me I know)

3) I'm so sick of iThis and iThat, iCould puke.

Yet I digress and Thank You for the best laugh of my day... :D
 
  • Like
Reactions: CafeKampuchia
Upvote 0
How long does it take to boot into recovery for the first time ?
Coz mine took about 5 mints and didn't boot into recovery :/
Did everything right as mentioned :/
I have installed TWRP.
Booting into recovery should take less than a minute. Are you attempting to boot using "fastboot boot recovery.img" or booting into recovery by pressing volume down and the power button simultaneously?

If you haven't done so, try the latter. If still no go, try re-flashing TWRP or CWM/PhilZ instead.
 
  • Like
Reactions: KOLIO
Upvote 0
ROOTING METHOD 1:
Root by flashing SuperSU zip without unlocking the bootloader
1. Download SuperSU zip
1A. Head over to Chainfire&#8217;s CF-Root download page and download the SuperSU access management tool, probably called something like UPDATE-SuperSU-v2.XX.zip. This zip file will root your device and install the SuperSU access management app in one smooth motion. Much thanks, credit and kudos go out to XDA user Chainfire. Login over at XDA and hit the thanks button for him here or donate to his Paypal account and buy him a Coke. ;)
1B. Copy UPDATE-SuperSU-v2.XX.zip to your phone&#8217;s SD card.

2. Download a custom recovery for temporary use
2A. Download this zip file which contains PhilZ Touch CWM recovery.
2B. Open the zip file and extract &#8220;recovery.img&#8221; to the location where you installed SDK tools (ADB & fastboot).

3. Boot the device into the temporary recovery
3A. Power off the phone and boot into fastboot mode by simultaneously holding down the volume up & power buttons until it vibrates. You will see a black screen that says &#8220;Fastboot Mode.&#8221;
3B. Plug the phone into the computer, open a command prompt in Windows and navigate to the location where you installed SDK tools (ADB & fastboot).
3C. Type the following command:
Code:
fastboot boot recovery.img
After a few seconds, you will see a screen like this:
galaxy-s4-philz-cwm-recovery-touch.jpg
4. Root the device4A. Flash the UPDATE-SuperSU-v2.XX.zip file you copied to the SD card in step 1 as follows:
  • Install Zip
  • Choose zip from /sdcard
  • UPDATE-SuperSU-v2.01.zip
  • Yes - UPDATE-SuperSU-v2.01.zip
  • +++++Go Back+++++
  • Reboot System Now
You will see &#8220;Android is upgrading...&#8221; as the device reboots.
4C. Go to the app drawer and open SuperSU. Its icon looks like this:
148_Phlash3D-1.png
Update the binary if prompted.
4D. Download and install Root Checker from the Play Store to verify that you have root access. ;)

CREDITS:
Source, credits to The Jack of Clubs at XDA

After flashing and updating to 30O update my bootloader is locked, it has been suggested that this method will now brick my phone.
Any ideas if this will work or if it will brick?
Thanks


Trying to fastboot a recovery image I get this....

C:\1>fastboot boot recovery.img
downloading 'boot.img'...
OKAY [ 0.316s]
booting...
FAILED (remote: Device not unlocked cannot boot)
finished. total time: 0.318s

C:\1>
 
Upvote 0
After flashing and updating to 30O update my bootloader is locked, it has been suggested that this method will now brick my phone.
Any ideas if this will work or if it will brick?
Thanks


Trying to fastboot a recovery image I get this....

C:\1>fastboot boot recovery.img
downloading 'boot.img'...
OKAY [ 0.316s]
booting...
FAILED (remote: Device not unlocked cannot boot)
finished. total time: 0.318s

C:\1>
It won't brick the device because it's not possible. This method exploited a security hole that was patched with 30O.
 
  • Like
Reactions: KOLIO
Upvote 0
Just wanted to give a well-deserved SHOUT-OUT :thumbup: to CafeKampuchia for the tutorials in this thread.

I recently had got my 1+1 back from being loaned-out & had to re-root/recover,as I had restored the phone to out-of-box condition before loaning it out.

When I got it back,I attempted to use the same toolkit (not posted here) I had used pre-33O update & it didn't work.

So,I took a look at Method #2 listed for installing recovery/root & voila,success:

http://androidforums.com/6655548-post3.html

The tutorial is well thought-out,enough so that a quasi-noob as myself could even catch on to using shell commands/using fastboot/etc....

Again,a big THX to CafeKampuchia for an excellent tutorial.

I would also be remiss I if I didn't give a big THX to EarlyMon for getting me pointed in the right direction,w/countless hrs of help on the HTC ONE M8. ;) :thumbup:
 
Upvote 0
I appreciate the guide being here - just as soon as I come up with reason for me to root my phone I'll be using it. It's weird I had my S3 rooted but since getting my OnePlus One I can't remember what I used that required root.
I'd recommend that you root it sooner than later, since doing so will require a factory reset and loss of all data.
old.gif
 
Upvote 0

BEST TECH IN 2023

We've been tracking upcoming products and ranking the best tech since 2007. Thanks for trusting our opinion: we get rewarded through affiliate links that earn us a commission and we invite you to learn more about us.

Smartphones