
this is a guide to creating a gold card. original directions are from here:
Copy all of the data on your microSD card to a backup location on your PC
Format the microSD to FAT32 format
*note: if you use the gold card helper app you can skip right to step 3,and enter the number from the app
1)Open a command prompt one again and type the following:
cd c:\directory (example: cd c:\miniadb )
adb devices
adb shell cat /sys/class/mmc_host/mmc2/mmc2:*/cid
You should get a long number something along the lines of 532600bd227d9c0347329407514d5420
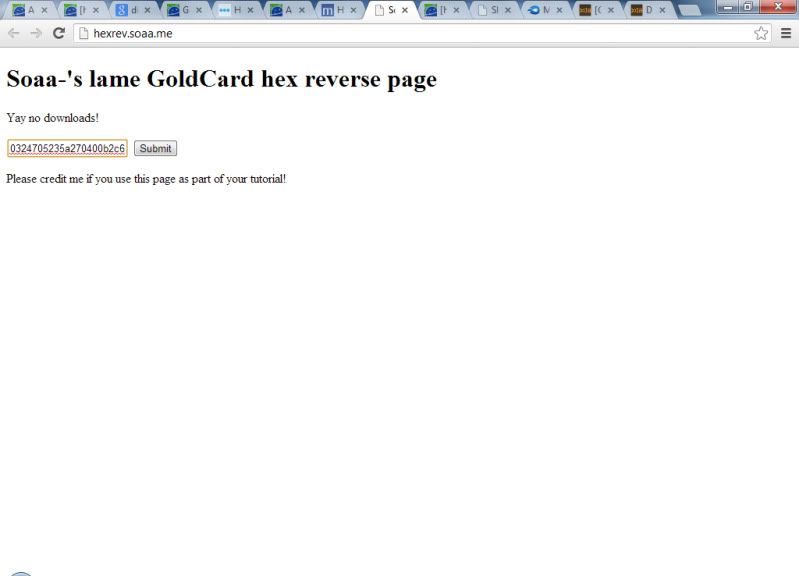
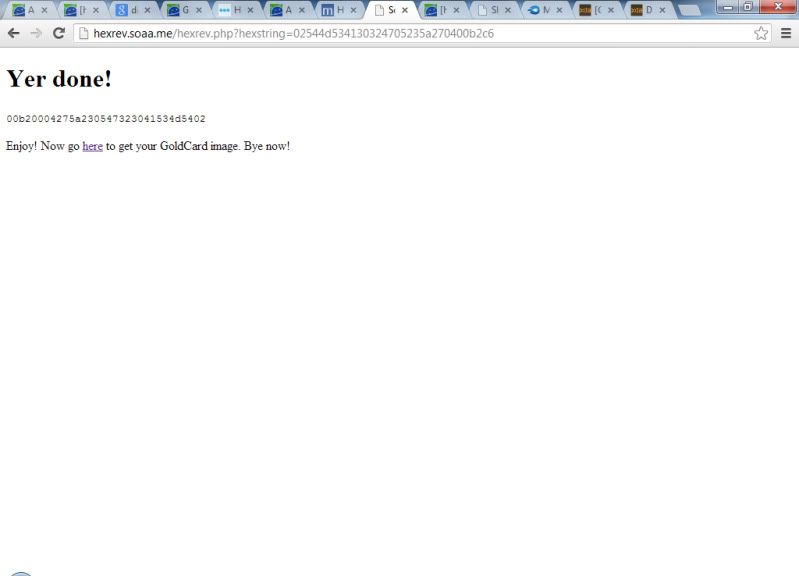
2)Goto this page and copy the number in the above step into the box and hit Submit, you’ll then be given another long number
3)Go to this page and enter this new number into the SD Card Serial (CID) field
4)Enter the other details and hit Generate Goldcard
the site will generate and download a goldcard. transfer the image to somewhere convenient,like the desktop or root of your c drive

5)Download HxD Hex Editor from here and install
*at this point i recomend to remove the sd card from the phone,and place it in an sd card reader in your PC.
6)Open HxD Hex Editor. If you are using Windows Vista or Windows 7, you must run the application as administrator
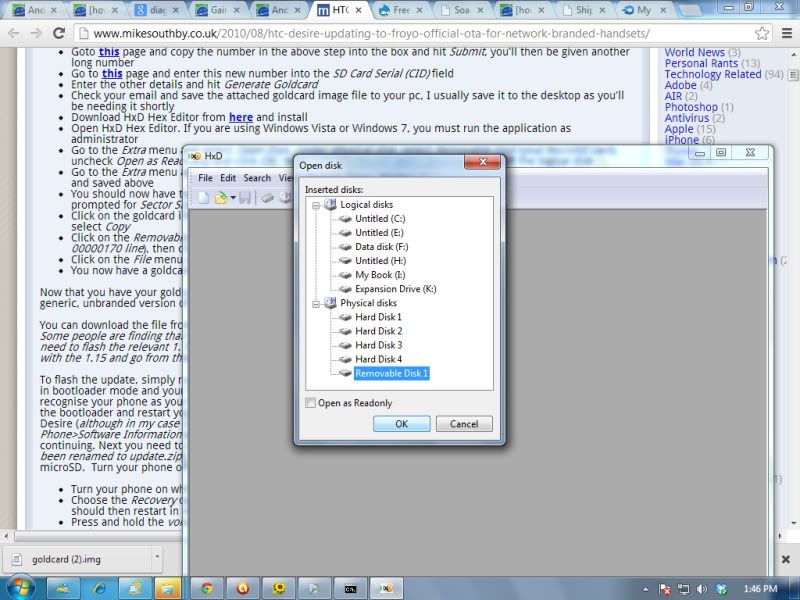
7)Go to the Extra menu and select Open Disk. Under physical disk, select Removable Disk (your microSD card), uncheck Open as Read-only and click OK. Note that you should select physical disk NOT the logical disk
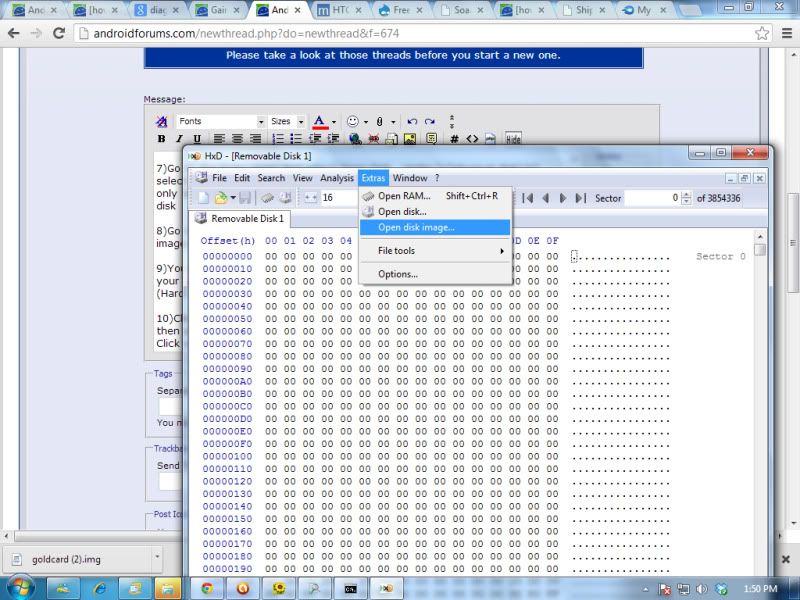
8)Go to the Extra menu again and select Open Disk Image. Open the goldcard image that you received by email and saved above
9)You should now have two tabs; one is your removable disk and the other is your goldcard image. Press OK when prompted for Sector Size (selecting 512 (Hard disks/Floppy disks)) and click OK
10)Click on the goldcard image tab. Go to the Edit menu, choose Select All then select the Edit menu again and select Copy

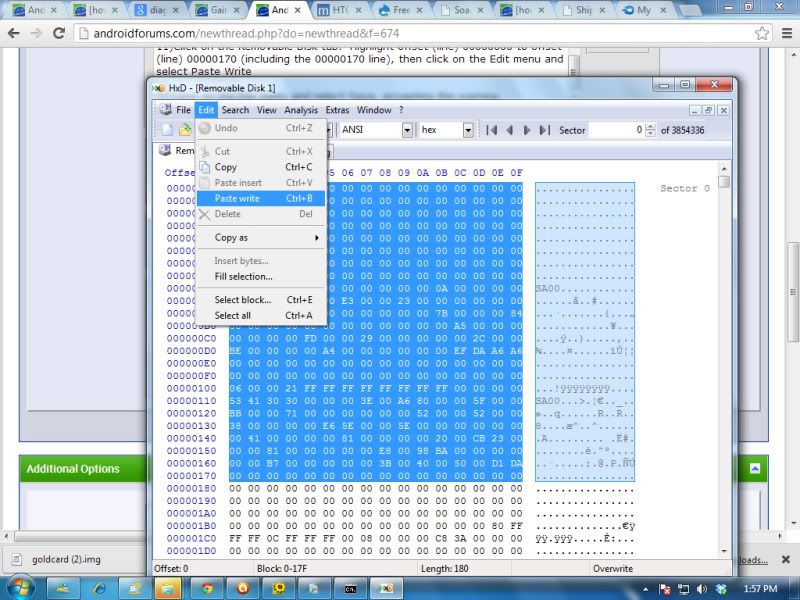
11)Click on the Removable Disk tab. Highlight offset (line) 00000000 to offset (line) 00000170 (including the 00000170 line), then click on the Edit menu and select Paste Write
result will be this:
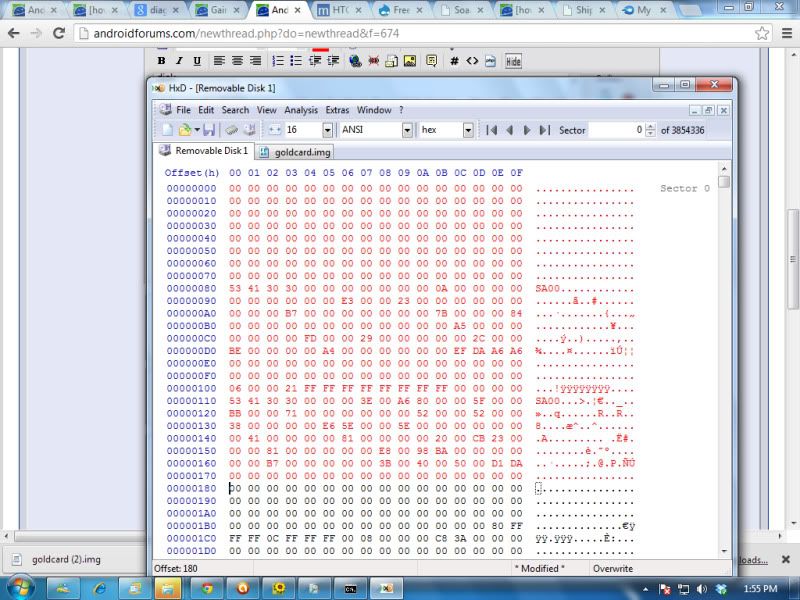
12)Click on the File menu and select Save, accepting the warning
You now have a goldcard
Copy all of the data on your microSD card to a backup location on your PC
Format the microSD to FAT32 format
*note: if you use the gold card helper app you can skip right to step 3,and enter the number from the app
1)Open a command prompt one again and type the following:
cd c:\directory (example: cd c:\miniadb )
adb devices
adb shell cat /sys/class/mmc_host/mmc2/mmc2:*/cid
You should get a long number something along the lines of 532600bd227d9c0347329407514d5420
Code:
Microsoft Windows [Version 6.1.7601]
Copyright (c) 2009 Microsoft Corporation.  All rights reserved.

C:\Users\Scott>[COLOR="Red"]cd c:\mini-adb_inspire[/COLOR]

c:\mini-adb_inspire>[COLOR="red"]adb devices[/COLOR]
* daemon not running. starting it now *
* daemon started successfully *
List of devices attached
HTxxxxxxxxxx    device


c:\mini-adb_inspire>[COLOR="red"]adb shell cat /sys/class/mmc_host/mmc2/mmc2:*/cid[/COLOR]
02544d534130324705235a270400b2c6

c:\mini-adb_inspire>
2)Goto this page and copy the number in the above step into the box and hit Submit, you’ll then be given another long number
3)Go to this page and enter this new number into the SD Card Serial (CID) field
4)Enter the other details and hit Generate Goldcard
the site will generate and download a goldcard. transfer the image to somewhere convenient,like the desktop or root of your c drive
5)Download HxD Hex Editor from here and install
*at this point i recomend to remove the sd card from the phone,and place it in an sd card reader in your PC.
6)Open HxD Hex Editor. If you are using Windows Vista or Windows 7, you must run the application as administrator
7)Go to the Extra menu and select Open Disk. Under physical disk, select Removable Disk (your microSD card), uncheck Open as Read-only and click OK. Note that you should select physical disk NOT the logical disk
8)Go to the Extra menu again and select Open Disk Image. Open the goldcard image that you received by email and saved above
9)You should now have two tabs; one is your removable disk and the other is your goldcard image. Press OK when prompted for Sector Size (selecting 512 (Hard disks/Floppy disks)) and click OK
10)Click on the goldcard image tab. Go to the Edit menu, choose Select All then select the Edit menu again and select Copy
11)Click on the Removable Disk tab. Highlight offset (line) 00000000 to offset (line) 00000170 (including the 00000170 line), then click on the Edit menu and select Paste Write
result will be this:
12)Click on the File menu and select Save, accepting the warning
You now have a goldcard

")


