• After 15+ years, we've made a big change: Android Forums is now Early Bird Club. Learn more here.

Root [HOW TO ROOT] - Lightray 4G (Droid Charge Technique) **WINDOWS & MAC**

Killah1994

Android Expert
Aug 15, 2012
1,208
275
DroidXcon

Post #1 = Index
Post #2 = FAQ
Post #3 = GingerSnap One click root (Retired Semi Auto root)
Post #4 = ADB rooting (Beginner-Intermediate)
Post #5 = How to root using a Mac (Beginner-Intermediate) [NOT AVAILABLE - LINK BROKEN]
[RESERVED AGAIN]
Post #6 = Removing apps once rooted (Coming soon) [RESERVED]
Post #7 = How to Unroot
Post #8 = Credits

[warn]The methodS of rooting your Android device as described in the article herein is solely for enthusiasts and not for the faint of heart.

Android Central, Android Police, Team AndIRC and myself disclaim all liability for any harm that may befall your device, including, but not limited to: bricked phones, voided manufacturer warranties, exploding batteries, etc.

THESE METHODS ONLY WORK FOR ED1 BUILD, ANYTHING BEYOND THAT REQUIRE A CUSTOM KERNEL THAT INCLUDES ROOT​
 
DroidXcon
Q: What is Root?
A: Root, is super user access of your phones operating system. Think of your phone as a desktop computer. Right now you are logged on as a guest account. you can browse things and use applications but if you really want to change anything in your system you can't. What gaining root does is it gives you superuser permission to alter files that you could not before; again thinking of it as a computer you now have an Administrator account.

Q:Does rooting void my warranty?
A:Yes and no. If you walk into your carriers store with a phone that has Root access and they actually check it they have the right to say this phone was tampered with. But for those of you in the know, there are methods to unroot your phone first.

Q: Does rooting slow down my phone or drain battery.
A: NO, root is not an application or a running process, gaining root does not do anything but give you permissions that you normally would not have. Basically all you did during the rooting process was move files around. Its what you do with this new found permission that changes things. But as far as just rooting it does not make a difference.

Q: Will i lose any apps or data during the rooting process?

A: No, for the same reason as above. Rooting is basically just moving some files around. Of course there is always a risk of something happening in any process. I would say chances are of causing serious problems is slim to non. Its what you do with this new found permission that changes things. But as far as just rooting it does not make a difference.

Q: I lost root during an update, am i doomed?
A: No, what happend was the file containing your super user access was over written. Just re-attempt gaining root and you will be fine.

********************************************************************************************

Preparations:

1. Download and Install Samsung Drivers

DOWNLOAD-13.gif


www.androphiles.com/files/android/Samsung_Mobile_USB_Driver.exe

Samsung drivers Mirror"]http://www.multiupload.com/FVZ1TEDTJ1"]Samsung drivers Mirror

2. Go to Settings > Applications > Developement > Enable Debugging, then connect your phone to your PC, allow 2-3 minutes to configure drivers
debug.png
 
Upvote 0
DroidXcon
[WARN]Gingersnap (along with all other Android modifications) is experimental software and while I have made this as safe as possible, differences in operating environments and natural disasters can cause your device to become unusable. Please make sure you understand this important fact before downloading.

Disclaimer: Neither myself, Android Central or any other member of Android Central are responsible for any disasters that occur as a result of any hack or modification you perform on your device. Your use of this application is at your own risk![/WARN]


With that out of the way, I'd like to introduce you to the Gingersnap Root Utility. Gingersnap is a one-click root utility, much like SuperOneClick or Universal Androot.

The nitty gritty: Gingersnap uses a modified version of the famous GingerBreak exploit to automatically root your Android-powered device and installs the necessary files to maintain a permanent root status.

Pre-use Requirements:
1) You need the .NET 4 Framework. Not the Client Profile, the full .NET 4 Framework.
2) For some reason you need the Visual C++ 2008 redistributable installed. Don't ask me why.
3) You need proper drivers for the your phone. Your video card doesn't work without drivers and neither will your phone.
4) Before running this Utility please make sure your phone is in debugging mode

Instructions:
  • Download and unzip Gingersnap-V1.2.zip to anyplace on your computer
  • Connect your phone to computer in debugging mode
  • Open Gingersnap-V1.2 folder
  • Double click Gingersnap applications icon
    gingersnap.png
  • press GO , sit back and relax
Credits:
Gingersnap Utility: drewwalton19216801
GingerBreak exploit: C-Skills (Sebastian)
Autoroot shell script (com.sh): Droidxcon, YAY ME!
MAJOR thanks to jondevere for being drewwalton19216801's personal guinea pig!

Think you're ready? The file is attached to this post.

Source Code:
The modified GingerBreak source code is attached to this post. The filename is gingerbreak-mod-gs-src.zip
 

Attachments

  • gingerbreak-mod-gs-src.zip
    4.6 KB · Views: 155
  • Gingersnap-V1.2.1.zip
    1.5 MB · Views: 238
  • gingersnap.png
    gingersnap.png
    4.2 KB · Views: 113
Upvote 0
DroidXcon
Directions: (Assuming you followed preparations from Post #2)

Download DSChargeRoot.zip:
Download-5.gif

www.androphiles.com/files/android/DSChargeRoot.zip


With your phone in debugging mode set to stay awake
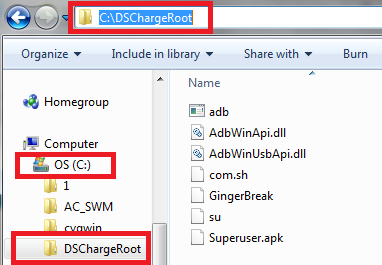
1. Extract downloaded DSChargeRoot.zip file directly to your C:\ Drive
DSCloc.png


2. Now go to your start button on your menu bar,in the run field or search field depending on your version of windows, type CMD and hit enter. The command box will present itself. From here on out just copy and paste the commands i will provide below. To paste in the command box you must right click on the mouse and select paste. Do not paste BOLD text below those are just for info.

Commands are as follows:

Code:
cd C:\DSChargeRoot 

adb devices

It will state
"List of devices attached
I500******* device"
If you dont see this you are not connected


Code:
adb push su /data/local/su
adb push Superuser.apk /data/local/Superuser.apk
adb push GingerBreak /data/local/GingerBreak
adb push com.sh /data/local/com.sh
adb shell chmod 777 /data/local/su
adb shell chmod 777 /data/local/GingerBreak
adb shell chmod 777 /data/local/com.sh
adb shell

The adb shell command will not put you in the phones internal command terminal. This is represented with "$" prompt. You will now execute the GingerBreak exploit. This make take serveral minutes.

Code:
/data/local/GingerBreak

After entering the above command Gingerbreak will do its thing. A successful exploit will end with this,"[!] dance forever my only one"
If it ends in anything else or if it hangs for more than 5 minutes pull your battery and attempt to root again.
After exploit is complete you will have a command prompt that looks like this "#". That represents root access. You will now excute shell script then reboot your phone.


Code:
/data/local/com.sh
exit
exit
adb reboot

Your phone will now reboot. Congrats Enjoy your rooted device
[TIP]
superuser-1.png
check app drawer to see if superuser app is installed,if it is you are rooted
 
Upvote 0
DroidXcon

Unroot batch file download:
Download-5.gif

www.androphiles.com/files/android/Start_Unroot.zip

How to Unroot
  • Download Start_Unroot.zip
  • UnzipStart_Unroot.zip folder Place anywhere on your computer
  • Place your phone in debugging mode
  • Connect phone to PC
  • Open Start_Unroot folder Double Click Start_Unroot.bat
When the command window prompts you to enter adb shell , press any key to continue

[tip]To copy and paste into the command window, simply copy the command, then right click in the command window and a drop down menu will appear. Then select the option Paste[/tip]

Then at the "$" prompt enter the following commands
Code:
su

After entering this command look at your phone screen right away Superuser app may ask you to allow or deny root permission , select allow . Once you receive "#" prompt you may proceed. if you get permission denied , pull your battery and try again

Code:
mount -o remount,rw -t rfs /dev/block/stl10 /system
rm /system/xbin/su
rm /system/bin/su
rm /system/bin/busybox
exit
exit

Your phone will now reboot
Once the phone restarts you must uninstall superuser app
settings>applications>manage applications>superuser

Once uninstalled Unroot is complete.
 
Upvote 0

BEST TECH IN 2023

We've been tracking upcoming products and ranking the best tech since 2007. Thanks for trusting our opinion: we get rewarded through affiliate links that earn us a commission and we invite you to learn more about us.

Smartphones