


This is the usual disclaimer:
Only you are responsible for what happens to your phone. Neither I nor AF are responsible for what happens. Please read this guide thoroughly and if you have any questions then please feel free to ask.
Before we proceed to rooting your phone, lets go into OTA's and what they are and what they mean to you. OTA stands for Over the Air updates. It is how devices receive updates to the phone. It usually contains a new hboot(more on this later), radios, kernels, and the latest software updates. It also might contain things like security updates and other fixes as well.
NEVER ACCEPT AN OTA WHILE YOU ARE ROOTED OR PLAN ON ROOTING YOUR PHONE! If you follow this rule, you will never have any issues going forward. Usually with each new OTA any exploits used to gain root will be closed and then you will have to wait for the devs to find another exploit to gain root. And by accepting an OTA while you are rooted, there is a possibility that it will unroot the phone. You will then be forced to wait for the devs to come up with another way to root it.
Fortunately, the great devs from Team Unlimted IO and others have found a way to root the latest hboots. So now we have a bunch of different ways to root the phone. I will go into detail into each methods and it will be up to you to decide how you want to root the phone.
- Update:11/4/2013 I added windroid to the root method. This is a toolkit and not a method, but it can be used to unlock the bootloader, get s-off and install recovery.
- Update:11/1/2013 i added in a new root method that will work on 3.17.651.4 called rumrunner. this method will give you s-off.
- Update: 6/23/2013 added Facepalm and Moonshine root methods. I redid the format of the guide as well.
- Update: 2/11/2013: So looks like Team Unlimited has done it once again. You guys who took the OTA can now root your phone. If you are on software version 3.16.651.3 then you can now get s-off.
- Update: 01/31/2013: This is the latest update though it is a small maintenance update, it has caused quite a stir. For one Dirty Racun does not support the latest ota (3.16.651.3). The only option for those with the 3.16 OTA will need to use HTCdev and unlock the bootloader. However,the latest ota will create some issues with the TWRP recovery on unlocked bootloaders. There are some amazing peeps working on the issue. I will update the guide as more info comes in.
- Update: 01/11/2013: So Team Unlimted has done it again, you can now root your Evo 4g LTE with hboot 2.09 by using Dirty Racun. This means that you will be able to now get s-off!!!!!!!
- Update: 12/13/12: So there has been a new OTA that gives you hboot 2.09. Unfortunately LazyPanda and DirtyRacun will not work with the new hboot. You will need to use the HTCdev method found in section 2. At the moment you will not be able to get s-off with the new hboot so hopefully you did not accept it. If you did you will need to wait for s-off. In the meantime all you can do now is unlock the bootloader and install a custom recovery. You will still be able to flash roms, but kernels may be different.
This guide is divided into 5 main chapters with the last chapter dedicated to giving credit where credit is due. You must complete all chapters to gain full root. Here is the way it works. The methods in this guide will only give you either s-off or unlocked. You still need a recovery and have the superuser installed. The info for that will be in the following chapters.
Chapter 1: Pre-Root Info
For best results, experience shows that USB 2.0 ports work best, not 3.0.
What is Hboot you ask?
Google Wallet Important info, please read
What is S-ON/OFF?
What is Hboot you ask?
Hboot is what HTC calls the bootloader on their phones. The bootloader is like the BIOS on your PC except a little different. It's essentially the most basic program on your phone where everything gets transferred/loaded from. The hboot # is an important piece of info for root purposes since updates often change this. And in updating the hboot a lot of the time the root exploit is closed.
So how does one get to Hboot?
A pointer from our good friend novoxx77:
So how does one get to Hboot?
A pointer from our good friend novoxx77:
novoxx77 said:The proper way to get to HBOOT is the following:
1) power down the device. Wait for it to power down completely.**
2) press POWER + VOL-DOWN simultaneously and keep VOL-DOWN pressed.
Let go of POWER, or you risk powering back down after the 10 seconds (I'm referring to the mechanism of hard-shutdown which HTC put in place due to the lack of a battery-pull option).
After a few more seconds, the white HBOOT screen will appear.
Yes, you can let go of POWER almost immediately, as long as the buttons at some point were both pressed together.
**Please note that if you try this procedure before the phone is completely shut down, it won't work. The problem is, there's no visual cue to let you know when the phone is completely shut down. Just because the screen turns off doesn't mean the phone isn't still booting down.
I've found a way to help determine if the phone is completely powered down. It requires that you plug your phone in to charge. When you shut down, the screen will go off, along with the charge indicator. Wait for the indicator to come back on. Even though it's back on, the phone still isn't ready; you should wait another 10 seconds or so. Then give the HBOOT procedure a try. If the charge light doesn't go out after you let go of POWER, wait a few more seconds and try again. When the light does go off when you release POWER, it will work; just keep VOL-DOWN held down, and HBOOT will come up.
If you ever plan on using Google Wallet please read this very carefully. There is a very good chance that you can brick your secure element which is what allows you to make secure transactions using Google Wallet. Please do the following before you do anything else in the guide.
Go to and open your Google Wallet. Then go into menu>settings>reset Google Wallet. THAT'S IT!!!!
You will need to do this before doing any of the following in this guide. And the same goes for every time you flash a rom.
Here is the original thread:
PSA: Clear Google Wallet Settings Before Flashing ROM/Hard Resets! - xda-developers
Back in the days of the OG EVO having s-off was always the goal when you rooted a phone. But with HTC locking the bootloader and a tool to unlock it, we do not need to have s-off. HTC has given us a backdoor so to speak and enabled us to leave s-on and still root the phone. So what is the difference? Well "s" is your security and having s-on means you have your securities turned on. With s-off, you will have your securities turned off so that you can set permissions to read and write onto the system partitions, think flashing or installing of roms. "S" is like setting administrator rights on the computer.
So why should we care about getting s-off, if HTC lets us unlock the bootloader? Well with s-on there are certain things you can and cannot flash to your phone. Radios, and kernels do not get flashed like s-off phones. There are ways to flash them, but the procedure is different. More on this later on.
Also on s-on phones the bootloader will be watermarked. This means it will say at the top of the bootloader "unlocked" which is a dead giveaway of a rooted phone. However, Sprint has changed their view of rooted phones. Please read this: http://androidforums.com/evo-4g-all-things-root/543645-sprints-policy-rooting.html. Also this is a great account that happened to an actual developer, ropodope: Spint's Policy Put to the Test. So you can see that having a watermarked bootloader is not that bad.
Thanx really needs to go out to all of the awesome devs we have for our phone. Even though we already have s-off, our devs continue to perfect and find easier root methods. We now have 5 different ways to get s-off. I will go into more details on the methods and it will be up to you to decide which way to go.
so here they are:
DirtyRacun/BabyRacun
HTCdev Method
Facepalm
Moonshine
rumrunner s-off
WinDroid HTC EVO 4G LTE Toolkit
so here they are:
DirtyRacun/BabyRacun
So with the hboots(1.15 & 1.19, and 2.09), the exploit that LazyPanda used was closed. But with DirtyRacun, you can now get full s-off. This will work with all phones that is on software version 3.15.651.3. This will not work with software version 3.16.651.3 which is the latest from the recent OTA. You do not have to get s-off by running DirtyRacun. The method of unlocking the bootloader still works. However, flashing roms and kernels(info on kernels is in the second post) will be more work then a s-off phone depending on the rom you flash. So please read both and decide which way want to go.
When you took the latest ota 3.16.651.19 Dirty Racun does not work. But now the awesome devs from Team Unlimited have now found a way to get s-off with Dirty Racun. They are calling it BabyRacun. If you have this ota then you will need to use BabyRacun.
DirtyRacun/BabyRacun S-Off Method(works on all HBoots):
Method #2: BabyRacun
 So like any other OTA's, rooting phones will always get harder with each new OTA. This is why you should never take an OTA even if you are only thinking about rooting. Team Unlimited has now found a way to root your phone that has the latest OTA(3.16.651.19). It is basically Dirty Racun, but with some extra steps in the middle. I believe that the Baby Racun step downgrades the hboot(do not quote me on this) so that you can run their 3.15 ruu found on their website.
Ok like before, I will respect the wishes of Team Unlimited and not go into too much detail on the process. For a full detailed step by step please head on over to Unlimited.IO.
here is the overview:
1. unlock the bootloader
2. install TWRP recovery
3. run BabyRacun
4. re-lock the bootloader
5. run the 3.15 RUU
6. unlock the bootloader again
7. run RabiesShot.exe
Step 1 Unlocking the Bootloader
When you took the latest ota 3.16.651.19 Dirty Racun does not work. But now the awesome devs from Team Unlimited have now found a way to get s-off with Dirty Racun. They are calling it BabyRacun. If you have this ota then you will need to use BabyRacun.
DirtyRacun/BabyRacun S-Off Method(works on all HBoots):
DirtyRacun

Method #1: DirtyRacun:
Ok so you have the latest hboot all is not lost. The devs from Team Unlimited IO has just found away to root hboot 1.15/1.19/2.09. This method will now work with all hboots.
On their request I will not have instructions on how to use their method.
You will need to go here:DirtyRacun S-OFF Public Beta for the actual instructions.
Couple of points to know ahead of time:
On their request I will not have instructions on how to use their method.
You will need to go here:DirtyRacun S-OFF Public Beta for the actual instructions.
Team Unlimited.IO said:DirtyRacun is the third release from Team Unlimited. It is a tool for gaining (radio) S-OFF and flashing a custom bootloader that supports full write/erase fastboot commands.
DirtyRacun does not provide root access, however with S-OFF this is a simple process of flashing superuser from recovery once you have finished this process.
DirtyRacun comes with NO WARRANTY (express or implied), and NO GUARANTEE OF FITNESS for any particular task. We have made every effort we can to make this a safe process for users however the authors disclaim any liability for damage to your phone or other materials or devices used during this process. The entire risk of running DirtyRacun lies with you, the user. By downloading and/or using any software, video file or text from this website you acknowledge and accept that the authors are not liable for any loss, material or otherwise howsoever caused.
Couple of points to know ahead of time:
- If you have an older hboot then you can still use Dirty Racun. You will need to run a ruu that will upgrade your phone to one of the newer hboots. It does not matter which of the newer hboots you choose. They will be provided on their website as well.
- You will need to either install Ubuntu or create an Ubuntu Live Cd in order to use DirtyRacun. For instructions on how to do this, go to step#1 in section 1 of this guide.
- Make sure that you back up your sd card. For instructions on how to fully back the card up please check this thread out:http://androidforums.com/evo-4g-lte-all-things-root/567529-how-make-full-sd-card-backup-via-usb.html
- You will need to use USB 2.0. This will not work with USB 3.0
- Only Windows 7 (32 bit) or Ubuntu 12.04 (and newer) 32bit are supported. (Thus a Live Cd is the best way to go)
- After running DirtyRacun you will need to install a custom recovery and either flash su(superuser) file or flash a custom rom. See Step 2 and 3
- Follow directions very carefully.......so please read and read and then read some more before trying this.
Thanx to EarlyMon we have a guide that should help you with Ubuntu commands. You will need to use this if you plan on running Dirty Racun with Ubuntu or if you need to use Ubuntu to unbrick your phone.
EarlyMon said:Back up your external sd card. It may get temporarily or completely hosed.
Must be on a stock-based rom. Follow Unlimited team's instructions.
Make a live whatever of ubuntu, all directions here -
https://help.ubuntu.com/community/LiveCD
You want rev 12.04 LTS, also linked above, 32-bit.
Booting is not fast. Even when it looks to be hanging up, give a few minutes.
The only snag people seem to hit sometimes is getting networking up so give it a test run, and if it causes trouble, it's still fixable. (I understand the newer Windows will shut down the NIC before shutdown and you many have to go into device manager to stop that - again, we have a thread on that, I'm not a Windows guy.) Reasonable to expect that you'll get a driver pop-up and then a lan card icon in your upper right. Tap that to config your wifi drivers if it comes up. At that point, I prefer to tap the empty wifi icon and uncheck wifi, give it half a minute and then repeat to check it back on. That seems to scan more quickly for networks in my case.
If network problems persist, see - http://androidforums.com/computers/646562-ethernet-problems-in-ubuntu-12-04-a.html
You need the two Unlimited tar.gz (tgz) packages for Linux, one for s-off, one to unbrick.
Or, you could just put the Unlimited Dirty Racun links in an gmail to yourself, and then visit your gmail with Firefox to get to those links.
Launching Firefox is easy, it's an icon on the left panel. Choose to save both files. Iconify or quit FF once you have the two files.
Get a terminal via control-alt-T.
Tab key auto-completes on command-line, following commands use it to save typing.
For each command make sure to <TAB-key> <ENTER> after typing it.
In terminal window, go to your downloads subdir -
[HIGH]cd Downloads[/HIGH]
See the two tgz files -
[high]ls -l *tgz[/high]
Run this for each one -
[HIGH]tar zxf (replace_me_with_file_name).tgz[/HIGH]
Follow all Unlimited team's instructions.
To confirm what directory you're in, if you need to -
[HIGH]pwd[/HIGH]
To change to a different directory -
[HIGH]cd (directory_name)[/HIGH]
To get a listing of files where you are -
[HIGH]ls -l[/HIGH]
To run an app in the directory you are in, put dot-slash in front of the app name, no spaces -
[HIGH]./(app_name)[/HIGH]
If told to sudo a command (app name), such as fastboot -
[HIGH]sudo ./fastboot (rest_of_fastboot_command)[/HIGH]
When done -
REBOOT -
I'm sure there are buttons in Ubuntu for that. Here's what I use in the terminal window -
[HIGH]sudo shutdown -r now[/HIGH]
That should get you there.
Ok like before, I will respect the wishes of Team Unlimited and not go into too much detail on the process. For a full detailed step by step please head on over to Unlimited.IO.
here is the overview:
1. unlock the bootloader
2. install TWRP recovery
3. run BabyRacun
4. re-lock the bootloader
5. run the 3.15 RUU
6. unlock the bootloader again
7. run RabiesShot.exe
Step 1 Unlocking the Bootloader
- Please see the HTCdev method for instructions
- please see chapter 3 for instructions
- extract DirtyRacun files into the android folder you created when you unlocked the bootloader.
- run BabyRacun as per Unlimited.IO
- on your phone reboot into the bootloader and select fastboot
- open command window on the android folder you created earlier
- enter this command:
Code:fastboot oem lock
- use the 3.15.651.1 RUU found at Unlimited.IO
- unlock the bootloader via HTCdev.
- Please see the HTCdev method for instructions, if you forgot
- as per Unlimited.IO
This method is something that htc has done to keep their word on providing us with bootloaders that are not locked down like on some other phones. however, there are some things that you should know about it, if you are planning on going this route. Yes the bootloader will be unlocked, but you will have s-on still. However, this also means that the bootloader will be watermarked and this will void your warranty on the phone.
And yes with this method, you will be able to flash roms, kernels and such though you will still have s-on. Once the bootloader is unlocked all you need to do is have a custom recovery and either flash a custom rom or flash the su (superuser) file and then you are good to go. However, the kernel that comes with the rom will need to be flashed separately. And it is done by using the fastboot command. Please refer to the second post in the After Root section for kernel info.
An Overview of the process:
1.Clear Google Wallet
2.Go to HTCdev and follow directions to get your bootloader unlocked
3.Install custom recovery
4.Flash the su file or you can flash a rom of your choice
the Setup
You will need to download these files:
The adb files i have above are all you really need to get everything working. But for those who want more info on adb, check out this guide:http://androidforums.com/faqs/443072-adb-guide-updated-12-05-2011-a.html
Make sure that you have htc sync installed and that you have the latest java running.
HTCdev bootloader unlocker
1.Clear Google Wallet
2.Go to the htc website:HTCdev - Unlock Bootloader
3.At the very far right there should be a drop down menu.
4.Just follow the steps. and use the files that you downloaded earlier when asked.
5.You will then get an email and follow directions according to the email.
6.Congrats!!!!!!!! you have now just unlocked your bootloader
Here is a step by step as stated on the htcdev.com site.
1.power off (make sure that fastboot is disabled. settings>power>uncheck fastboot
2.Press and hold power+vol down
3.With the vol buttons highlight fastboot and select it with your power button.
4.Connect the device to the computer via usb cable
5.Create a new folder and call it android
6.Download the first three files and save it to the android folder
7.Right click on your android folder while holding shift and select open command window here (3rd or 4th option).
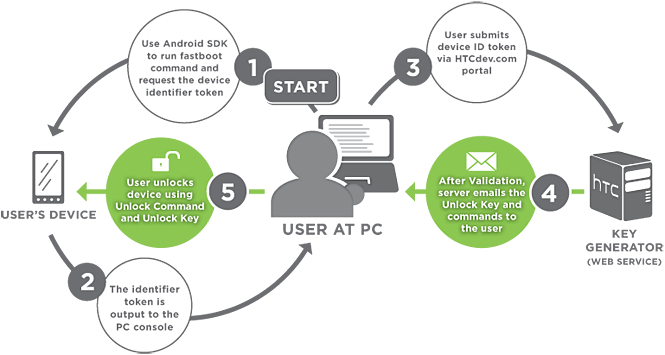
8.In the command window type:
9.you will need to copy the long block of text that is displayed
Right Click > Mark > highlight the block of text > Right click to copy
10.The first line you should highlight should be:
<<<<<Identifier Token Start>>>>>
and end with:
<<<<<Identifier Token End>>>>>
11.Paste the text into the token field and then hit submit.
12.You will then get an email with the unlock key and commands to finish the process.
13.Once you get the email download the attached .bin file and move to your android folder you created earlier.
14.Open the command window (right click+shift, open command window here) and type:
15. You will then see a disclaimer just select yes.
CONGRATS!!!!!!!!!!!!!!!!!YOU ARE NOW UNLOCKED!!!!!!
And yes with this method, you will be able to flash roms, kernels and such though you will still have s-on. Once the bootloader is unlocked all you need to do is have a custom recovery and either flash a custom rom or flash the su (superuser) file and then you are good to go. However, the kernel that comes with the rom will need to be flashed separately. And it is done by using the fastboot command. Please refer to the second post in the After Root section for kernel info.
An Overview of the process:
1.Clear Google Wallet
2.Go to HTCdev and follow directions to get your bootloader unlocked
3.Install custom recovery
4.Flash the su file or you can flash a rom of your choice
the Setup
You will need to download these files:
The adb files i have above are all you really need to get everything working. But for those who want more info on adb, check out this guide:http://androidforums.com/faqs/443072-adb-guide-updated-12-05-2011-a.html
Make sure that you have htc sync installed and that you have the latest java running.
HTCdev bootloader unlocker
1.Clear Google Wallet
2.Go to the htc website:HTCdev - Unlock Bootloader
3.At the very far right there should be a drop down menu.
4.Just follow the steps. and use the files that you downloaded earlier when asked.
5.You will then get an email and follow directions according to the email.
6.Congrats!!!!!!!! you have now just unlocked your bootloader
Here is a step by step as stated on the htcdev.com site.
1.power off (make sure that fastboot is disabled. settings>power>uncheck fastboot
2.Press and hold power+vol down
3.With the vol buttons highlight fastboot and select it with your power button.
4.Connect the device to the computer via usb cable
5.Create a new folder and call it android
6.Download the first three files and save it to the android folder
7.Right click on your android folder while holding shift and select open command window here (3rd or 4th option).
8.In the command window type:
Code:
fastboot oem get_identifier_tokenRight Click > Mark > highlight the block of text > Right click to copy
10.The first line you should highlight should be:
<<<<<Identifier Token Start>>>>>
and end with:
<<<<<Identifier Token End>>>>>
11.Paste the text into the token field and then hit submit.
12.You will then get an email with the unlock key and commands to finish the process.
13.Once you get the email download the attached .bin file and move to your android folder you created earlier.
14.Open the command window (right click+shift, open command window here) and type:
Code:
fastboot flash unlocktoken Unlock_code.binCONGRATS!!!!!!!!!!!!!!!!!YOU ARE NOW UNLOCKED!!!!!!
Ok this will be a basic overview of the method. For a more detailed instructions please go to [S-Off] Facepalm S-Off for HTC Evo 4g LTE - xda-developers
download these files:
basic over view:
download these files:
- http://androidforums.com/evo-4g-lte-all-things-root/671150-mini-sdk-all-rooter-needs.html for adb and fastboot. It is the same ones you used for the HTCdev method.
- PJ7510000-EvoLTE.zip move to the android folder
- EvoLTE-rescue.img move to the android folder
basic over view:
- you will need at least the su file installed and flashed so that you get root permission to add in superCID.
- you will need adb and fastboot for this method to work. but since you have to be unlocked first you can use the same folder and adb files used to unlock the bootloader. if you do not have it, then you can go here: http://androidforums.com/evo-4g-lte-all-things-root/671150-mini-sdk-all-rooter-needs.html. extract the .zip file into a folder (i'd call it android)
- download the two facepalm files(do not extract them) and move them to the android folder.
- open the command window from that folder and enter the commands as shown in the facepalm op.
Ok here is another method to get s-off. It is recommended to use a livecd of linux(Ubuntu is recommended), but it is not necessary. You can use Windows for this method. I will only include the Windows method. If you want to use linux then please go to the Moonshine website: http://moonshine.io/instructions/
prerequisites:
1. download the file for the HTC Evo 4G LTE(windows)
2. unzip the file anywhere on the pc as long as you know where it is.
3. right click on the unzipped file and run as administrator
4. congrats!!!!!!!!!!!
original thread:
[S-OFF] Moonshine S-OFF for 3.16.651.3 - xda-developers
prerequisites:
- uninstall htc sync
- htc drivers installed
- no android software that can communicate with the phone(ie doubltwist or pdanet)
- pc with access to the internet
- your phone needs to be on 3.16.651.3 in order for moonshine to work
- disable fastboot (settings/power/uncheck fastboot)
- unlocked bootloader
- it is recommended to be on a stock rom(rooted) vs a custom rom
- do not use usb 3.0
1. download the file for the HTC Evo 4G LTE(windows)
2. unzip the file anywhere on the pc as long as you know where it is.
3. right click on the unzipped file and run as administrator
4. congrats!!!!!!!!!!!
original thread:
[S-OFF] Moonshine S-OFF for 3.16.651.3 - xda-developers
OK so thanx needs to go out to beaups and fuses. If you did not know, the latest OTA (firmware version 3.17) was not rootable(no s-off).......until now. thanx to rumrunner s-off we now have root again for the latest OTA.
just a reminder that you should never accept an OTA, especially if you plan on rooting your phone. this habit should be applied to any device.
anyways here is rumrunner:
first off i will not be doing a play by play as it is better if you follow the devs instructions and not mine, since they know best....what i will be doing is just giving you an overview in the hope that it will make it easier for you to understand what the devs wants you to do.
ok so here are the prerequisites:
ok so here it is:
1.download the correct file for the htc evo 4g LTE.....there is two....the first one is for linux, while the other is for windows.
2.extract the file as explained in the guide
3.run the soju.exe
4.accept the terms and conditions
5.Congrats!!!!!!!!
now this will give you su and busybox so there is no need to do that as described in chapter 4. if you want you can stay on stock after running rumrunner, but you will still need a recovery so proceed to the next chapter.
here is the xda thread:
[s-off] rumrunner s-off - xda-developers
and here is the actual site:
http://rumrunner.us/
just a reminder that you should never accept an OTA, especially if you plan on rooting your phone. this habit should be applied to any device.
anyways here is rumrunner:
first off i will not be doing a play by play as it is better if you follow the devs instructions and not mine, since they know best....what i will be doing is just giving you an overview in the hope that it will make it easier for you to understand what the devs wants you to do.
ok so here are the prerequisites:
- this will only wok in either linux or windows.
- virtual machines are unsupported
- if you are on windows:
- have the latest htc drivers
- no htc sync(it needs to be deleted)
- any program that needs to communicate to the phone...no pdanet and such
- disable all internet securities and firewalls
- a working internet
- usb debugging turned on
- fastboot disabled(settings/battery/uncheck fastboot)
- make sure not to have any passcode or patterns for lockscreen
- use usb 2.0....there is connectivity issues with usb 3.0
- must be on 3.17 software and firmware versions
- you must be unlocked....please see the HTCdev method for instructions
- you must be on a stock sense rom or run the risk of bootloops or worse
ok so here it is:
1.download the correct file for the htc evo 4g LTE.....there is two....the first one is for linux, while the other is for windows.
2.extract the file as explained in the guide
3.run the soju.exe
4.accept the terms and conditions
5.Congrats!!!!!!!!
now this will give you su and busybox so there is no need to do that as described in chapter 4. if you want you can stay on stock after running rumrunner, but you will still need a recovery so proceed to the next chapter.
here is the xda thread:
[s-off] rumrunner s-off - xda-developers
and here is the actual site:
http://rumrunner.us/
First off thanx should go out to WindyCityRockr. This is not a root method really, but more of a tool that you can use to do numerous cool things. This toolkit will guide you through on getting your bootloader unlocked; you can get recovery; and even get s-off with this toolkit. This toolkit will get your phone s-off using various methods depemding on what your firmware is. rumrunner which is the current s-off method for with the latest ota is in the works......so if you have the latest ota, software version 3.17 then you will have to wait until the dev can update windroid with rumrunner.
here is the original thread:
[TOOL] [10.01.13] WinDroid HTC EVO 4G LTE Toolkit v2.0 | Unlock | Root | Flash | S-OFF |
here is the original thread:
[TOOL] [10.01.13] WinDroid HTC EVO 4G LTE Toolkit v2.0 | Unlock | Root | Flash | S-OFF |
The next step is to get a custom recovery. The recovery is where the magic happens. It is where we can wipe the phone clean, install roms, kernels, tweaks, mods and themes. Just remember that as long as you have recovery all is not lost. It is also where we can backup the phone by making a nadroid backup (more to come on it later on) so if anything goes wrong you can always go back with your backup. Remember that nandroid backups are your friend.
so here is how you do it:
so here is how you do it:
1.go to openrecovery-twrp-2.4.1.0-jewel.img to download the file.
2.move the file into the android folder you created earlier when you unlocked your bootloader.
3.on your phone you should be in the bootloader menu screen, select the fastboot option. if you are not in the bootloader menu then power off the phone and then press and hold power+vol down.
4.on your computer press and hold shift while right clicking the android folder.
5.select open command window here option (windows 7)
6.enter command:
7.from the bootloader menu reboot the phone.
congrats!!!!!!
2.move the file into the android folder you created earlier when you unlocked your bootloader.
3.on your phone you should be in the bootloader menu screen, select the fastboot option. if you are not in the bootloader menu then power off the phone and then press and hold power+vol down.
4.on your computer press and hold shift while right clicking the android folder.
5.select open command window here option (windows 7)
6.enter command:
Code:
fastboot flash recovery openrecovery-twrp-2.4.1.0-jewel.imgcongrats!!!!!!
Now to finish the root process you will need to do one last step. This involves gaining root permission so that you can make changes to the system partition(ie. deleting bloatware) or so that root apps will be allowed to run. There are two ways you can do this. You can either flash the superuser(su) file. This is what will allow you to stay on the stock rom, but still gain root permission. Or you can flash a custom rom which has su cooked in. For me always I will choose a custom rom over stock any day, but that will be your choice to make.
here are the options:
here are the options:
Option A Flash the SU file
Option B Flash a rom
1.download this fileSuperSU Download
2.once your phone is rebooted connect the phone to the pc and set it as disk drive and move the file over to the sd card. do not put it in any folder, it needs to be on the root of the card.
3.go into recovery then power off then press and hold power+vol down.
4.select recovery from the bootloader menu using the vol up and down keys and the power buttons.
5.in recovery select install (make sure that at the top that the external sd card option is selected and then navigate to the su file your transferred over.
6.slide the bar to start the install "flash" of the su file.
7.reboot the phone.
8.now we need to update the su binaries. go into the app drawer and open the superuser app and agree to update the binaries.
credit goes to covert_death:http://androidforums.com/evo-4g-lte-all-things-root/597083-ota-update-root-possible-yet.html
1.clear Google Wallet
2.download the rom of your choice and transfer it to your card.
3.go into recovery
4.make a nandroid backup
5.select wipe from the main menu and wipe dalvik cache, cache, and data
6.select flash zip from sdcard
7.find the superwipe file and select it.(optional)
8.find your rom and select it.
9.reboot.
first boot will take a bit longer then normal, so be patient.
I wanted to devote this last section to the awesome devs and others who have worked endlessly on freeing our devices from the grips of carriers and manufacturers. Without you guys my phone would be just a phone and how boring is that? Please if you have any money to spare please go to these guys and donate whatever you can afford. Remember most of these guys have other jobs and do this on the side.
zedomax
regaw_leinad
team Unlimited.IO
sparkym3
Dan Rosenberg
Fuses
jcase
Also not to mention my fellow AF members. Thanx should go out to the following:
EarlyMon
Granite1
Rxpert83
You guys rock!!!!!!
zedomax
regaw_leinad
team Unlimited.IO
sparkym3
Dan Rosenberg
Fuses
jcase
Also not to mention my fellow AF members. Thanx should go out to the following:
EarlyMon
Granite1
Rxpert83
You guys rock!!!!!!
So what now? Please see the second post for more info about being rooted..........and please hit the thanx button, if you found this guide helpful
")


") . In this section I will go into more details on all things root related and how to perform them. I will cover things like kernels, roms, and nandroids in full detail.
. In this section I will go into more details on all things root related and how to perform them. I will cover things like kernels, roms, and nandroids in full detail.