
Please Note: This guide was made when the X10 was on 1.6/2.1 - It's now on 2.3 so some steps may be out of out date!
Alot of people seem to have continuous problems installing the HTC keyboard, so last week rosered asked me to write a fool-proof step-by-step guide for those users. So after getting back from my short vacation I decided to write a step-by-step guide which also includes screenshots to make it easier for you")
First of all I will explain how to install the original HTC keybaord, then I will tell you where to customize your own HTC keyboard for those of you that prefer it customized
How to install the HTC keybaord on your Xperia X10
Before you start, make sure your phone is set to allow apps from unknown sources. To enable this, go to Settings > Applications and make sure Unknown Sources is checked
1. Download the HTC Keyboard here
2. Open the zip archive and copy the files to your desktop
AT&T users will not be able to install this keyboard using steps 3-8 as they cannot side load apps. If you are an AT&T user, scroll down to see the instructions at the bottom of this guide explaining how to install the HTC keyboard. When you have done that, go to step 9
3. Connect your phone to your computer using the USB cable, drag down the notification bar on your Xperia and tap "USB COnnected" then tap "Mount". Alternatively, some people prefer to slide the SD card into a Memory Card slot on your computer
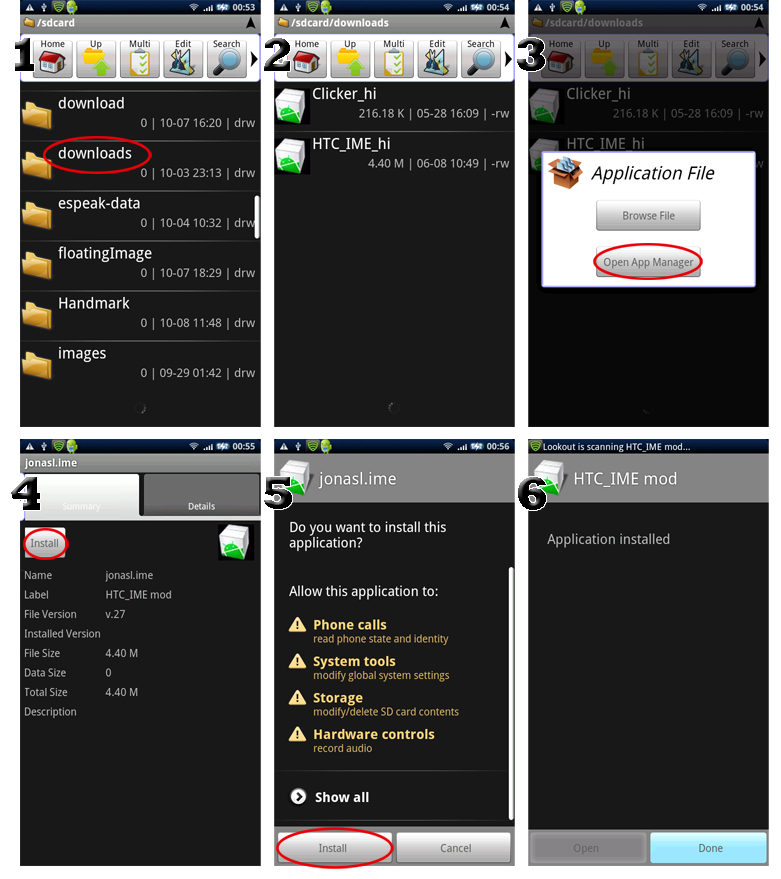
4. Copy the HTC Keyboard files from your desktop, into a directory on your phone that you will remember (in my example I will use the 'downloads' directory
5. Disconnect your phone from the usb cable (or put the SD card back into your phone if you used a memory card slot)
6. Open your file manager. If you do not have one, download ASTRO from the market, it is completely free and in my opinion, it's the best on the market (it must be a file manager than is capable of handling .apk files)
7. Locate to the directory you saved the keybaord files (in my example it is the 'downloads' folder)
8. Open the HTC_IME.apk & Clicker.apk files, and install them. I have included some screenshots below, for those using ASTRO
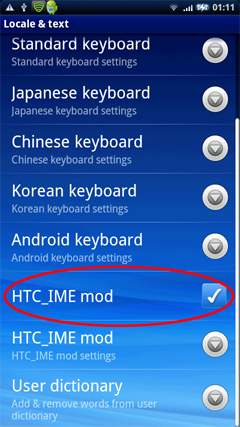
9. The keyboard should now be installed. You now need to active it. To do this, go to the home screen, press MENU, choose Settings, then choose Locale & Text. Ensure 'HTC_IME mod' is ticked (see image below) Please note in 2.1 look for Language and Keyboard
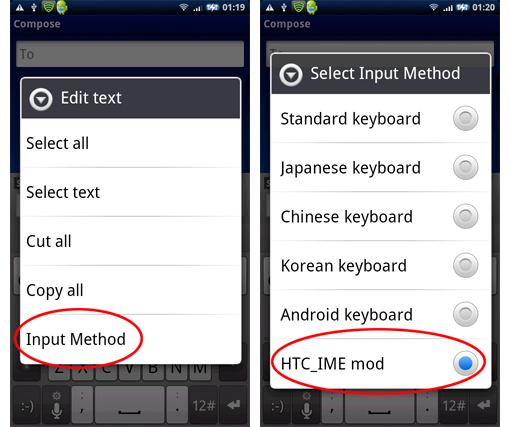
10. Now long press on any text input box, and choose 'Input Method', then choose 'HTC_IME mod'.
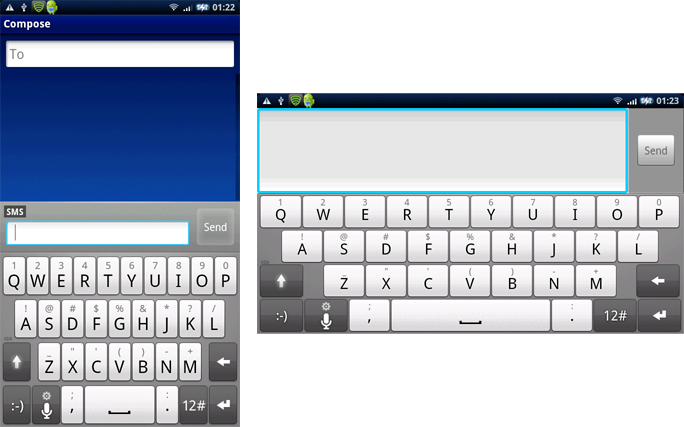
You now have the HTC Keyboard
If you prefer a customized HTC keyboard, with your own colors and the option of having an image on your space bar, go to http://www.gimpsta.com/themer/


AT&T users cannot sideload apps so steps 3-8 will not work for you. Just follow the instructions below to install the keyboard to your phone, then go back to step 9 above and continue from there For this to work you must make sure you've installed the Windows USB driver for your phone and make sure that .NET 4 is installed on your computer
1. Make sure USB debugging is enabled on your phone. If it is not, go to Settings, tap 'Applications' then 'Development' and make sure 'USB debugging' is checked
2. Download the Android Sideload Wonder Maching here. Extract the 'AC-SWM' folder to a folder on your computer that you will easily remember.
3. Connect your USB cable to your phone and the computer.
4. Open the 'AC-SWM' folder and double click 'AndroidCentral-SWM.exe' to run the program
5. Click 'Choose a file' and browse the files you saved for the HTC Keyboard. Load one at a time, and click 'Go'. Repeat for each of the 2 Keyboard files
6. Follow any instructions in the command window then your Keyboard will be successfully installed
This software can also be used to sideload other apps to your AT&T android phone
Now go back up to the top to step 9 and continue from there
I hope this little tutorial helps many people
Alot of people seem to have continuous problems installing the HTC keyboard, so last week rosered asked me to write a fool-proof step-by-step guide for those users. So after getting back from my short vacation I decided to write a step-by-step guide which also includes screenshots to make it easier for you
First of all I will explain how to install the original HTC keybaord, then I will tell you where to customize your own HTC keyboard for those of you that prefer it customized
How to install the HTC keybaord on your Xperia X10
Before you start, make sure your phone is set to allow apps from unknown sources. To enable this, go to Settings > Applications and make sure Unknown Sources is checked
1. Download the HTC Keyboard here
Keyboard for Gingerbread HERE
2. Open the zip archive and copy the files to your desktop
AT&T users will not be able to install this keyboard using steps 3-8 as they cannot side load apps. If you are an AT&T user, scroll down to see the instructions at the bottom of this guide explaining how to install the HTC keyboard. When you have done that, go to step 9
3. Connect your phone to your computer using the USB cable, drag down the notification bar on your Xperia and tap "USB COnnected" then tap "Mount". Alternatively, some people prefer to slide the SD card into a Memory Card slot on your computer
4. Copy the HTC Keyboard files from your desktop, into a directory on your phone that you will remember (in my example I will use the 'downloads' directory
5. Disconnect your phone from the usb cable (or put the SD card back into your phone if you used a memory card slot)
6. Open your file manager. If you do not have one, download ASTRO from the market, it is completely free and in my opinion, it's the best on the market (it must be a file manager than is capable of handling .apk files)
7. Locate to the directory you saved the keybaord files (in my example it is the 'downloads' folder)
8. Open the HTC_IME.apk & Clicker.apk files, and install them. I have included some screenshots below, for those using ASTRO
9. The keyboard should now be installed. You now need to active it. To do this, go to the home screen, press MENU, choose Settings, then choose Locale & Text. Ensure 'HTC_IME mod' is ticked (see image below) Please note in 2.1 look for Language and Keyboard
10. Now long press on any text input box, and choose 'Input Method', then choose 'HTC_IME mod'.
You now have the HTC Keyboard
If you prefer a customized HTC keyboard, with your own colors and the option of having an image on your space bar, go to http://www.gimpsta.com/themer/
AT&T users cannot sideload apps so steps 3-8 will not work for you. Just follow the instructions below to install the keyboard to your phone, then go back to step 9 above and continue from there
For this to work you must make sure you've installed the Windows USB driver for your phone and make sure that .NET 4 is installed on your computer1. Make sure USB debugging is enabled on your phone. If it is not, go to Settings, tap 'Applications' then 'Development' and make sure 'USB debugging' is checked
2. Download the Android Sideload Wonder Maching here. Extract the 'AC-SWM' folder to a folder on your computer that you will easily remember.
3. Connect your USB cable to your phone and the computer.
4. Open the 'AC-SWM' folder and double click 'AndroidCentral-SWM.exe' to run the program
5. Click 'Choose a file' and browse the files you saved for the HTC Keyboard. Load one at a time, and click 'Go'. Repeat for each of the 2 Keyboard files
6. Follow any instructions in the command window then your Keyboard will be successfully installed
This software can also be used to sideload other apps to your AT&T android phone
Now go back up to the top to step 9 and continue from there
I hope this little tutorial helps many people


")


