• After 15+ years, we've made a big change: Android Forums is now Early Bird Club. Learn more here.

Root [International] Rooting Galaxy S4 - Dummies Guide

ironass

Extreme Android User
Aug 17, 2010
12,772
6,356
Cotswolds, England
#1.0. This is a step-by-step guide, with videos and screenshots, for absolute beginners to Android and the Galaxy S4. Please read posts #1, #2, #3 and #4 carefully and thoroughly as they will take you through the rooting and recovery installation procedure and answer most of your queries.


This guide is for the Samsung Galaxy S4, GT-i9505 quad core and the Samsung Galaxy S4, GT-i9500 octa core, phones only and no other variant!

If you are unsure of the model of your phone, go to... Settings > More > About device > Model number

(If you use this guide on any other model of phone do not come crying to me... you have been warned!)

(WARNING On firmwares that are Knox security enabled, the following instructions will result in the Knox security flag being increased. See, Knox Security & locked bootloader on new firmwares for more details. Whilst the CF-Auto-Root kernel, "may", not trip the Knox flag, allowing rooting, a custom recovery certainly will.)


Index to posts...

#1. General information and setup

#2. Flashing the root and custom recovery

#3. What to do after you are rooted

#4. Tips for using this Dummies Guide.


#1.1. What is rooting?

Rooting gives you, "Superuser", access to your phone and its features. It allows the installation of the latest custom ROM's, kernels, modems, applications and features that are not available to un-rooted phones. All this process does is to replace the stock kernel, that comes with your phone, with a root kernel and does not affect any data stored on the phone. For more information on the advantages of rooting, see here.


#1.2. Is it difficult

That really depends on your ability to read and follow instructions. I would strongly suggest that you read all the links published here, carefully and thoroughly, to help you understand the process before attempting to root your phone. The actual, "flashing", process, post #2, takes about 30 seconds, however, the set-up for this is longer and can be done in advance.


#1.3. What hardware do I need?

Galaxy S4, GT-i9505 quad core phone

or

Galaxy S4, GT-i9500 octa core phone

USB lead that came with the phone.

A Windows PC running, XP, Vista, 7, 8 or 8.1


#1.4. What software do I need?

7-Zip (or similar... WinRAR or WinZip) to extract the .zip files on your PC. Download, here.


Odin3 v3.09. This is the PC programme that will install the rooted kernel to your phone. Unzip the file and run Odin3 v3.09. Download, here.


Samsung Kies. This is a PC Suite for the Samsung. Download and install to your PC as you will require the drivers that come bundled with it, to connect your phone to the PC and Odin3.

Download for Windows, here.

When you have downloaded and installed Kies, connect your phone via the USB lead to ensure that it is working. If you encounter any problems connecting your phone to Kies, see this trouble shooting guide, here.


#1.5. The Root Kernel

To root your phone you will need to replace the stock kernel with a modified root kernel that will allow you Super User access.

Download the CF-Auto-Root kernel for the Samsung Galaxy S4, GT-i9505, quad core...

CF-Auto-Root-jflte-jfltexx-gti9505.zip

or

Download the CF-Auto-Root kernel for the Samsung Galaxy S4, GT-i9500, octa core...

CF-Auto-Root-ja3g-ja3gxx-gti9500.zip


Download the .zip file to your desktop and unzip it. To extract the file, just right click on it and select 7-Zip/WinRAR/Winzip and, "Extract here". This extracted .tar file is the one you will need. This is the .tar file that contains the kernel that will root your phone. To avoid confusion you can now delete the original .zip file that it came with.


Continued in next post...


ironass motto... "Flash in haste... repent at leisure" ;)
 
#2.0. Rooting procedure

Just to recap. You should by now have installed Samsung Kies and Odin3 on your PC and be able to connect via your USB lead. Also, you have the correct CF-Auto-Root .tar file on your home screen.


Important: Now make a note of your phone's, "Version" in case you ever need to revert back to stock firmware. To do this, open the dial pad and type in the following:- *#1234#

This will give you 3 lines of information about your phones firmware and CSC code, etc: You should make a careful note of all this information and keep it somewhere safe in case you ever need to un-root by flashing your stock firmware and kernel.


Now you can watch this video to give you a general idea on what to expect.


#2.1. Step 1.

Ensure that your phone is fully charged.

On your phone, go to... Settings > More > About device > Build number and tap 7 times on it. This will enable the hidden, “Developer options”, menu when you go back to the, “More”, menu. Open the, “Developer options”, menu and check, “USB debugging”. See video, here.

Put your phone into Download mode by turning it off completely and then press and hold the following buttons... Volume Down + Home (centre hard key) + (lastly) Power. Continue to hold these buttons until your phone boots into the Warning! screen asking you to press volume up if you want to continue or volume down to cancel. Press Volume Up. See video, here.


#2.2. Step 2.

Right click on Odin3 and select, "Run as Administrator", to open it. Ensure that the Samsung Kies programme is NOT running at the same time as this can cause problems

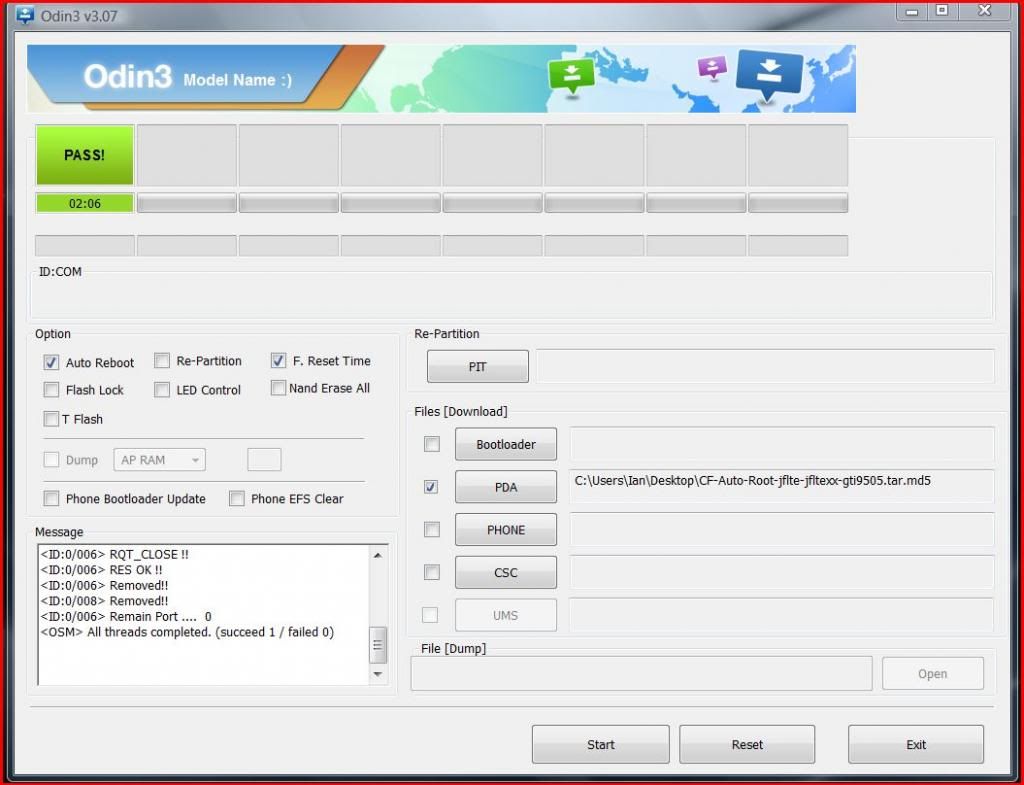
With Odin3 displayed on your PC screen, click on the AP button, (formerly labelled PDA on earlier versions of Odin), and navigate to the .tar file, that you placed on your home screen, and select it.

Make sure that Re-Partition is unchecked and that Auto Reboot, F.Reset Time and AP are checked and that the AP box now contains your .tar file.


#2.3. Step 3.

Connect your phone, still in Download mode, to the PC using the USB lead. If you have successfully connected to Odin3 you should see the ID:COM box in Odin turn yellow or light blue, (depending on which version of Odin you are using).


#2.4. Step 4.

In Odin click the Start button and you should see a green progress bar above ID:COM and shortly after that the box above it will turn green with the word PASS! in it and your phone will automatically reboot.


#2.5. Should you encounter any problems with booting automatically at this stage then repeat the entire procedure again. If it will still not install root then go to Odin and un-check, “Auto reboot”, and, after flashing, pull the battery out and replace it and then boot into Recovery mode by pressing and holding the following buttons... Volume Up +Home (centre hard key) + (lastly) Power. Continue to hold these buttons until your phone boots into the Recovery screen. See video, here. This will start the install process.


You can now disconnect from the USB lead and check your App drawer where you will find an extra app has been added. This is SuperSu.

If you saw the red Android logo during the rooting process but do not have the SuperSu app in your app drawer this is because of left over files and settings and you should download and install SuperSu from the Google Play Store.

If you are unsure whether your phone is now rooted you can install Root Checker Basic, free from the Play Store, and run it.


#2.6. Resetting the hidden flash counter

Because you have now rooted your phone with CF-Auto-Root the hidden flash counter on your phone will now show 1 and void your warranty. This counter will increase every time you flash a custom ROM or kernel. You should download and install, “Triangle Away”,* from the Google Play Store in the event that you need to re-flash your stock firmware for a warranty repair. There is no point in re-setting the counter until such time. Use at your own risk.
Note: This will not reset the separate Knox security counter that is included in the latest firmwares... nothing will.

(*Appears not to work on the GT-i9500, octa core.)

For more details and support for the CF-Auto-Root kernel, visit the developers website, here.

Whilst CF-Auto-Root has now rooted your phone, it only offers the basic stock recovery options and you will still need to flash a custom recovery or CWM, (ClockWorkMod), to allow you to install custom Rom .zip files and kernels as well as make the all important, "nandroid", backups and restores as well as a whole host of other features available for modding.


#2.7.Installing a Custom Recovery

There are a number of ways of installing a custom recovery to your phone but this is the easiest method so far and will give you one of the best touch, CWM, recoveries around. It requires that you flash, via Odin, the PhilZ recovery which, by itself, cannot be used to root your phone. The steps are basically the same as #1 - #4 above.

Samsung Galaxy S4, GT-i9505, quad core...

Download the latest PhilZ_touch jflte.tar.md5 file, here.

or

Samsung Galaxy S4, GT-i9500, octa core...

Download the latest PhilZ_touch i9500.tar.md5 file, here.

Download the file to your desktop. This is the .tar file that contains the PhilZ custom recovery.


#2.8. Step 1.

Ensure that your phone is fully charged.


Put your phone into Download mode by turning it off completely and then press and hold the following buttons... Volume Down + Home (centre hard key) + (lastly) Power. Continue to hold these buttons until your phone boots into the Warning! screen asking you to press volume up if you want to continue or volume down to cancel. Press Volume Up. See video, here.


#2.9. Step 2.

Right click on Odin and select, "Run as Administrator", to open it. Ensure that the Samsung Kies programme is NOT running at the same time as this can cause problems

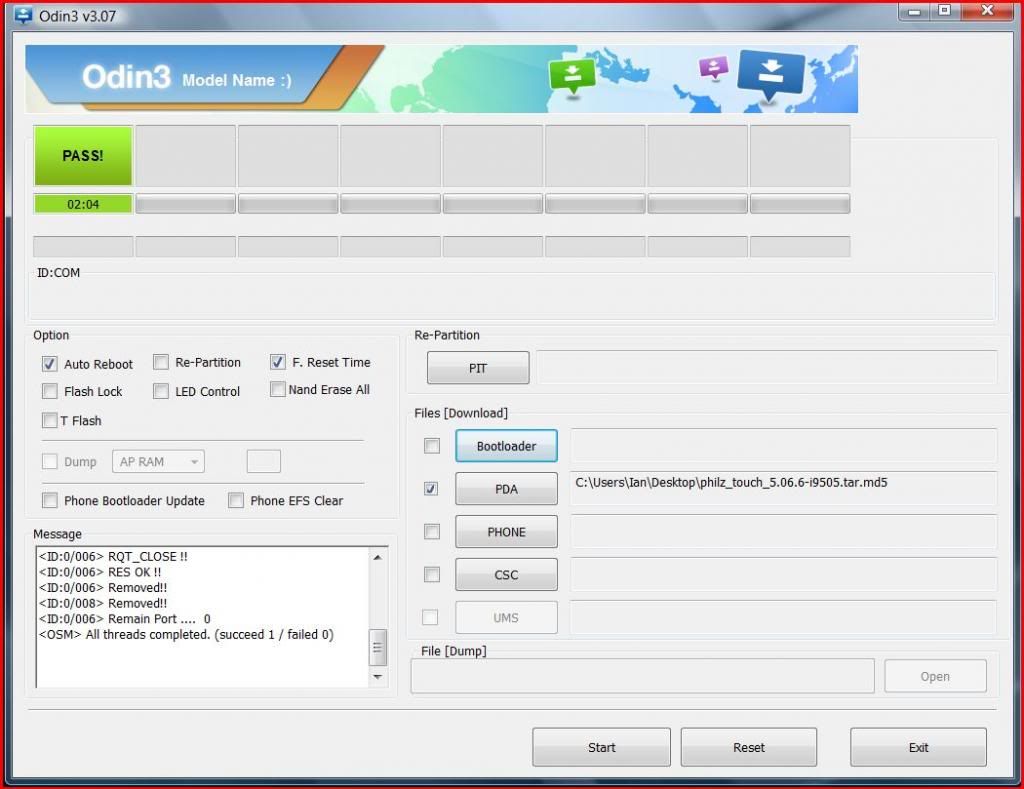
With Odin displayed on your PC screen, click on the AP button and navigate to the extracted PhilZ .tar file, that you placed on your home screen, and select it.

Make sure that Re-Partition is unchecked and that Auto Reboot, F.Reset Time and AP are checked and that the AP box now contains your .tar file.


#2.10. Step 3.

Connect your phone, still in Download mode, to the PC using the USB lead. If you have successfully connected to Odin you should see the ID:COM box in Odin turn yellow or light blue, (depending on which version of Odin you are using).


#2.11. Step 4.

In Odin click the Start button and you should see a green progress bar above ID:COM and shortly after that the box above it will turn green with the word PASS! in it and your phone will automatically reboot. If during re-booting you are offered the option to, "Fix Root", then select No.


Congratulations! You have just installed CWM, (ClockWorkMod), recovery to your Samsung Galaxy S4.

For more details and support for the PhilZ custom recovery, visit the developers website, here.


#2.12. Installing Nandroid Manager and Online Nandroid Backup


To make full use of the options that are now available you will need to download and install, "Nandroid Manager", and, "Online Nandroid Backup", from the Google Play Store.

You are now able to make, "nandroid", (mirror image of OS, app's and settings), backups and restores.

Tip: In Online Nandroid Backup > Menu > Settings > Default Backup Settings > Save Location... set it to, "/storage/extSdCard", as nandroids can be around 4GB and would soon fill up your internal storage.


#2.13. Note: If you flash a stock Samsung firmware which contains a stock, un-rooted, kernel, in future you will need to re-root and install the custom recovery again.


Continued in next post...


ironass motto... "Flash in haste... repent at leisure" ;)


If someone has helped you then be polite and select their Thanks button.
The "Search this Thread" button is your friend.
 
Upvote 0
#3.1. I'm rooted... now what?

Now that you are rooted you can start thinking about installing custom ROM's, kernels and modems as well as, "freezing", some of the, "bloatware" that comes with your phone.

See, GOOGLE EDITION 4.4.4 by Danvdh for the GT-i9505

See, CM Edition by Dan & Ktoonsez for the GT-i9505

See, Omega v14.1, JB 4.2.2 for the GT-i9500

See, WanamLite Fast | Clean & Rock Stable for the GT-i9500

See, Bloatware removal - Dummies Guide

See, GPS Fix - Dummies Guide


#3.2. What App's should I install

There are a number of app's that you can install from the Market to aid and enhance your modding experience now that you are rooted.

Titanium Backup and Pro key.

A, “must have”, app for making scheduled and selected backups and restores for apps and settings that can be used across different ROM’s. It also allows you to, “freeze”, the system, “bloatware”, that comes with your phone.


Root Explorer (File Manager)

Allows access to the phone’s system folders on rooted phones. I advise installing this app after rooting and using it to navigate to the, "/efs", file in the root directory of the phone and making a copy of this and putting it on both your external SD card and PC as its loss or corruption in future could render your phone unusable and require a Samsung repair.


#3.3. IMPORTANT: You should now make a nandroid, Titanium and /efs file backups after rooting.


Android System Info.

This app gives an all-in-one readout of your system. Very useful.


BetterBatteryStats.

A great app for tracking down what is actually using your battery.


CPU Spy.

This is a simple app to display the time the CPU spends in each frequency state. This can be a useful tool in diagnosing battery problems or tweaking your over-clock settings. It also displays the current kernel information.


BusyBox.

A must have for any rooted phone! Almost EVERY rooted applications needs BusyBox to perform their magic, if you have a rooted phone then you need BusyBox.


Mobile ODIN Pro

Mobile ODIN is the on-device firmware flasher of choice. Just throw those firmware files on your (internal or external) SD card, start Mobile ODIN and flash away.


Phone INFO

Have you ever wanted to know the Country of Origin? When the phone was manufactured? Do you want to know the Knox Warranty Void status without entering to the Download Mode?... Then this app is for you


GS4 Wipe Scripts

This suite of, currently, 7 scripts by Hawker are another must for modders and ROM flashers. They offer a quick reliable way of cleaning your system in preparation for installing ROM's, kernels and mods and can help prevent a lot of problems by correctly preparing your phone. Particularly useful is the GS4CacheWipe which can resolve bootloops from flashing.


Continued in next post...


ironass motto... "Flash in haste... repent at leisure" ;)

If someone has helped you then be polite and select their Thanks button.
The "Search this Thread" button is your friend.
 
Upvote 0
Tips for using this Dummies Guide.

I have tried to keep this, "Dummies Guide", as simple and easy to understand as possible for absolute beginners, with no prior knowledge of Android and the Samsung Galaxy S4, whilst trying to cover the most commonly asked questions about rooting.

#4.1. Please take the time to read posts #1, #2 and #3 carefully and thoroughly before posting a question as they should contain most of the answers you require.

#4.2. If a reply to a question states, "See, #1.7". It means that the answer to your query is already contained in post #1, item #7. Re-read that item again, carefully, and it should answer your question and saves the time and trouble of having to repeat things all over again.

#4.3. When posting a question you must include your phone model version and firmware details, see #1.2 and #1.3 of 28 Galaxy S4 models - know yours?, to avoid confusion. If you have used another method to try and root your phone, other than the one in posts #1 and #2 of this thread, could you please post a link as this may help in discovering your problem.

#4.4. Please, please, please, help keep this thread on topic. It is designated for the actual rooting of your phone and not for general questions about custom kernels, custom ROMs, modems, Kies connection problems, apps, ROM Manager, nandroid backups and restores, etc: There are other threads on the forum for that or you can start one of your own.

#4.5. Please do not PM me with rooting questions. I will not reply. Ask them on the forum so that others may benefit from the questions and answers.


#4.6. WARNING

Rooting your phone could, in theory, void your warranty. Also, in most cases, you will no longer be able to update your phone via Kies or OTA, (Over The Air), and will need to flash ROM's via Odin or CWM Recovery... which is probably why you rooted anyway!

Whilst I have taken every care in compiling this guide, I cannot be held responsible for any damage that may occur through its use, or mis-use, and the decision to use this guide lies with you, the owner.

This guide is written solely for, and on behalf of, Android Forums and may not be reproduced, in part or whole, without permission.


THANKS

My thanks go to the following for their help and contributions to this guide:-

Chainfire for the kernels and original instructions. Feel free to make a donation to Chainfire.

Phil3759 for his kernel and instructions. Feel free to make a donation to Phil3759.

To our very own Hawker, for his Kies troubleshooting guide.

To Nokia7Vista, olis4 and FastGSMServer for their videos.

To all the Android Forum posters whose posts I have plundered in an attempt to organise a definitive guide.


ironass motto... "Flash in haste... repent at leisure" ;)

If someone has helped you then be polite and select their Thanks button.
The "Search this Thread" button is your friend.
 
Upvote 0
Shall press thanks even though your too late to help me :p

Ungrateful wretch! ;)

It takes hours of research and testing to put together a guide like this. My flash counter stands at 32 at the moment! Unlike the SGSII forum, I'm missing my 2 cohorts, Hawker and Syd at the moment. Hawker for his undoubted technical know-how and Syd who possessed all the qualifications of a phone test pilot.... brave, fearless, intrepid and... above all...


stupid enough to do it! :stupido3:

Seriously though, as always great job! Let's just await the questions and the people who can't/won't read before flashing! Lol

As you will know from previous Dummies Guides, by far the largest number of posts are from people who simply do not bother to read them through properly. Hence the ironass motto at the foot of each post... "Flash in haste... repent at leisure". :banghead:

My next Dummies Guide...

 
Upvote 0
I got myself a Galaxy S4 with O2 (UK) yesterday and today found out that I can't even use App2SD because of the way Samsung have set the phone up, so I decided to root the thing and get some functionality back!

Thanks for creating this guide, I went over a few others but they weren't as clear and concise as this one, plus I couldn't find one that sounded like it would work with my particular carrier.

I'm happy to report that it worked absolutely fine for the initial rooting and installation of the PhilZ recovery.

However, when moving onto the next step and installing ROM Manager, when opening the program up it is asking me to install CWM Recovery and no matter which option I choose I'm taken to a screen listing phone models, of which the S4 is not one of them.

While I'm not in any rush right now to install a custom ROM, it would be nice to have the option. Any suggestions as to why it's doing this/why the phone is not listed?

Edit: OK, retract that slighty, it's now showing Current Recovery: ClockworkMod 6.0.3.2. Although if I tell it to update it, again it asks me to choose a handset, which the S4 is not on.
 
Upvote 0
Hello and welcome to Android Forums thefold! :)

I got myself a Galaxy S4 with O2 (UK) yesterday and today found out that I can't even use App2SD because of the way Samsung have set the phone up, so I decided to root the thing and get some functionality back!

Moving apps to SD is included in firmware releases from MEA onwards. See, here.

However, when moving onto the next step and installing ROM Manager, when opening the program up it is asking me to install CWM Recovery and no matter which option I choose I'm taken to a screen listing phone models, of which the S4 is not one of them.

In ROM Manager > Recovery Setup > Install or Update Recovery > Unsupported device (Device not listed above) > select Yes when prompted with your phone version.
 
Upvote 0
I realize this has to be a pretty ret@arded question.. but when I follow these directions to deduce exactly which version/model S4 I've got, I see "SCH-I545".

I just Googled, Samsung Galaxy SCH-I545 and got...

Samsung Galaxy S 4 | Verizon Android Smartphone | Samsung Mobile

Android Forum for that is here...

(Verizon) Galaxy S4 - All Things Root - Android Forums

I've googled such & am still not sure which of the versions listed in the beginning of original post I've got?

Neither of them... obviously!

I thought this guide was for absolute beginners. :eek:

It is for absolute beginners. Which is why I ask people to check the model of their phone before proceeding in case it is not either of the two versions that this International forum and rooting thread are concerned with... as you have now found out! ;)

EDIT I'm guessing that you knew that you had a Verizon phone as you have been posting in the All Things Root forum for Verizon, here less than an hour before you posted on here. :rolleyes:
 
Upvote 0
I've been reading rooting guides for weeks and this is definitely one of the best. I'm totally new to Android phones, the only thing I don't like about my S4 is not being able to store apps completely on the memory card. I have a few questions that weren't covered off above.

1. Does the phone have to be unlocked from the network before you can root it?
2. Do you need to modify a "bootloader" at any stage?
3. How many of the above steps (rooting, custom recovery, custom ROM) do I have to complete before I can move apps fully to my SD card? Just rooting?
4. My baseband version was recently updated to I9505XXUBMEA - do we know if the above guide will still work?
5. I've read that some phones have "unrootable" kernals. My current version is 3.4.0-768421 - again, does that kernal version set off alarm bells?
6. Is there a way to find out if I definitely have Snapdragon?
7. I've read other guides where it says you can still get updates thru KEIS and OTA post-root. Does following this guide definitely mean all future updates will have to be manually thru Odin?

Sorry for double-checking every detail. I'm just very weary of breaking my phone and not being able to get it sorted under warranty. I don't want to "flash in haste, repent at leisure"! My other details are below, just in case.

Samsung S4 GT-I9505
Android 4.2.2
Baseband as above
Network: O2
Kernal as above

I've wanted to do this for weeks now (phone is already full with apps/games that can't currently be moved to the SD) but, like I say, I'm scared of "bricking" my phone.

Any help would be greatly, greatly appreciated!

Hello and welcome to Android Forums cowie86! :)

Lets just run through the answers to your questions...

1. No

2.No

3. Depends on the method you intend using to fully move apps. Stock firmware from MEA onwards will move the app but not the data. Maybe a forum post can help. See #4.4

4. Yes. Your modem is not affected.

5. No

6. All GT-i9505's have Qualcomm APQ8064T Snapdragon 600. See, here.

7. Just rooting your phone should mean that you will still be able to update.
 
Upvote 0
Thanks very much for such a prompt reply ironass, I'm thinking about rooting my S4 this evening. I just have two more questions:
1. After odin finishes the rooting process, the phone reboots in its normal mode, and I just disconnect the USB wire? Phone doesnt have to be turned off before disconnecting? And there's no 'disconnect' button I need to hit anywhere on screen before I pull the cable?
2. The link to the video in #2.5 doesn't seem to be working. Do you have a link to another video showing whatever was in the original one?

Thanks again for all the help!

1. No. As per #2.4

2. Link repaired
 
Upvote 0

BEST TECH IN 2023

We've been tracking upcoming products and ranking the best tech since 2007. Thanks for trusting our opinion: we get rewarded through affiliate links that earn us a commission and we invite you to learn more about us.

Smartphones