
The original thread, and all of my posts, were deleted in a freak electrical storm that gave me super human strength. Luckily Google Cache managed to save this page long enough for me to hit copy/paste.
----
I've seen a few guides around the internet in regards to activating a G1 over wifi without a data package, and decided to test it myself. Since it worked, I'm compiling the information that I've gathered into one easy-to-read thread. This guide assumes that you have a semi-working knowledge of the command prompt or terminal.
Standard disclaimer:
Bricked phones, not my fault.
The Setup
1x Stock G1 running cupcake, this phone has no root modifications on it.
1x USB cable
1x SD card, at least 128MB
The image file to downgrade to version RC29 of Android, download here
ADB for your computer:
Linux Download
Mac Download
Windows Download
Windows Only:
AdbWinApi.dll, place in same folder as ADB.exe
Windows Drivers for Android (Tested on XP/Win7 only) If anyone can confirm these drivers work on other Windows OSs, please post.
--End Setup--
1. Ensure that your SD card is formated FAT32, and place the DREAIMG.nbh, that came out of the DREAIMG-RC29.zip file, in the root directory of the SD card. (No, DREAIMG is not a typo.)
2. With the phone off, insert the SD card into your G1.
3. While holding down the camera button, turn on the phone.
3a. You should see a rainbow screen, followed almost immediately by a gray screen. (mileage and colors may vary)
3b. One of the lines on the phone should read: "Press power button to start update image".
3c. Press the power button
3d. Wait for the entire process to complete, do not interrupt! It will tell you it is done updating.
4. Reboot phone.
Download the appropriate ADB file for your system, if you're on a Windurrs machine you'll need to download and install the Android drivers as well.
Ok, we're done rolling back to RC29; and we have access to the 'sploit which gives us terminal access without seeing the terminal.
Until I tell you to later on, do not touch the screen for any reason. During the rollback process the screen has turned into hot lava and will burn your hand if you touch it. If you can't resist, and touch the screen not only will you be sans one digit but you get to reboot your phone and start over.
You should now be at this screen:
5. Hit <enter>, type "reboot"(no quotes), and hit enter again.
5a. If all went well your phone just rebooted, yay good thing!
6. We're back to the last screen.
7. Plug your phone into your computer using your USB cable.
8. If you mistype this step or it doesn't work(because you mistyped), you'll need to reboot your phone and try, try again.
9. Hit <enter>, type "setprop persist.service.adb.enable 1"(no quotes), hit <enter>
9b. If all went well you should get an error message saying something like "cannot dial 7387767 7377478.7378423.232.362253 1, it's not an emergency number. This is a good thing, we hope.
10. Set your phone down.
11. Open a terminal on your computer, and navigate to the folder containing the adb file you downloaded earlier.
12. If all is well, you should be able to type "adb" and get a big screen of options.
13. Type "adb devices".
13a. You should see the following:
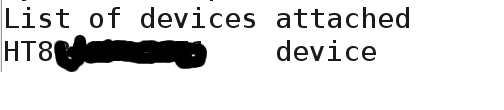
13b. If all you see is "list of devices attached", and nothing below it, reboot your phone and move back to step 8.
13c. type "adb shell" (no quotes)
14. Copy and paste "am start -a android.intent.action.MAIN -n com.android.settings/.Settings" into your terminal.(no quotes)
15. If your copy+paste-fu is strong, you'll see this screen:
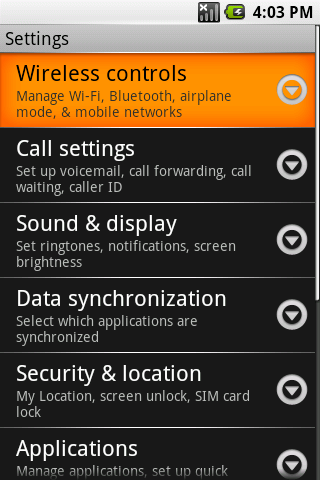
16. Hit "Wireless Controls" (The screen is no longer hot lava)
17. Now you're at:
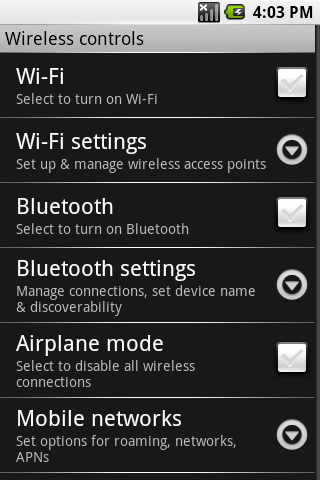
18. Hit Wi-Fi settingsm you're now at:
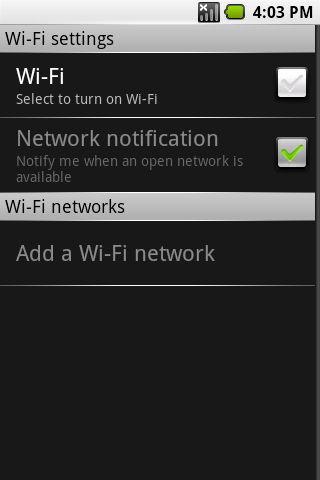
19. Turn on your wifi, and configure your network as necessary.
20. Hit the back button until you are back to this screen:
21. Run the standard setup instructions.
If all went well, you should now see:
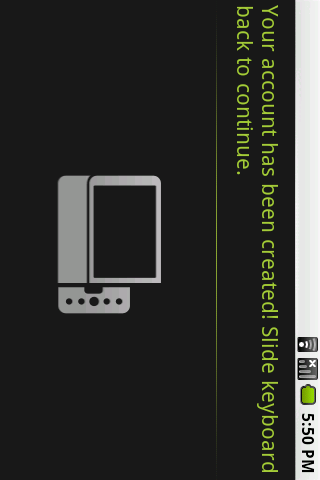
Congratulations, you just stuck it to the man and activated your G1 without the data package.
Thanks to Noonehereyet for running Get Your Droid On, where you download the DREAIMG.nbh, and where you can find all sorts of G1 builds, rooted or not.
And thanks to Balazer for catching the missing step 13c.
----
I've seen a few guides around the internet in regards to activating a G1 over wifi without a data package, and decided to test it myself. Since it worked, I'm compiling the information that I've gathered into one easy-to-read thread. This guide assumes that you have a semi-working knowledge of the command prompt or terminal.
Standard disclaimer:
Bricked phones, not my fault.
The Setup
1x Stock G1 running cupcake, this phone has no root modifications on it.
1x USB cable
1x SD card, at least 128MB
The image file to downgrade to version RC29 of Android, download here
ADB for your computer:
Linux Download
Mac Download
Windows Download
Windows Only:
AdbWinApi.dll, place in same folder as ADB.exe
Windows Drivers for Android (Tested on XP/Win7 only) If anyone can confirm these drivers work on other Windows OSs, please post.
--End Setup--
1. Ensure that your SD card is formated FAT32, and place the DREAIMG.nbh, that came out of the DREAIMG-RC29.zip file, in the root directory of the SD card. (No, DREAIMG is not a typo.)
2. With the phone off, insert the SD card into your G1.
3. While holding down the camera button, turn on the phone.
3a. You should see a rainbow screen, followed almost immediately by a gray screen. (mileage and colors may vary)
3b. One of the lines on the phone should read: "Press power button to start update image".
3c. Press the power button
3d. Wait for the entire process to complete, do not interrupt! It will tell you it is done updating.
4. Reboot phone.
Download the appropriate ADB file for your system, if you're on a Windurrs machine you'll need to download and install the Android drivers as well.
Ok, we're done rolling back to RC29; and we have access to the 'sploit which gives us terminal access without seeing the terminal.
Until I tell you to later on, do not touch the screen for any reason. During the rollback process the screen has turned into hot lava and will burn your hand if you touch it. If you can't resist, and touch the screen not only will you be sans one digit but you get to reboot your phone and start over.
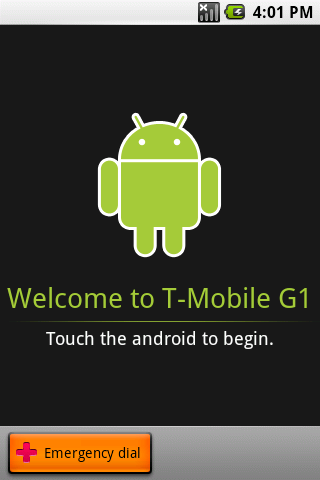
You should now be at this screen:
5. Hit <enter>, type "reboot"(no quotes), and hit enter again.
5a. If all went well your phone just rebooted, yay good thing!
6. We're back to the last screen.
7. Plug your phone into your computer using your USB cable.
8. If you mistype this step or it doesn't work(because you mistyped), you'll need to reboot your phone and try, try again.
9. Hit <enter>, type "setprop persist.service.adb.enable 1"(no quotes), hit <enter>
9b. If all went well you should get an error message saying something like "cannot dial 7387767 7377478.7378423.232.362253 1, it's not an emergency number. This is a good thing, we hope.
10. Set your phone down.
11. Open a terminal on your computer, and navigate to the folder containing the adb file you downloaded earlier.
12. If all is well, you should be able to type "adb" and get a big screen of options.
13. Type "adb devices".
13a. You should see the following:
13b. If all you see is "list of devices attached", and nothing below it, reboot your phone and move back to step 8.
13c. type "adb shell" (no quotes)
14. Copy and paste "am start -a android.intent.action.MAIN -n com.android.settings/.Settings" into your terminal.(no quotes)
15. If your copy+paste-fu is strong, you'll see this screen:
16. Hit "Wireless Controls" (The screen is no longer hot lava)
17. Now you're at:
18. Hit Wi-Fi settingsm you're now at:
19. Turn on your wifi, and configure your network as necessary.
20. Hit the back button until you are back to this screen:
21. Run the standard setup instructions.
If all went well, you should now see:
Congratulations, you just stuck it to the man and activated your G1 without the data package.
Thanks to Noonehereyet for running Get Your Droid On, where you download the DREAIMG.nbh, and where you can find all sorts of G1 builds, rooted or not.
And thanks to Balazer for catching the missing step 13c.
")


