
D
Deleted User
Guest

To prepare your device for reinstallation here are some files you need to continue to use this guide, if you already have these then skip over to step 1:
Odin3 v3.13.3:
https://www.androidsage.com/wp-content/uploads/2019/07/Odin3-v3.13.3.zip
SamFirm Tool v0.3.6:
https://www.androidsage.com/wp-content/uploads/2016/03/SamFirm_v0.3.6.zip
You will also need to install these in order for SamFirm to work:
Microsoft Visual C++ 2008 Redistributable Package (x86):
http://www.microsoft.com/en-us/download/details.aspx?id=29
Microsoft Visual C++ 2010 Redistributable Package (x86):
http://www.microsoft.com/en-us/download/details.aspx?id=5555
Microsoft .NET Framework v3.5:
https://www.microsoft.com/en-us/download/confirmation.aspx?id=21
Android Studio:
https://developer.android.com/studio
Samsung USB Drivers:
https://developer.samsung.com/galaxy/others/android-usb-driver-for-windows
Step 1: You will need to download your firmware for your device below is a diagram of what SamFirm looks like if yours isn't the one shown its a fake:
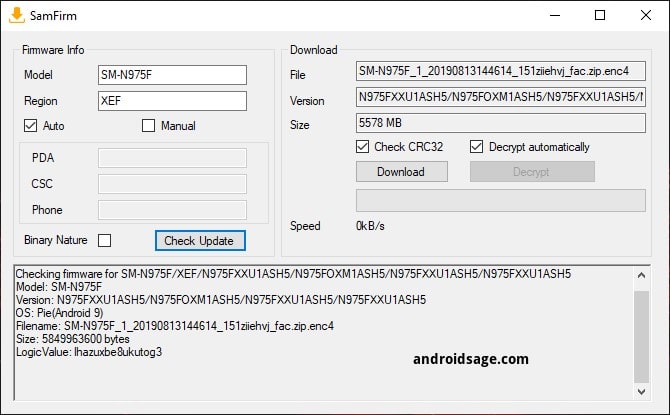
To prepare finding the correct firmware you will need to enter your model # in the "Model" field and enter your carrier in the "Region" field to find your reigion you can use an app called SamInfo this will help you find your reigion code. Ensure your select "Auto" to go based on the model and reigion fields and it's the easiest method!
Notice: Remember your region code is not the country you live in it is based on your carrier code for example for Sprint it will be entered like this "SPR" if you do not do this you will get an error.
Step 2:
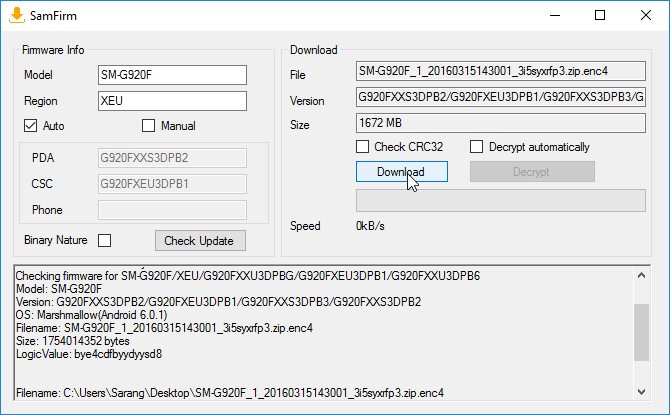
Now that you entered the model info you will see the firmware pop up on the top right fields as you see displaying all arrows to help you out below ensure everything is popped up as you see in the image:
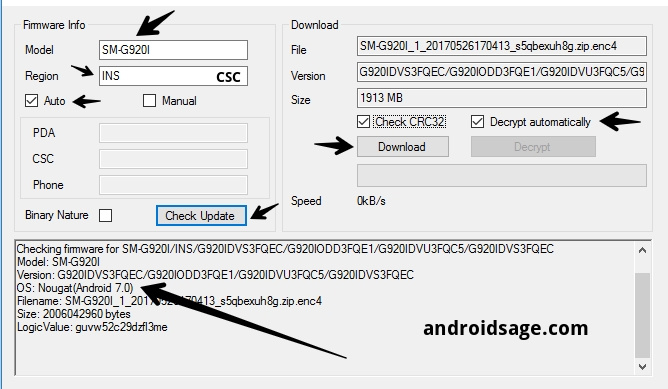
Ensure that Check CRC32 & Decrypt automatically and click "Download" depending on your internet connection speeds will depend how fast the download takes as shown below:
Step 4:
Once the download has completed it will be available in the folder named "Documents" that's if you saved it there and extract the zip.
Once extracted you will need to extract the "Odin3_v3.13.3" zip and you will see it in its separate folder.
Once extracted you will need to move all the files in the firmware folder you have extracted and move them to the folder that contains the Odin3 files.
Step 5:
Now that you moved your files into odin3's folder you will need to boot you note 10/10+ in the bootloader
To do this you will need to have android studios installed and the samsung drivers installed.
In your CMD (Command Prompt) type ths in this order top to bottom:
1) cd appdata
2) cd local
3) cd android
4) cd sdk
5) cd platform-tools
after this you should see this path
C"/Users/YourUsername/Appdata/Android/Sdk/Platform-Tools"
Now once you see it plug in your note 10/10+ make sure usb debugging is enabled and allow your phone to connect as a prompt may pop up!
Now type in your command prompt this line:
adb reboot recovery
You should see your note10/10+ reboot into your recovery. Once in your recovery select reboot to bootloader and it will boot into your bootloader and ensure you have it plugged into your PC.
Step 6:
Once you have it plugged in you will need to open your odin3 it should look like this:
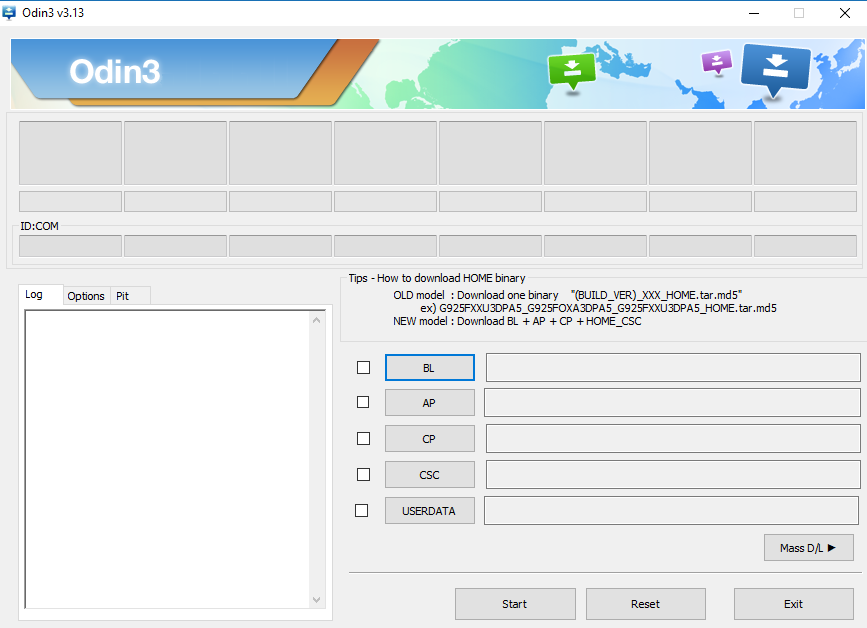
You will see a little number show up in the left side if you see this number odin3 has successfully detected your device, if nothing shows up you need to reinstall the drivers etc or retrace your steps
On the right side you will see 5 different buttons each one goes according to what you see in the folder with the files in the odin3 folder that we instructed you to move the firmware files into in the earlier steps
• BL: Bootloader partition (bios)
• AP: System partition (boot)
• CP: Modem Partition (Vendor)
• CSC: Customer Software Customization
• USERDATA: Factory Reset
To figure out witch file goes where i will guide you where to place them and i used my firmware of my device as an example each button is where the file must go be sure you pay attention to the 1st two letters this will tell you where the file goes in each button as shown below, but some will have more the 3 words but their the same process:
Be aware the the AP file will take the longest to varify, so during this process do not touch anything or add new files to other buttons till its done checking otherwise odin3 will crash and you will have to do it all over again.
This file goes into the AP button:
"AP_N975USQS2BSLA_CL17481071_QB227977300_REV00_user_low_ship_MULTI_CERT_meta_OS10.tar.md5"
This file goes into the BL button:
"BL_N975USQS2BSLA_CL17481071_QB227977300_REV00_user_low_ship_MULTI_CERT.tar.md5"
This files goes into the CP button:
"CP_N975USQS2BSLA_CP14662403_CL17481071_QB227977300_REV00_user_low_ship_MULTI_CERT.tar.md5"
This file goes into the CSC button:
"CSC_OMC_OYN_N975USQS2BSLA_CL17481071_QB227977300_REV00_user_low_ship_MULTI_CERT.tar.md5"
This file goes into the USERDATA button:
"USERDATA_SPR_N975USQS2BSLA_CL17481071_QB227977300_REV00_user_low_ship_MULTI_CERT.tar.md5"
Step 6:
Once everything is added to their appropriate buttons you can now start the flashing during this time we RECOMMEND you to not touch the program till it says PASS and make sure you do not turn off your device during the flashing process this lead to severe reprocussions if power or connection is lost between your PC and your Note10/10+
The install may take up to 15 minutes or less to complete, once it's completed your note10/10+ will reboot, factory reset to complete installation and then reboot, and your done you successfully reinstalled your firmware enjoy
If you liked this guide, consider rating the guide and share it as well to help others!
Thank you for reading!
Last edited by a moderator:


