
Hey everybody, just wanted to share the below build.prop performance tweaks. I have been using them for some time now trying different values to see what works the best. From what I have been able to tell any difference made using these tweaks is most noticeable using Stock or a Stock based Roms. Performance wise I would not expect to find the Holy Grail within these lines but they do seem to make a difference and can help with a few minor annoyances. Feel free to test them out and let everyone know what you think, at your own risk that is.
General Performance
debug.sf.hw=1
Edit existing line,
dalvik.vm.heapsize=48m
persist.sys.ui.hw=1
Faster Scrolling
ro.max.fling_velocity=12000
ro.min.fling_velocity=8000
Saves power
ro.ril.disable.power.collapse=1
pm.sleep_mode=1
windowsmgr.max_events_per_sec=60
wifi.supplicant_scan_interval=180
*If you don’t keep Wi-Fi active lowering the value below the default of 90 seems to make Wi-Fi connect faster after being turned on but will consume more power if turning Wi-Fi off has been forgotten when not in range of a known network.
ro.mot.eri.losalert.delay=1000
*Should smooth out disconnects and reconnects, saving battery. Seems to brake tethering with CM7, let me know if anyone else experiences this issue.
Raises quality of images
ro.media.enc.jpeg.quality=90
[FONT="]ro.media.dec.jpeg.memcap=8000000
ro.media.enc.hprof.vid.bps=8000000[/FONT]
Increased Media & Streaming Performance
media.stagefright.enable-player=true
media.stagefright.enable-meta=true
media.stagefright.enable-scan=false
media.stagefright.enable-http=true
net.tcp.buffersize.default=4096,87380,256960,4096, 16384,256960 net.tcp.buffersize.wifi=4096,87380,256960,4096,163 84,256960
[FONT="]net.tcp.buffersize.umts=4096,87380,256960,4096,163 84,256960
net.tcp.buffersize.gprs=4096,87380,256960,4096,163 84,256960
net.tcp.buffersize.edge=4096,87380,256960,4096,163 84,256960[/FONT]
net.tcp.buffersize.evdo_b=4096,87380,256960,4096,16384,256960
*Note: I don't know why but the forum is placing spaces in the above lines that are not there. The last 3 are for data speeds but have been places here to avoid multiple explanations for the spaces. The spaces are not present when I edit and have even tried retyping them in Word and then pasting the lines in but it still shows the spaces after saving, kind of frustrating. The ends for the above lines should all be the same ending values for each line ([FONT="]=4096,87380,256960,4096,16384,256960).[/FONT] I don’t know why but for whatever reason anytime I save the post the spaces appear.
Disable error checking (Should speed things up a bit)
ro.kernel.android.checkjni=0
ro.kernel.checkjni=0
Disable sending usage data
ro.config.nocheckin=1
[FONT="]To make the phone ring faster when dialing out[/FONT]
[FONT="]ro.telephony.call_ring.delay=0[/FONT]
Disable black screen issue after call (Thanks to Whyzor for finding why looking into the other tweaks)
ro.lge.proximity.delay=25
mot.proximity.delay=25
Disable USB Debugging icon from Status Bar. (Just the Icon, debugging remains enabled.)
persist.adb.notify=0
makes apps load faster and frees more ram. (Edit exsisting line)
dalvik.vm.dexopt-flags=m=v,o=y
Improve 3g data speeds
ro.ril.hsxpa=2
ro.ril.gprsclass=10
ro.ril.hep=1
ro.ril.enable.dtm=1
ro.ril.hsdpa.category=10
ro.ril.enable.a53=1
ro.ril.enable.3g.prefix=1
ro.ril.htcmaskw1.bitmask=4294967295
ro.ril.htcmaskw1=14449
ro.ril.hsupa.category=5
Wipe both Caches in Recovery after adding or changing the above lines.
If you have used the 3g script put out by the developer of theV6 Turbocharger script then they have already been applied to your device.
Next few can be found in the CM7 Performance settings but am including them in case someone would like to use them on another Rom like Miui.
Lock Home Screen into memory
ro.HOME_APP_ADJ=1
Use Jit (Dalvik just-in-time compiler)
dalvik.vm.execution-mode=int:jit
Enable Surface dithering (Improves image quality at the cost of performance)
persist.sys.use_dithering=1
Allow purging of assets (System can free more Ram when needed)
persist.sys.purgeable_assets=1
Disable animation for faster startup
[FONT="]debug.sf.nobootanimation=1[/FONT]
To apply any of the above Tweaks you will need a File Explorer with Root Permission. I use Root Explorer so the below steps are assuming Root Explorer is being used. This can also be done using ADB or QtADB; if ADB would be preferred in place of a File Explorer then you probably do not need directions for doing so. You will find instructions for using the QtADB interface below. It is also important to check that any of these lines have been included with your Rom as I know since posting these originally some have now been worked into a few custom Roms for the Triumph.
1, Navigate into the system folder.
2, Mount the folder as R/W by tapping on the Mount R/W tab found at the top of the screen.
3, Long press on the Build.prop file and select open with text editor.
4, Add desired lines at the bottom of the script.
5, Tap menu key and select save and exit. The original Build.prop will be saved as Build.prop.bak.
6, Save the file in safe place just in case you would like to switch back
7, Reboot!
Please note that on occasion a 2nd reboot was required for the tweak was applied, USB debugging notification for example. Unless noted I have not had any issues with these lines breaking anything. With that said I also wipe both the Dalvik and Cache Partitions when performing the reboot.
This can also be done very easily using QtADB for those who are not familiar with ADB. QtADB can be installed in a few minutes by following the directions provided in the link below.
http://androidforums.com/triumph-all-things-root/494579-adb-gui-noobs.html
Once installed among many other very useful features this will give you the ability to just drag and drop the Roms Build.prop file onto your computers desktop, open the file in notepad or on other text editor, add the desired lines and then drag & drop the modified Build.prop file back into the system directory on the Triumph and reboot the phone all on your computer and without actually touching the device.
Before giving more details on how to use QtADB for the purpose of modifying the Build.prop having ADB in some form or another can be very helpful in general. One example is that after updating to CM7 one of my favorite Apps would FC when started. I was able to do a logcat with ADB and send it to the developer of the app. Based on the information provided in the logcat the developer was able to fix the issue in the next release. Anyway it’s very simple so here we go,
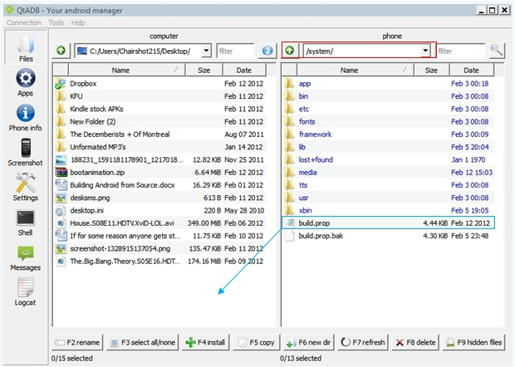
1, select /system/ from the dropdown outlined above in Red.
2, Drag and drop the Build.prop file highlighted Blue into the adjacent area on the left, follow the blue arrow. I have desktop selected for easier navigation but ware on the computer the file is moved does not matter as long as you remember where the file has been moved. Changing the location the file is saved is as easy as selecting the directory from the dropdown like was done with the Red outlined box in the first step above.
3 open the build.prop file now located on your computer inside notepad or another text editor, add the lines you would like to use at the end of the text file and then save. In notepad you may need to select Word Rap from the format tab from the menu at the top of the Notepad Window for the file to display correctly. I use notepad ++ and never have issues with the file displaying incorrectly. Would highly recommend making a copy of the original build.prop before editing and keeping in a safe place before editing the file.
Notepad++ can be downloaded here,
http://notepad-plus-plus.org/download/v5.9.8.html
4, once we have made our edits it’s time to move the modified file back to the Triumph. Drag and Drop the modified Build.prop back into the devices system folder. Follow the blue arrow from the below example.
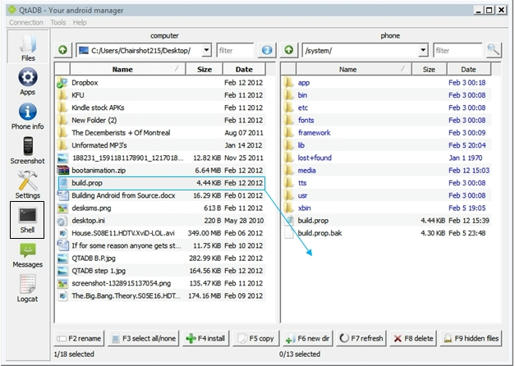
5, after the file has been moved back into the system folder select the Shell tab outlined in the black box.
6, Type reboot into the command line and your Triumph will now reboot using the modified Build.prop. Please note that on occasion a 2nd reboot was required for the tweak was applied, USB debugging notification for example. Unless noted I have not had any issues with these lines breaking anything. With that said I also wipe both the Dalvik and Cache Partitions when performing the reboot. If you would like to wipe caches just type "reboot" recovery into the command line.
I also came across this App for editing the build.prop. I don't have much experience with the App but if anyone would like to check it out,
https://market.android.com/details?id=com.joeykrim.buildpropeditor
These are lines that I am either currently testing or plan on testing. If anyone would like to quicken the process feel free to try them and let everyone know how they work out. Again, at your own risk. I have not tested the majority of the below lines, much less research what they exactly do. The little notes on the side are more of a guideline of what to be looking for if tested and do not guarantee they will not do anything. Just picked them out as ones I found interesting from other Forums around the Web. So basically if you do not feel comfortable recovering from a boot loop just wait it out.
debug.qctwa.statusbar=1 (qualcomm device specific)
debug.qctwa.preservebuf=1 (qualcomm device specific)
debug.qc.hardware=true (qualcomm device specific)
com.qc.hardware=true (qualcomm device specific)
ro.telephony.sms_segment_size=160
persist.telephony.support.ipv6=1
persist.telephony.support.ipv4=1
ro.config.hw_fast_dormancy=1
persist.sys.shutdown.mode = hibernate
ro.config.hw_power_saving=true
ro.media.enc.hprof.vid.fps=65
ro.config.vc_call_steps=20 (Makes more volume steps in calls and a little louder.)
dalvik.vm.dexopt-flags=v=n,o=v
dalvik.vm.checkjni=0
debug.egl.profiler=1
debug.egl.hw=1
ro.ril.enable.amr.wideband=1 (better in call voice quality)
ro.mot.hw.HAC=1
ENFORCE_PROCESS_LIMIT=false
persist.sampling_profiler=0
ro.min_pointer_dur=5
ro.config.nocheckin=1
profiler.force_disable_err_rpt=1
profiler.force_disable_ulog=1
debug.kill_allocating_task=0
dalvik.vm.dexopt-flags=m
General Performance
debug.sf.hw=1
Edit existing line,
dalvik.vm.heapsize=48m
persist.sys.ui.hw=1
Faster Scrolling
ro.max.fling_velocity=12000
ro.min.fling_velocity=8000
Saves power
ro.ril.disable.power.collapse=1
pm.sleep_mode=1
windowsmgr.max_events_per_sec=60
wifi.supplicant_scan_interval=180
*If you don’t keep Wi-Fi active lowering the value below the default of 90 seems to make Wi-Fi connect faster after being turned on but will consume more power if turning Wi-Fi off has been forgotten when not in range of a known network.
ro.mot.eri.losalert.delay=1000
*Should smooth out disconnects and reconnects, saving battery. Seems to brake tethering with CM7, let me know if anyone else experiences this issue.
Raises quality of images
ro.media.enc.jpeg.quality=90
[FONT="]ro.media.dec.jpeg.memcap=8000000
ro.media.enc.hprof.vid.bps=8000000[/FONT]
Increased Media & Streaming Performance
media.stagefright.enable-player=true
media.stagefright.enable-meta=true
media.stagefright.enable-scan=false
media.stagefright.enable-http=true
net.tcp.buffersize.default=4096,87380,256960,4096, 16384,256960 net.tcp.buffersize.wifi=4096,87380,256960,4096,163 84,256960
[FONT="]net.tcp.buffersize.umts=4096,87380,256960,4096,163 84,256960
net.tcp.buffersize.gprs=4096,87380,256960,4096,163 84,256960
net.tcp.buffersize.edge=4096,87380,256960,4096,163 84,256960[/FONT]
net.tcp.buffersize.evdo_b=4096,87380,256960,4096,16384,256960
*Note: I don't know why but the forum is placing spaces in the above lines that are not there. The last 3 are for data speeds but have been places here to avoid multiple explanations for the spaces. The spaces are not present when I edit and have even tried retyping them in Word and then pasting the lines in but it still shows the spaces after saving, kind of frustrating. The ends for the above lines should all be the same ending values for each line ([FONT="]=4096,87380,256960,4096,16384,256960).[/FONT] I don’t know why but for whatever reason anytime I save the post the spaces appear.
Disable error checking (Should speed things up a bit)
ro.kernel.android.checkjni=0
ro.kernel.checkjni=0
Disable sending usage data
ro.config.nocheckin=1
[FONT="]To make the phone ring faster when dialing out[/FONT]
[FONT="]ro.telephony.call_ring.delay=0[/FONT]
Disable black screen issue after call (Thanks to Whyzor for finding why looking into the other tweaks)
ro.lge.proximity.delay=25
mot.proximity.delay=25
Disable USB Debugging icon from Status Bar. (Just the Icon, debugging remains enabled.)
persist.adb.notify=0
makes apps load faster and frees more ram. (Edit exsisting line)
dalvik.vm.dexopt-flags=m=v,o=y
Improve 3g data speeds
ro.ril.hsxpa=2
ro.ril.gprsclass=10
ro.ril.hep=1
ro.ril.enable.dtm=1
ro.ril.hsdpa.category=10
ro.ril.enable.a53=1
ro.ril.enable.3g.prefix=1
ro.ril.htcmaskw1.bitmask=4294967295
ro.ril.htcmaskw1=14449
ro.ril.hsupa.category=5
Wipe both Caches in Recovery after adding or changing the above lines.
If you have used the 3g script put out by the developer of theV6 Turbocharger script then they have already been applied to your device.
Next few can be found in the CM7 Performance settings but am including them in case someone would like to use them on another Rom like Miui.
Lock Home Screen into memory
ro.HOME_APP_ADJ=1
Use Jit (Dalvik just-in-time compiler)
dalvik.vm.execution-mode=int:jit
Enable Surface dithering (Improves image quality at the cost of performance)
persist.sys.use_dithering=1
Allow purging of assets (System can free more Ram when needed)
persist.sys.purgeable_assets=1
Disable animation for faster startup
[FONT="]debug.sf.nobootanimation=1[/FONT]
To apply any of the above Tweaks you will need a File Explorer with Root Permission. I use Root Explorer so the below steps are assuming Root Explorer is being used. This can also be done using ADB or QtADB; if ADB would be preferred in place of a File Explorer then you probably do not need directions for doing so. You will find instructions for using the QtADB interface below. It is also important to check that any of these lines have been included with your Rom as I know since posting these originally some have now been worked into a few custom Roms for the Triumph.
1, Navigate into the system folder.
2, Mount the folder as R/W by tapping on the Mount R/W tab found at the top of the screen.
3, Long press on the Build.prop file and select open with text editor.
4, Add desired lines at the bottom of the script.
5, Tap menu key and select save and exit. The original Build.prop will be saved as Build.prop.bak.
6, Save the file in safe place just in case you would like to switch back
7, Reboot!
Please note that on occasion a 2nd reboot was required for the tweak was applied, USB debugging notification for example. Unless noted I have not had any issues with these lines breaking anything. With that said I also wipe both the Dalvik and Cache Partitions when performing the reboot.
This can also be done very easily using QtADB for those who are not familiar with ADB. QtADB can be installed in a few minutes by following the directions provided in the link below.
http://androidforums.com/triumph-all-things-root/494579-adb-gui-noobs.html
Once installed among many other very useful features this will give you the ability to just drag and drop the Roms Build.prop file onto your computers desktop, open the file in notepad or on other text editor, add the desired lines and then drag & drop the modified Build.prop file back into the system directory on the Triumph and reboot the phone all on your computer and without actually touching the device.
Before giving more details on how to use QtADB for the purpose of modifying the Build.prop having ADB in some form or another can be very helpful in general. One example is that after updating to CM7 one of my favorite Apps would FC when started. I was able to do a logcat with ADB and send it to the developer of the app. Based on the information provided in the logcat the developer was able to fix the issue in the next release. Anyway it’s very simple so here we go,
1, select /system/ from the dropdown outlined above in Red.
2, Drag and drop the Build.prop file highlighted Blue into the adjacent area on the left, follow the blue arrow. I have desktop selected for easier navigation but ware on the computer the file is moved does not matter as long as you remember where the file has been moved. Changing the location the file is saved is as easy as selecting the directory from the dropdown like was done with the Red outlined box in the first step above.
3 open the build.prop file now located on your computer inside notepad or another text editor, add the lines you would like to use at the end of the text file and then save. In notepad you may need to select Word Rap from the format tab from the menu at the top of the Notepad Window for the file to display correctly. I use notepad ++ and never have issues with the file displaying incorrectly. Would highly recommend making a copy of the original build.prop before editing and keeping in a safe place before editing the file.
Notepad++ can be downloaded here,
http://notepad-plus-plus.org/download/v5.9.8.html
4, once we have made our edits it’s time to move the modified file back to the Triumph. Drag and Drop the modified Build.prop back into the devices system folder. Follow the blue arrow from the below example.
5, after the file has been moved back into the system folder select the Shell tab outlined in the black box.
6, Type reboot into the command line and your Triumph will now reboot using the modified Build.prop. Please note that on occasion a 2nd reboot was required for the tweak was applied, USB debugging notification for example. Unless noted I have not had any issues with these lines breaking anything. With that said I also wipe both the Dalvik and Cache Partitions when performing the reboot. If you would like to wipe caches just type "reboot" recovery into the command line.
I also came across this App for editing the build.prop. I don't have much experience with the App but if anyone would like to check it out,
https://market.android.com/details?id=com.joeykrim.buildpropeditor
These are lines that I am either currently testing or plan on testing. If anyone would like to quicken the process feel free to try them and let everyone know how they work out. Again, at your own risk. I have not tested the majority of the below lines, much less research what they exactly do. The little notes on the side are more of a guideline of what to be looking for if tested and do not guarantee they will not do anything. Just picked them out as ones I found interesting from other Forums around the Web. So basically if you do not feel comfortable recovering from a boot loop just wait it out.
debug.qctwa.statusbar=1 (qualcomm device specific)
debug.qctwa.preservebuf=1 (qualcomm device specific)
debug.qc.hardware=true (qualcomm device specific)
com.qc.hardware=true (qualcomm device specific)
ro.telephony.sms_segment_size=160
persist.telephony.support.ipv6=1
persist.telephony.support.ipv4=1
ro.config.hw_fast_dormancy=1
persist.sys.shutdown.mode = hibernate
ro.config.hw_power_saving=true
ro.media.enc.hprof.vid.fps=65
ro.config.vc_call_steps=20 (Makes more volume steps in calls and a little louder.)
dalvik.vm.dexopt-flags=v=n,o=v
dalvik.vm.checkjni=0
debug.egl.profiler=1
debug.egl.hw=1
ro.ril.enable.amr.wideband=1 (better in call voice quality)
ro.mot.hw.HAC=1
ENFORCE_PROCESS_LIMIT=false
persist.sampling_profiler=0
ro.min_pointer_dur=5
ro.config.nocheckin=1
profiler.force_disable_err_rpt=1
profiler.force_disable_ulog=1
debug.kill_allocating_task=0
dalvik.vm.dexopt-flags=m


