
D
Deleted User
Guest
DISABLING INTEL ME - DELL PRECISION M4800
I've been gifted a chip flasher and have been using it for the power of good: to disable the Intel Management Engine on all the laptops I can. I've done it on a few so far, and maybe in the future I'll put up guides for all of those other ones I did too, but for now I want to write how to do it on the Dell Precision M4800 because I just did that one earlier tonight.
Like with Android mods, by following this guide you acknowledge you're doing this at your own risk. BIOS mods are very risky, messing up one thing could literally brick your entire computer and make it unusable. This guide assumes you're somewhat computer-literate, and (ideally) have used a chip flasher before.
WHAT IS INTEL ME, AND WHY IS IT AN ISSUE
Intel's Management Engine is basically a computer inside of your computer. You cannot access this secondary-computer from your "normal-computer", but it CAN access your normal-computer. In fact, that's exactly what it was designed to be: an invisible man in the middle for everything that goes on on your system. Intel ME can log keystrokes, access files, circumvent OS firewalls, read encryption keys in memory... it can basically see and manipulate everything about your computer. It's an invisible administrator you have no control over, and comes standard on every Intel machine from ~2007 onwards. Doesn't matter what OS you're running, if you have an Intel computer, Intel ME can access everything about your machine.
The problem with Intel ME is that it can be, and has been, exploited. If an attacker can gain access to Intel ME on your computer, they have complete low-level access to anything and everything that goes on on your machine, regardless of what OS you're running. And if your machine's ME has been exploited, there's no way for you to know, nor is there a way for you to remove it. You're pretty much screwed, and you'll never even realize it.
WHY YOU SHOULD DISABLE INTEL ME
For most machines, it's impossible to entirely remove Intel ME or else you'll brick your computer*. You can however, "disable" it if you're willing to gain physical access to the BIOS chip on your system's motherboard and do some external reading and flashing. When you disable Intel ME, it only does the critical functions necessary to start your computer up during the BIOS. After the BIOS is done and your OS loads, ME shuts itself off and renders itself unavailable for the rest of the time the computer is on. Unfortunately it still needs to remain on your system, but having it disable itself after the BIOS is much better than having it run all the time.
*....unless your computer is running a pre-Nehalem series CPU like a Core 2 Duo, then according to the me_cleaner Github page it IS possible to remove it entirely and the script can do that for you. The Dell Precision M4800 does not fall in this category though.
SIDE EFFECTS OF DISABLING INTEL ME
- On some machines, Intel P States will no longer work. Intel P States is a power saving feature. I'm not sure exactly how it all works, but it has something to do with lowering power consumption when the computer is idle or suspended. This is mostly used for laptops as you can imagine. If you want to read more about it, go HERE. There is no way to tell if a particular machine will break P States when disabling Intel ME. One machine may break it, another may continue to have it work just fine. These machines may be identical laptops too: as in one Precision M4800 may break it while another identical one won't.
- When you go back into your BIOS, it will say all the DIMM (RAM) slots are empty. Your RAM and RAM slots still work fine. For some reason the BIOS just doesn't display them anymore. This is normal.
There are no other known side effects for disabling Intel ME, assuming it is disabled properly. I did it on my machine here and everything's working just fine. I'm not sure if my P States are broken, but even if they are I'm not too concerned with potential power drainage because the battery life on this thing is so terrible to begin with.
WHAT YOU'LL NEED
- A Dell Precision M4800 to clean
- Another computer with Linux to do the actual BIOS reading/writing/modding with (in this guide I assume you're running Ubuntu/Mint, but pretty much any distro should be fine)
- An SPI flasher, I used the CH341A flasher over USB (you can use other things like a Raspberry Pi if you want but for this guide I'm assuming this kind of flasher)
- An 8-pin chip clip to attach to the flasher
On your secondary Linux computer use a sudo apt install command to install git and flashrom. Then use git to clone the me_cleaner scripts to your home directory with "git clone https://github.com/corna/me_cleaner.git". You'll also need python3 to run the me_cleaner py script, but most Linux distros should come with this already.
PREREQUISITE: UPDATE THE PRECISION'S BIOS
I'm not sure if doing an ME clean is a 100% persistent mod that will stick through BIOS updates, especially if said update alters the 8M chip that ME is located on. So I recommend updating the BIOS on the Precision beforehand to get the latest patches and microcode before continuing and doing the mod. That way, you'll have recent security patches on your machine's firmware in case you don't want to update the BIOS again and run the risk of the mod erasing itself.
As of writing this post, the latest BIOS can be found HERE. I highly recommend checking the Precision M4800 driver page for a later revision though. Install whatever the latest revision is. Set your OS to be "BIOS" to see this. This BIOS update EXE can either be flashed in Windows, or if you're running Linux on your M4800, make a FreeDOS USB with Unetbootin and put the BIOS update EXE on there. Then boot from the FreeDOS USB in legacy boot mode, run the BIOS update from that, and let it complete as normal.
PREREQUISITE: SETTING UP THE FLASHER
To be honest my buddy did this part here, so I have no idea what any of this means, but you'll need to have your 8 Pin Layout on the flasher to be like the following. Once I learn more about this I'll update the section with better info.
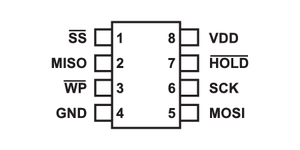
If you can, make Pin 1 a different color too. For ours we have that wire as red and the others are grey.
Make sure your flasher is set up for 3.3V too. Any more could damage the components.
STEP 1: DISASSEMBLING THE M4800 AND LOCATING THE BIOS CHIPS
The Dell Precision M4800 has 2 BIOS chips, the usual 4MB and 8MB setup found on many laptops. Complete mainboard disassembly/removal is required to access the BIOS chips. Full guides can be found on Dell's Precision M4800 User Guide on their website. Unfortunately I did not get a picture of the BIOS chips but here is a reference image of the topside of the mainboard. The BIOS chips are found under the black cover. Relative to the following image of the mainboard, they are to the right of the docking port and below the CMOS battery. They are 2 Winbond chips lined up left and right.
https://www.vrassets.us/images/product/_57_16_4274.jpg
The leftmost one (closest to the CPU bracket) is the 4M chip, the other to the right the 8M chip. The Winbond BIOS chips on this machine will look similar to this (the model number will probably be different but basically just look for 2 of these right next to each other):
https://c.76.my/Malaysia/bios-chip-...m-empty-hypertronic-1612-20-hypertronic@1.jpg
To disable ME, you SHOULD only need a read of the 8M chip, the one furthest from the CPU bracket closer to the edge of the mainboard. But we will be pulling both images nonetheless just for the sake of ensuring we do a complete job. Never hurts to have a backup of both chips anyway.
STEP 2: READING THE FIRST BIOS CHIP
Like stated before, although only the 8M chip should required, I recommend getting a read from both since you're already there anyway.
A quick note too, make sure the flasher is unplugged when messing with the chip clip. This will reduce the risk of a short circuit or something screwing the BIOS chips up. When you're done aligning the clip and you let it go, THEN you can plug in the flasher and run the flashrom commands.
On the first Winbond chip (we will start with the one closest to the CPU bracket, the one closest to the mainboard center), align the 8 pin clip so that Pin 1 aligns with the dot on the BIOS chip. If you made the Pin 1 wire a different color, this part will be easy. Clamp the clip to the BIOS chip and then plug the flasher into your secondary computer. Make sure that all the chip clip's contacts are making good contact with the 8 silver contacts running out of the BIOS chip. Run the following command to read the 4M BIOS chip contents:
sudo flashrom -p ch341a_spi -r close-to-center.rom
If flashrom complains that no chip was found, unplug the flasher from its USB port and try to unclamp and clamp the 8 pin clip again. Sometimes the clamp isn't good and all the clip's contacts aren't really all making good contact with the BIOS chip. I'm not really good at this part myself, I had to retry the clamp 2 or 3 times before it finally worked. If all goes well though, after a minute or two you'll have a close-to-center.rom on your secondary computer that should be 4MB in size.
Once it's read successfully, get another read in a separate file without unplugging it:
sudo flashrom -p ch341a_spi -r close-to-center-1.rom
You want 2 reads because you want to make sure the computer actually read the BIOS chip's contents properly. If you MD5 each ROM you pulled and they're the same, then it was probably a good read. If they're different, unclip and try again until you get consistent reads. To run MD5 hashes on each image, do the following commands:
md5sum close-to-center.rom
md5sum close-to-center-1.rom
If the output is the same, you're good to go.
STEP 3: READING THE SECOND BIOS CHIP
Unplug the flasher and move the clip over to the other Winbound BIOS chip that's further from the center. Do the same thing as outlined above, but change the file names:
sudo flashrom -p ch341a_spi -r far-from-center.rom
sudo flashrom -p ch341a_spi -r far-from-center-1.rom
Assuming all was good and the MD5 sums were identical, now you should have good reads of both BIOS chips: one ROM being 4MB and the other ROM being 8MB.
By the way, once your confirm that both reads were good/identical, you can delete the files with the -1 suffix. All you need are one copy of each, those extra copies were just to ensure that the reads of each chip you got were good.
STEP 4: RUNNING ME CLEANER
cd to the me_cleaner git repo you cloned and run the me_cleaner.py script on both BIOS images:
python3 me_cleaner.py -S -O ~/close-to-center-CLEANED.rom ~/close-to-center.rom
python3 me_cleaner.py -S -O ~/far-from-center-CLEANED.rom ~/far-from-center.rom
It should fail on the 4M (close to center) image, this is fine. Running the cleaner script on both anyway is just to make sure you're getting everything you can. You should now have another 8MB ROM image in your home directory with a CLEANED suffix at the end.
STEP 5: FLASHING BACK THE CLEANED IMAGE
As stated before, me_cleaner should have only recognized and cleaned the 8M image, or the image of the BIOS chip furthest from the center. You now want to write this cleaned image back to the Precision M4800. Make sure your clip is clamped onto the correct BIOS chip, and write it back with the following command:
sudo flashrom -p ch341a_spi -w far-from-center-CLEANED.rom
After a few minutes, if all went well it will have successfully written and verified the cleaned image back to the M4800. Unplug the reader from the USB, then unclamp the clip from the BIOS chip. It's now time to reassemble everything and see if it worked.
STEP 6: REASSEMBLY AND TESTING
Reassemble the M4800 and boot into it. Once reassembled you might notice that the Precision shuts itself off and power cycles a lot once you first turn it on. You might also notice that once you first turn it on again after reassembling the BIOS menu is broken and doesn't let you alter any settings. THIS IS NORMAL, THIS HAPPENED TO ME TOO. Just let the machine boot from your OS on the internal HDD and reboot it. I dont know why the laptop gets all tempermental like that but just leave it do its thing for 2-3 minutes and after it gets over its state of panic and dimentia it should go back to normal. From this point on you should be able to alter the BIOS settings again (which you should do because having the CMOS out for so long reset any changes you made before) and it won't take 3 minutes and 5 power cycles to turn on again. All Dell laptops I own do this, this is all normal behavior.
Once you let it do its initial boot and sort itself out, then you need to boot into Linux on it somehow. Like with the secondary computer, I will be assuming Ubuntu or Mint. If you had Linux installed on an internal drive just do that. if not, make a live USB and boot from that. Whatever you choose to do, you want to make sure you have the iomem kernel parameter set as relaxed. Regardless if you're running Linux off of a Live USB or internally, get to a GRUB boot menu and press E to edit the boot option that starts the OS normally. Look for the line that ends with a "--". Right before this --, add "iomem=relaxed" without quotes, and with a space before and after it. Then press Ctrl+X or whatever key it tells you to boot.
Once in Linux, run the following commands to get the required stuff for testing and to test for Intel ME:
sudo apt update
sudo apt install libpci-dev git make build-essential
git clone https://review.coreboot.org/coreboot.git
cd coreboot/util/intelmetool/
make
sudo modprobe msr
sudo ./intelmetool -b
If all went well, you will see the tool report that ME failed to become ready. The ME status table will look something like this:
ME: FW Partition Table : OK
ME: Bringup Loader Failure : NO
ME: Firmware Init Complete : NO
ME: Manufacturing Mode : YES
ME: Boot Options Present : NO
ME: Update In Progress : NO
ME: Current Working State : Initializing
ME: Current Operation State : Bring up
ME: Current Operation Mode : Debug
ME: Error Code : No Error
ME: Progress Phase : BUP Phase
ME: Power Management Event : Pseudo-global reset
ME: Progress Phase State : 0x4d
...In addition to this, if you also see the following at the end:
Your southbridge configuration is insecure!!
BootGuard keys can be overwritten or wiped, or you are in developer mode.
BootGuard MSR Output : 0x0
Your system isn't BootGuard ready.
You can flash other firmware!
Your system can have open source firmware like coreboot ported to it in the future. This is unrelated to the guide, but worth mentioning nonetheless because coreboot would be awesome on this thing.
You can now use your computer like normal, with the peace of mind that Intel's Management Engine backdoor has been defeated on your system.
CONCLUSION
I wrote this pretty late at night so if I failed to describe some things properly I apologize in advance. Let me know in a reply and I'll try to fix it when I can. I'm 99% sure all my info is correct, but if I made a stupid mistake, like for example after reading both BIOS images you found out I mixed up the sizes for each chip, please let me know and I'll fix it. That being said, I am confident I got it all right though.
FOLLOW UP (UNTESTED): A MORE PERMANENT INTEL ME REMOVAL
According to the man pages for me_cleaner, there is a way to disable Intel ME AND disable read/write access to the ME region so that supposedly updating the BIOS doesn't change the fact that it's disabled and overwrite your mod. I haven't done this myself so I can't testify if it works or not, but I'll put a copy+paste from the man pages on corna's me_cleaner GitHub page here in case any of you want to try it:
"Remove most of the Intel ME firmware modules and set the HAP/AltMeDisable bit, disable the Read/Write access of Intel ME to the other flash region, then relocate the code to the top of the image and truncate it, extracting a modified descriptor and ME image:
me_cleaner.py -S -r -t -d -D ifd_shrinked.bin -M me_shrinked.bin -O modified_firmware.bin full_dumped_firmware.bin"
This does more than a soft disable like I did in my guide, this apparently also deletes the unused parts of the ME region, disables the ability for the rest of the BIOS to modify it, and relocates the shrunken image to the beginning of its allocated BIOS memory space. While my outlined solution was more of a soft-disable, this right here is an example of a much more permanent hard-disable. I didn't know you could do this, and have never done this myself. Therefore I cannot vouch that this will work on this specific computer, but I want to list it here anyway for the following reason:
In theory this can only be done on a computer whose BIOS regions are not protected and verified. On most newer computers (Intel Haswell generation or newer) you probably won't be able to do this because of Intel Boot Guard and Verified Boot. But would you look at that... despite being a Haswell laptop the Precision M4800 doesn't have Boot Guard or Verified Boot as outlined before, so this COULD work on this machine because there's no signature verification on a firmware level.
Last edited by a moderator:


