.
GOOD NEWS!
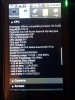
Thanks to geitnowmarketing's test recovery image, I managed to boot into a custom recovery menu for the LG Shine Plus and get a Nandroid backup. Was able to restore the Nandroid as well. And... managed to get a custom ROM working.
The following instructions will show you how to load custom ROMs onto your device, as well as how to restore your device back to original condition.
As a bonus, there are instructions provided to create your own custom ROMs!
A. Root your device
To do this, you first need to root your device using the Z4Root or the Universal Androot apps. Just google for them. I used z4Root because it easily allows you to unroot as well.
B. Flash Custom Recovery Menu
Next, follow the steps below:
Paraphrasing getitnowmarketing's original instructions -
C. Flashing Your First LG Shine Plus Custom ROM
Finally, here's a sample custom ROM I made:
For Android 2.1-update1:
dsixda_shine_plus_2_1.zip
dsixda_shine_plus_2_1_deodexed.zip (deodexed version - for theming)
Options included:
- Rooted (unsecured boot.img)
- Rooted (Superuser.apk + su)
- ZipAligned
- Removed starting boot sound
- BusyBox installed
- BusyBox run-parts support
- Nano text editor installed
- Bash shell support
Just copy this ROM to the root of your SD Card and flash it from the recovery menu.
D. OPTIONAL: Restore to Stock ROM
If you want to go back to the stock ROM, with no rooting, modifications, etc., just flash this:
Stock ROM for Android 2.1-update1
Just copy this ROM to the root of your SD Card and flash it from the recovery menu.
If you ever want to restore your system to pure stock state and be able to receive the latest updates to your phone, then restore both the stock ROM *and* the stock recovery!
E. OPTIONAL: Restore to Stock Recovery Image
Here is a link to the original (stock) recovery image in case you ever want to get rid of the custom recovery menu:
recovery.zip
Unzip the archive to get the recovery.img and copy it to your SD card. Ensure you still have root (Superuser app) on your device, as well as the 'flash_image' binary installed (mentioned at the top).
Then, in your terminal, type:
F. OPTIONAL: Windows Drivers (for ADB)
If you want access to your Shine Plus using ADB then you need to install the LG drivers to your PC:
http://s3.amazonaws.com/lgforum.com...river_WHQL_ML_Ver_1.0_All_Win7.exe?1283438684
G. OPTIONAL: Stock Components for "Cooking" with the Android Kitchen
Below is the stock system.img and boot.img for the Shine Plus... I've removed the superuser stuff. You can use these to make your own custom ROM with my Android Kitchen (at xda-developers.com) :
For Android 2.1-update1:
stock_lg_shine_plus_2.1.7z
Enjoy!
GOOD NEWS!
Thanks to geitnowmarketing's test recovery image, I managed to boot into a custom recovery menu for the LG Shine Plus and get a Nandroid backup. Was able to restore the Nandroid as well. And... managed to get a custom ROM working.
The following instructions will show you how to load custom ROMs onto your device, as well as how to restore your device back to original condition.
As a bonus, there are instructions provided to create your own custom ROMs!
A. Root your device
To do this, you first need to root your device using the Z4Root or the Universal Androot apps. Just google for them. I used z4Root because it easily allows you to unroot as well.
B. Flash Custom Recovery Menu
Next, follow the steps below:
Paraphrasing getitnowmarketing's original instructions -
Directions:
1. Download the custom recovery image and unzip and copy to root of sdcard (not in a folder)
recovery-RA-alohag-shine-v1.2.5-GNM.img.zip
2. Download flash_image from attachment at end of this post. Unzip it and copy to root of sdcard.
3. Open a terminal app on phone (e.g. ConnectBot app from the Market) and enter the commands below.
First, become superuser (required for subsequent commands) by typing:
su
To install flash_image, type each of these lines followed by Enter (in your terminal app):
mount -o remount,rw -t yaffs2 /dev/block/mtdblock1 /system
cat /sdcard/flash_image > /system/bin/flash_image
chmod 755 /system/bin/flash_image
mount -o remount,ro -t yaffs2 /dev/block/mtdblock1 /system
Then, install the custom recovery menu with flash_image:
flash_image recovery /sdcard/recovery-alohag-shine-v1.2.5-GNM.img
4. Now power off your phone.
5. The recovery menu can be booted via VOLUME DOWN + HOME + POWER with the phone off, and then with the keys released at LG splash. Alternatively, I could access it through ADB ("adb reboot recovery") or ConnectBot on the phone ("su", "reboot recovery").
6. Make a Nandroid backup from the recovery menu before you do anything else!!
C. Flashing Your First LG Shine Plus Custom ROM
Finally, here's a sample custom ROM I made:
For Android 2.1-update1:
dsixda_shine_plus_2_1.zip
dsixda_shine_plus_2_1_deodexed.zip (deodexed version - for theming)
Options included:
- Rooted (unsecured boot.img)
- Rooted (Superuser.apk + su)
- ZipAligned
- Removed starting boot sound
- BusyBox installed
- BusyBox run-parts support
- Nano text editor installed
- Bash shell support
Just copy this ROM to the root of your SD Card and flash it from the recovery menu.
D. OPTIONAL: Restore to Stock ROM
If you want to go back to the stock ROM, with no rooting, modifications, etc., just flash this:
Stock ROM for Android 2.1-update1
Just copy this ROM to the root of your SD Card and flash it from the recovery menu.
If you ever want to restore your system to pure stock state and be able to receive the latest updates to your phone, then restore both the stock ROM *and* the stock recovery!
E. OPTIONAL: Restore to Stock Recovery Image
Here is a link to the original (stock) recovery image in case you ever want to get rid of the custom recovery menu:
recovery.zip
Unzip the archive to get the recovery.img and copy it to your SD card. Ensure you still have root (Superuser app) on your device, as well as the 'flash_image' binary installed (mentioned at the top).
Then, in your terminal, type:
su
flash_image recovery /sdcard/recovery.img
F. OPTIONAL: Windows Drivers (for ADB)
If you want access to your Shine Plus using ADB then you need to install the LG drivers to your PC:
http://s3.amazonaws.com/lgforum.com...river_WHQL_ML_Ver_1.0_All_Win7.exe?1283438684
G. OPTIONAL: Stock Components for "Cooking" with the Android Kitchen
Below is the stock system.img and boot.img for the Shine Plus... I've removed the superuser stuff. You can use these to make your own custom ROM with my Android Kitchen (at xda-developers.com) :
For Android 2.1-update1:
stock_lg_shine_plus_2.1.7z
Enjoy!