
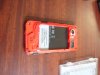
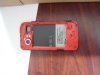
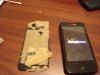
After 5 weeks of owning my Dinc, it took a fall that it would not recover from. A mere 4 feet from my lap getting out of my truck. It landed, what appeared to be perfectly, flat on the driveway to surface with a cracked screen. The LCD worked fine and the touch worked fine technically. Unfortunately the glass shards made it difficult to work with so I picked up a cheap screen protector so I could use the phone without drawing blood on my fingers nor face. Thank goodness for insurance right? Well, after calling Asurion about the claim it became apparent that it was on backorder and the could not give me any timeframe for when I might see a replacement. I started looking for replacement digitizers from USA sellers and found one on ebay for ~$75. I ordered on to have on hand in the event I do not get a replacement soon. After waiting a week from Asurion and no new developments on my replacement I decided to attempt this task of replacing the digitizer( glass touch screen). Also, since I have not had any problems with my current Dinc I did not want to risk the chance of getting a dud and having to wait up to a month to get replaced, replaced, replaced. I searched the net for insight and found a couple of good sources. One was a youtube video from TechRestore(YouTube - Droid Incredible Disassembly by TechRestore) and the other was a post in the droid forum. The both proved very helpful. The images that follow show from start to end. Please note this was very intimidating to begin with but in the end the phone fired up and screen looks great so I am less intimidated afterwards.
Tools used: plaster tool that came with digitizer, tweezers, clear non-toxic adhesive, #6 star bit, packing tape(cover glass), exacto knife.
Couple of tips:
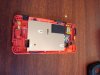
1)use plastic tool to slowly separate glass from housing
2)use plastic tool to scrape old adhesive from housing to apply new digitizer
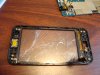
3)use tweezers to remove all three connectors- should slide out smoothly
4)Have TechRestore disassembly video on hand during project
Enjoy new screen.
Update: Initially I was getting some outages on screen next day and realized that there are black clips on the end of the connectors that should be laying down parallel with pins NOT perpendicular. Once I went back in and adjusted all down. Works like its brand new.( In a good way)
Tools used: plaster tool that came with digitizer, tweezers, clear non-toxic adhesive, #6 star bit, packing tape(cover glass), exacto knife.
Couple of tips:
1)use plastic tool to slowly separate glass from housing
2)use plastic tool to scrape old adhesive from housing to apply new digitizer
3)use tweezers to remove all three connectors- should slide out smoothly
4)Have TechRestore disassembly video on hand during project
Enjoy new screen.
Update: Initially I was getting some outages on screen next day and realized that there are black clips on the end of the connectors that should be laying down parallel with pins NOT perpendicular. Once I went back in and adjusted all down. Works like its brand new.( In a good way)
Attachments
-
 DSC02141.jpg59.2 KB · Views: 529
 -
 DSC02142.jpg74.7 KB · Views: 523
 -
 DSC02143.jpg54.5 KB · Views: 514
 -
 DSC02144.jpg25.7 KB · Views: 442
 -
 DSC02145.jpg37.6 KB · Views: 440
 -
 DSC02146.jpg57.4 KB · Views: 447
 -
 DSC02147.jpg67.3 KB · Views: 502
 -
 DSC02148.jpg71.5 KB · Views: 593
 -
 DSC02150.jpg62.1 KB · Views: 812

")


