
Rooting the Prevail for Dummies! (A.K.A. How to make your phone not suck)
Written by Caeadas, The Retired Dummy. Maintained by LordVincent (and this awesome community)
I TAKE NO CREDIT FOR THIS WRITE UP. CAEADAS CREATED THIS GUIDE. I WAS MERELY GIVEN THE PRIVILEGE OF BEING ABLE TO UPDATE IT AS NEEDED SINCE HE IS GONE.
WARNING: Doing any of the stuff listed here is inherently dangerous to your phone. We are changing things that Samsung and Boost never intended us to change. While every effort has been made to ensure this stuff works, and lots of people have done this stuff repeatedly with no issues, bad things can happen once in a while. By doing anything to your phone, you accept responsibility for your actions. You break it, you bought it!
So, you've just bought yourself a Samsung Galaxy Prevail and ripped it out of its annoying plastic packaging, fired it up, and realized it's full of useless crap.(whaaa... two navigation apps?!?!?! Geo-cashing?!?) So after either seconds, or weeks, of google searching, you've made you way here and are wondering if you can do all the confusing and scary things. Well that depends... Do you have:
1. A Samsung Galaxy Prevail from Boost Mobile (if its not exactly that, go away)
2. A Windows-based PC (Sorry Mac users, get an iPhone and return to you walled garden)
3. An internet connection (umm...)
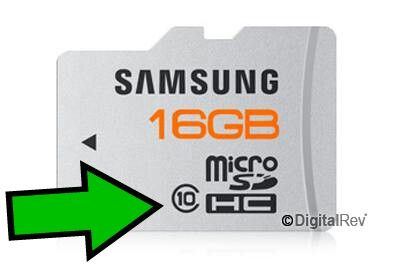
4. Not a necessity, but I highly recommend a fast SD card. One of the steps in this guide will change the phone so all of your apps and data are run from your sdcard and slower cards can cause some lag. (Phone slow to react or freezing)
You can determine the class (speed) of your sdcard by removing it from the phone and looking for a small number with a circle around it. The classes go all the way up to 10. The higher the class, the faster the card.
If there is no number, it's likely a class 4
If you have all four things, some time, some patience, and the ability to read carefully, I can show you how to do a basic root, install a custom rom and kernel, and perform some basic actions. First things first...
Chapter zero: Back Up Your Phone
The majority of the things we are about to do will wipe everything off your phone, so it's important to back up and save often, preferably to your computer. Also, you can save your contacts and calendar directly to Google's servers by going to Settings/ Account and sync settings, clicking on your account, and making sure the respective boxes are checked
Also, at some point we will reformat the SD card, so make sure you save anything on there you may want, like music, ringtones, pictures, etc.
And if you have any apps that you want to keep data for, or would break your heart if they got reset, then it's time to do a backup of them. Several people have recommended MyBackup from the Google play store since it works on non-rooted phones.
Chapter one: All Hail Mighty Odin!
Odin (Return phone to Stock/Factory)
Odin is a recovery utility that is the first and last line of defense against making your phone into an expensive paperweight. With it, you can return most broken phones back to it's stock unrooted state. It's also the only reliable way to root your phone, so its important to know how to use Odin.
Step zero: Go to the Odin thread and read it all. Go now. I'll wait for you.
Step one: Download one of the Odin packages from Odin (Return phone to Stock/Factory) to your computer and make sure to send some thanks that way. DO NOT USE ANY OTHER ODIN PACKAGES FROM ANY OTHER PLACE OR FOR ANY OTHER PHONE That's a good way of breaking things.
(if the odin package you downloaded doesn't include Odin Multi_Downloader_v4.43.exe, download THIS
this zip contains the proper version of odin and the .ops file for the prevail)
The most recent package is FF19 Gingerbread. (thanks kouma for fixing it's previous issues :thumbup: )
Click here for the
LINK TO THE NEWEST ROOTED IMAGE
Step two: Unzip the rooted image archive into a new folder. Leave the stock one zipped up until you need it
Step three: Install SAMSUNG_USB_Driver_for_Mobile_Phones_x86.exe to your computer. These are the drivers for your phone. Install it as you would any other program. (click "next" until stuff does stuff)
Press 'show' for the drivers
Step four: Power off the phone, then hold the camera, volume down, and power buttons until it says "Downloading..." in yellow text.
Step five: Connect your phone to your computer with your handy-dandy USB cord. Give it a minute to make sure everything is communicating properly.
Step six: Open Odin Multi_Downloader_v4.43.exe from your folder. (Again, only use the version of Odin included with the zip) You should see a yellow box with "com port mapping" above it. Also make sure that "one package" is NOT checked.
Step seven: Click OPS, and select SPHM820.ops. Click Phone and select the Rooted_PHONE.tar. Click PDA and select the Rooted_PDA.tar. Leave the other ones blank. Those extra files are for fixing broken phones and should not be used.
This is what your window should look like (Click for large version):
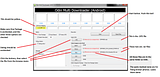
Step eight: Make sure everything is set correctly, and hit Start. Now leave it alone. It will take a couple minutes, you will become concerned and want to mess with it. Resist the urge. Once the phone restarts, and Odin says Reset, the process is complete.
You have successfully installed a rooted image on your phone. You now have superuser access and a very powerful tool ClockWorkMod Recovery
Written by Caeadas, The Retired Dummy. Maintained by LordVincent (and this awesome community)
I TAKE NO CREDIT FOR THIS WRITE UP. CAEADAS CREATED THIS GUIDE. I WAS MERELY GIVEN THE PRIVILEGE OF BEING ABLE TO UPDATE IT AS NEEDED SINCE HE IS GONE.
WARNING: Doing any of the stuff listed here is inherently dangerous to your phone. We are changing things that Samsung and Boost never intended us to change. While every effort has been made to ensure this stuff works, and lots of people have done this stuff repeatedly with no issues, bad things can happen once in a while. By doing anything to your phone, you accept responsibility for your actions. You break it, you bought it!
So, you've just bought yourself a Samsung Galaxy Prevail and ripped it out of its annoying plastic packaging, fired it up, and realized it's full of useless crap.(whaaa... two navigation apps?!?!?! Geo-cashing?!?) So after either seconds, or weeks, of google searching, you've made you way here and are wondering if you can do all the confusing and scary things. Well that depends... Do you have:
1. A Samsung Galaxy Prevail from Boost Mobile (if its not exactly that, go away)
2. A Windows-based PC (Sorry Mac users, get an iPhone and return to you walled garden)
3. An internet connection (umm...)
4. Not a necessity, but I highly recommend a fast SD card. One of the steps in this guide will change the phone so all of your apps and data are run from your sdcard and slower cards can cause some lag. (Phone slow to react or freezing)
You can determine the class (speed) of your sdcard by removing it from the phone and looking for a small number with a circle around it. The classes go all the way up to 10. The higher the class, the faster the card.
If there is no number, it's likely a class 4
If you have all four things, some time, some patience, and the ability to read carefully, I can show you how to do a basic root, install a custom rom and kernel, and perform some basic actions. First things first...
Chapter zero: Back Up Your Phone
The majority of the things we are about to do will wipe everything off your phone, so it's important to back up and save often, preferably to your computer. Also, you can save your contacts and calendar directly to Google's servers by going to Settings/ Account and sync settings, clicking on your account, and making sure the respective boxes are checked
Also, at some point we will reformat the SD card, so make sure you save anything on there you may want, like music, ringtones, pictures, etc.
And if you have any apps that you want to keep data for, or would break your heart if they got reset, then it's time to do a backup of them. Several people have recommended MyBackup from the Google play store since it works on non-rooted phones.
Chapter one: All Hail Mighty Odin!
Odin (Return phone to Stock/Factory)
Odin is a recovery utility that is the first and last line of defense against making your phone into an expensive paperweight. With it, you can return most broken phones back to it's stock unrooted state. It's also the only reliable way to root your phone, so its important to know how to use Odin.
Step zero: Go to the Odin thread and read it all. Go now. I'll wait for you.
Step one: Download one of the Odin packages from Odin (Return phone to Stock/Factory) to your computer and make sure to send some thanks that way. DO NOT USE ANY OTHER ODIN PACKAGES FROM ANY OTHER PLACE OR FOR ANY OTHER PHONE That's a good way of breaking things.
(if the odin package you downloaded doesn't include Odin Multi_Downloader_v4.43.exe, download THIS
this zip contains the proper version of odin and the .ops file for the prevail)
The most recent package is FF19 Gingerbread. (thanks kouma for fixing it's previous issues :thumbup: )
Click here for the
LINK TO THE NEWEST ROOTED IMAGE
Step two: Unzip the rooted image archive into a new folder. Leave the stock one zipped up until you need it
Step three: Install SAMSUNG_USB_Driver_for_Mobile_Phones_x86.exe to your computer. These are the drivers for your phone. Install it as you would any other program. (click "next" until stuff does stuff)
Press 'show' for the drivers
Step four: Power off the phone, then hold the camera, volume down, and power buttons until it says "Downloading..." in yellow text.
Step five: Connect your phone to your computer with your handy-dandy USB cord. Give it a minute to make sure everything is communicating properly.
Step six: Open Odin Multi_Downloader_v4.43.exe from your folder. (Again, only use the version of Odin included with the zip) You should see a yellow box with "com port mapping" above it. Also make sure that "one package" is NOT checked.
Step seven: Click OPS, and select SPHM820.ops. Click Phone and select the Rooted_PHONE.tar. Click PDA and select the Rooted_PDA.tar. Leave the other ones blank. Those extra files are for fixing broken phones and should not be used.
This is what your window should look like (Click for large version):

Step eight: Make sure everything is set correctly, and hit Start. Now leave it alone. It will take a couple minutes, you will become concerned and want to mess with it. Resist the urge. Once the phone restarts, and Odin says Reset, the process is complete.
You have successfully installed a rooted image on your phone. You now have superuser access and a very powerful tool ClockWorkMod Recovery
Last edited by a moderator:

")


